---
title: オレオレブログAPIサーバーCategoLJ3をデプロイしよう(Heroku編)
tags: ["CategoLJ3", "Heroku", "Spring Boot"]
categories: ["Dev", "Blog", "CategoLJ3"]
date: 2015-12-29T05:44:06Z
updated: 2015-12-29T05:53:23Z
---
[前記事](https://blog.ik.am/entries/364)でCategoLJ3を使ったオレオレブログAPIサーバーの作り方を説明しました。
本稿では前記事で作ったアプリを運用するために、Herokuにデプロイする方法を紹介します。
Herokuのアカウント作成やHeroku CLIのインストールが必須ですが、ここでは割愛します。
まずは、前記事で作ったアプリをHerokuに登録しましょう。
$ git init
$ heroku apps:create
Creating morning-dawn-8167... done, stack is cedar-14
https://morning-dawn-8167.herokuapp.com/ | https://git.heroku.com/morning-dawn-8167.git
Git remote heroku added
次にElasticsearchのアドインを追加します。
$ heroku addons:create searchbox
Creating searchbox-dimensional-7499... done, (free)
Adding searchbox-dimensional-7499 to morning-dawn-8167... done
Setting SEARCHBOX_SSL_URL, SEARCHBOX_URL and restarting morning-dawn-8167... done, v3
Use `heroku addons:docs searchbox` to view documentation.
ElasticsearchのURLが環境変数、`SEARCHBOX_SSL_URL`または`SEARCHBOX_URL`に設定されます。
この設定をアプリに反映するためにHeroku用の`heroku`プロファイルを作ります。
`heroku`プロファイルのみ有効になる設定は`application-heroku.properties`に書けば良いです。
このプロファイル用に`jest.connection-url`を設定しましょう。
jest.connection-url=${SEARCHBOX_SSL_URL}
`heroku`プロファイルはHerokuの`Procfile`に指定できます。
web: java $JAVA_OPTS -jar target/*.jar --server.port=$PORT --spring.profiles.active=heroku
CategoLJ3はJava 8が必須なので、`system.properties`にJavaのバージョンを指定します。
java.runtime.version=1.8
これで設定完了です。あとはHerokuにデプロイしましょう。
$ git add -A
$ git commit -m "Initial commit"
$ git push heroku master
Counting objects: 26, done.
Delta compression using up to 4 threads.
Compressing objects: 100% (16/16), done.
Writing objects: 100% (26/26), 48.92 KiB | 0 bytes/s, done.
Total 26 (delta 0), reused 0 (delta 0)
remote: Compressing source files... done.
remote: Building source:
remote:
remote: -----> Java app detected
remote: -----> Installing OpenJDK 1.8... done
remote: -----> Installing Maven 3.3.9... done
remote: -----> Executing: mvn -B -DskipTests clean dependency:list install
remote: [INFO] Scanning for projects...
(略)
remote: [INFO] ------------------------------------------------------------------------
remote: [INFO] BUILD SUCCESS
remote: [INFO] ------------------------------------------------------------------------
remote: [INFO] Total time: 19.351 s
remote: [INFO] Finished at: 2015-12-29T05:10:20+00:00
remote: [INFO] Final Memory: 40M/311M
remote: [INFO] ------------------------------------------------------------------------
remote: -----> Discovering process types
remote: Procfile declares types -> web
remote:
remote: -----> Compressing... done, 82.9MB
remote: -----> Launching... done, v6
remote: https://morning-dawn-8167.herokuapp.com/ deployed to Heroku
remote:
remote: Verifying deploy.... done.
To https://git.heroku.com/morning-dawn-8167.git
* [new branch] master -> master
これでデプロイ完了です。
APIにアクセスしましょう。
$ curl https://morning-dawn-8167.herokuapp.com/api/entries | jq .
{
"content": [],
"last": true,
"totalElements": 0,
"totalPages": 0,
"first": true,
"numberOfElements": 0,
"sort": null,
"size": 10,
"number": 0
}
前記事で追加した記事が反映されていません。これは新規のElasticsearchを使ったためです。
Gitの内容をElasticsearchに反映するために`/api/jest/reindex`にアクセスしてください。
$ curl https://morning-dawn-8167.herokuapp.com/api/jest/reindex
これでGitの内容が反映されました。
$ curl https://morning-dawn-8167.herokuapp.com/api/entries | jq .
{
"content": [
{
"entryId": 1,
"content": "This is my first article using CategoLJ3!",
"created": {
"name": "Toshiaki Maki",
"date": "2015-12-28T17:16:23Z"
},
"updated": {
"name": "Toshiaki Maki",
"date": "2015-12-28T17:16:23Z"
},
"frontMatter": {
"title": "First article",
"tags": [
"Demo"
],
"categories": [
"Demo",
"Hello"
]
}
}
],
"last": true,
"totalElements": 1,
"totalPages": 1,
"first": true,
"numberOfElements": 1,
"sort": null,
"size": 10,
"number": 0
}
あとは記事を追加するだけです。
起動時にElasticsearchにGitで管理された記事を反映したい場合は、`appplication.properties`に以下の設定を追加すれば良いです。
jest.init=true
最後に、`https://morning-dawn-8167.herokuapp.com/api/git/pull`をwebhookに登録しましょう。
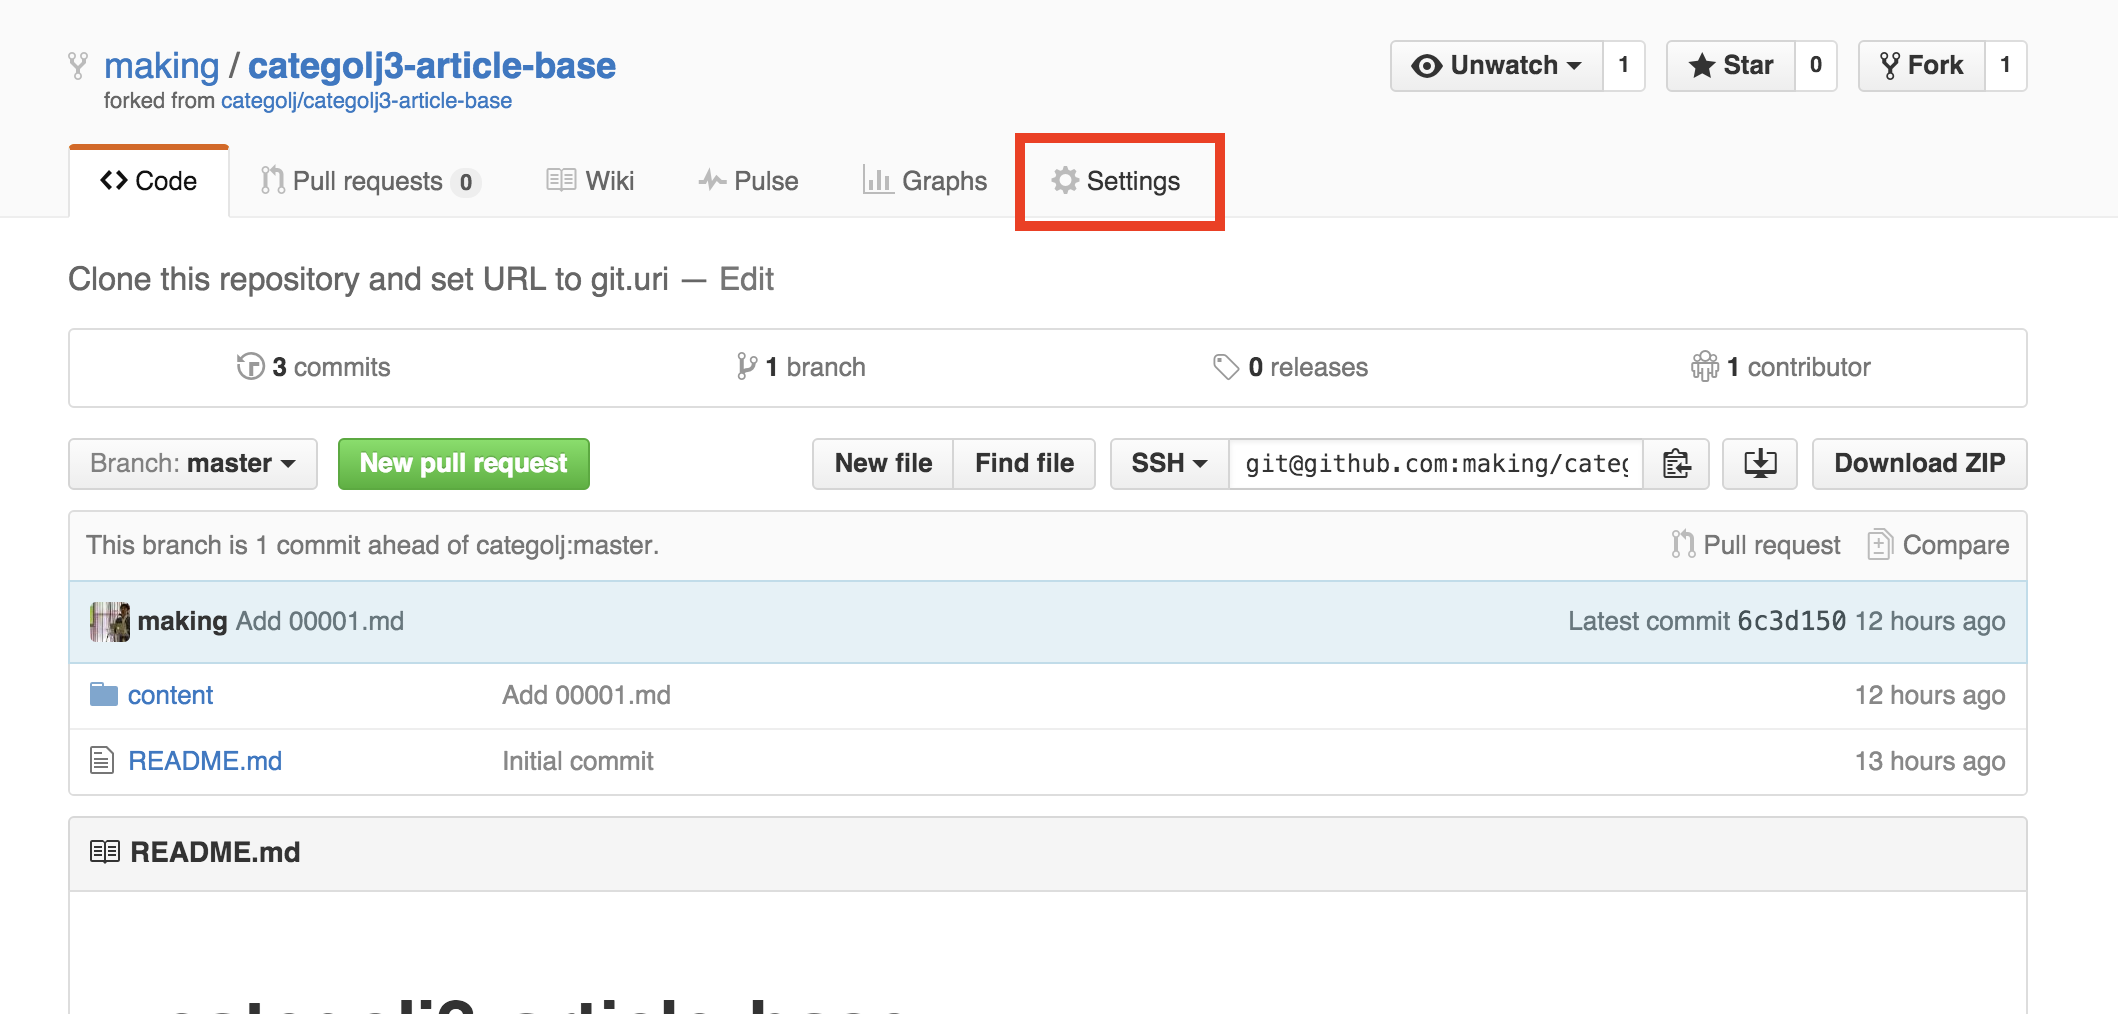
記事を管理しているリポジトリの「Settings」をクリックし、
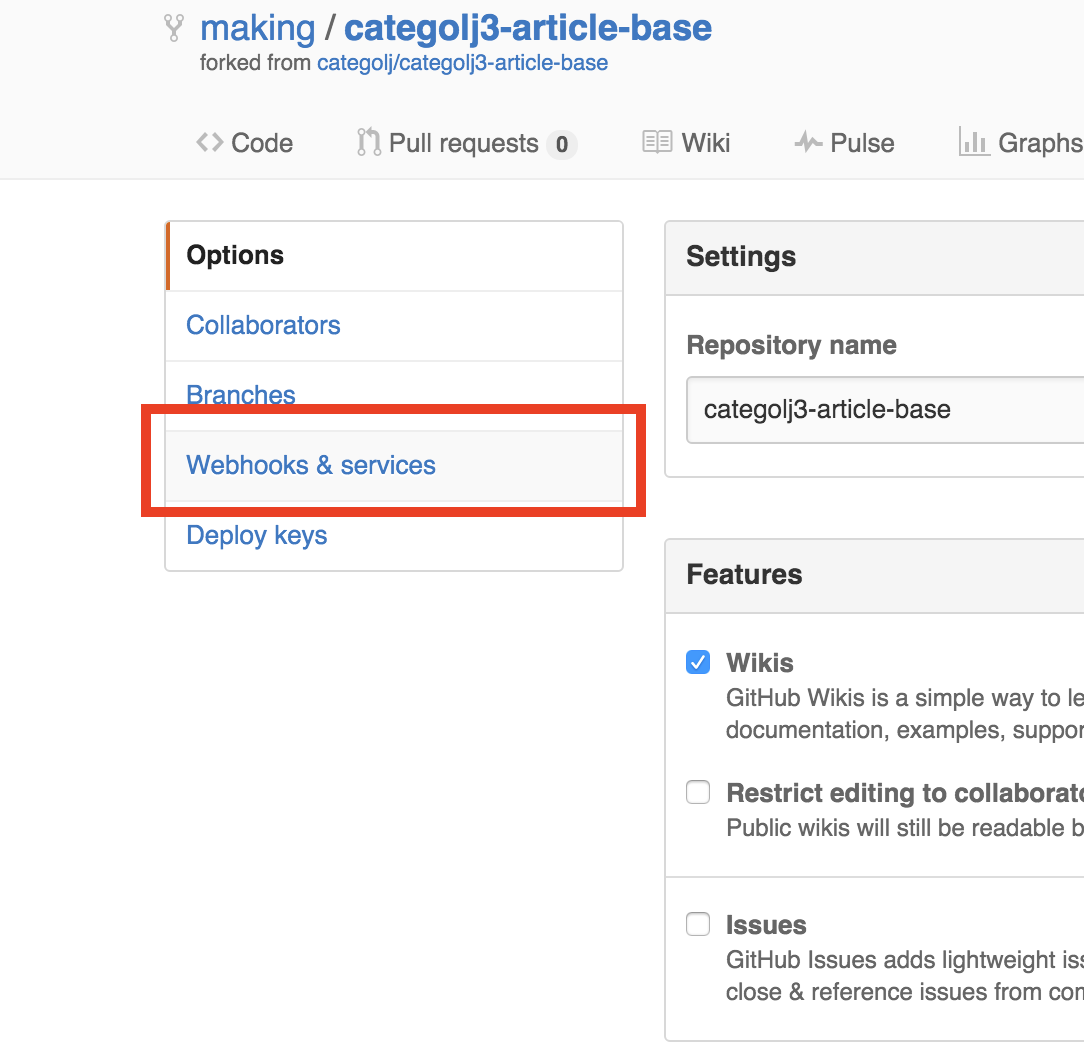
 「Webhooks & services」をクリック、
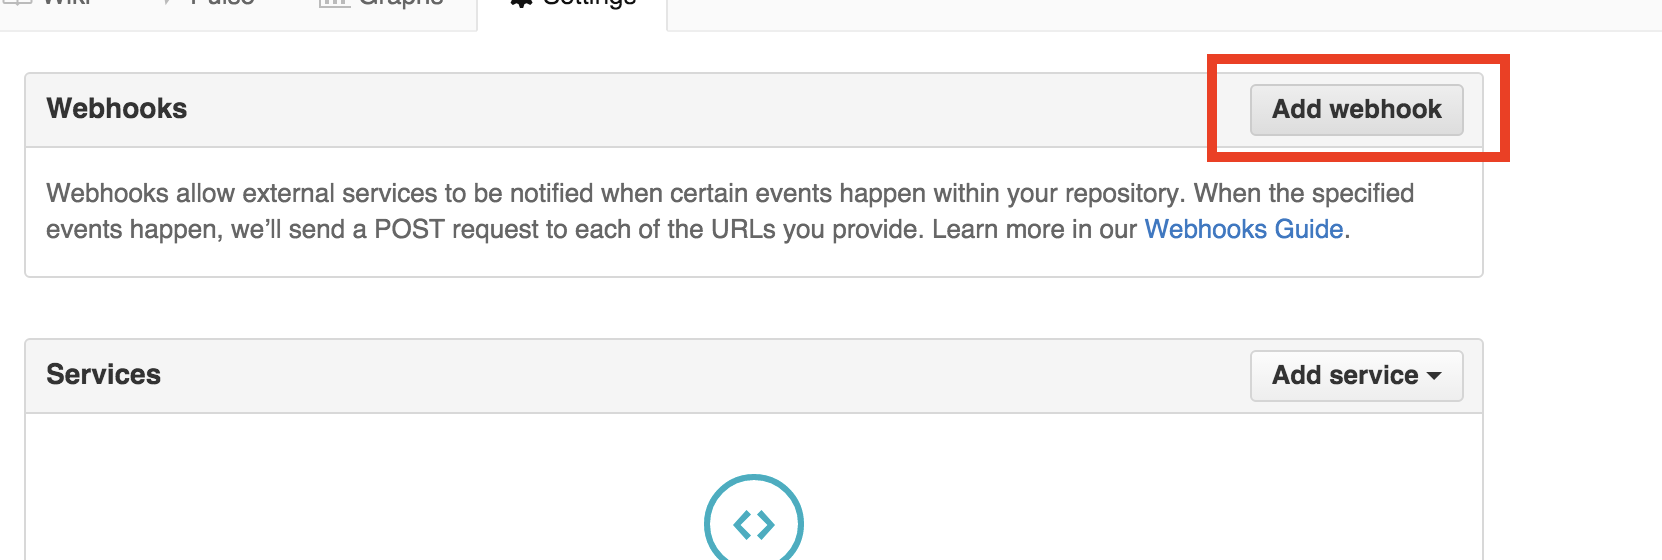
 「Add webhook」をクリック、
 「Payload URL」に`/api/git/pull`を設定し、
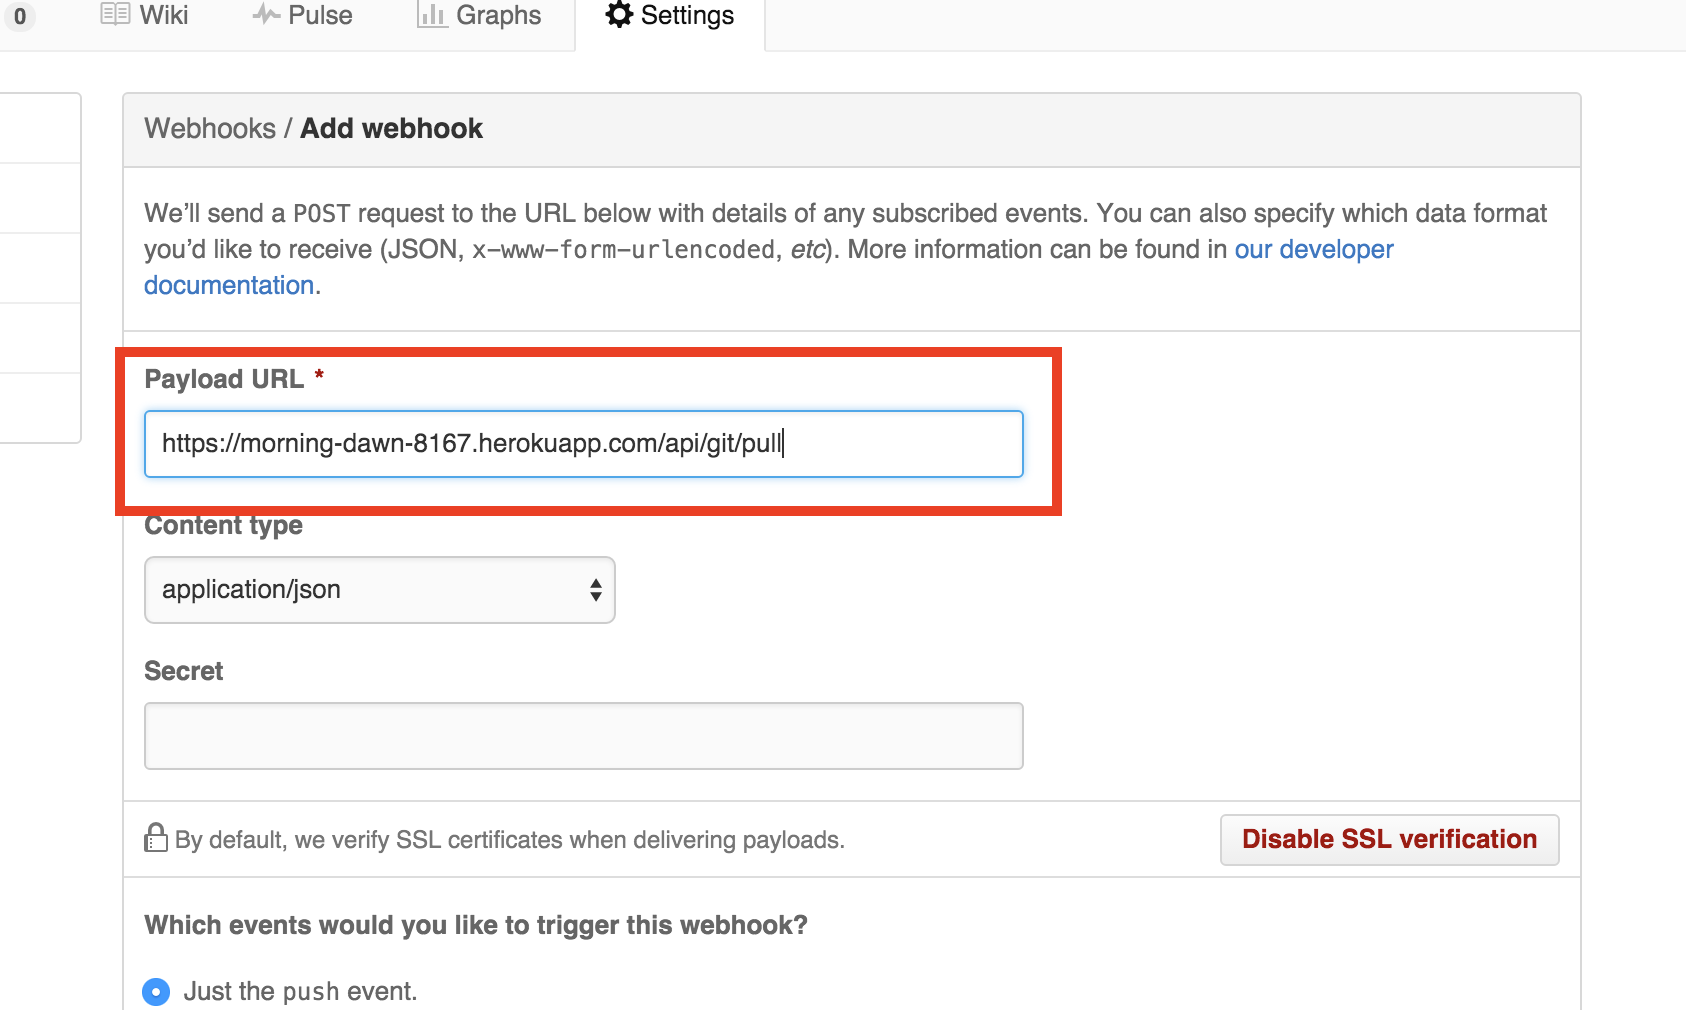 「Add Webhook」ボタンをクリックして、登録完了です。これで、記事をpushするとREST APIサーバーにも反映されます。
----
あとはこのREST APIサーバーにアクセスするWebアプリ(画面)を作ればオレオレブログの完成です。
REST APIのアプリにThymeleafなどを追加して、スタンドアロンアプリにしても良いですし、別のアプリ(Java以外でも可)にしてHTTPでアクセスするのでも良いです。
今回作ったアプリは[こちら](https://github.com/categolj/categolj3-demo)です。
「Add Webhook」ボタンをクリックして、登録完了です。これで、記事をpushするとREST APIサーバーにも反映されます。
----
あとはこのREST APIサーバーにアクセスするWebアプリ(画面)を作ればオレオレブログの完成です。
REST APIのアプリにThymeleafなどを追加して、スタンドアロンアプリにしても良いですし、別のアプリ(Java以外でも可)にしてHTTPでアクセスするのでも良いです。
今回作ったアプリは[こちら](https://github.com/categolj/categolj3-demo)です。