ConcourseのCredential ManagementにCredHubを使う(ACL対応)
ConcourseでCredHubを使ってCredentials管理する方法を紹介します。
普通のCredentials設定
Concourseのパイプラインで使用するCredentialsは、通常バージョン管理しないようにパイプラインから外出しし、-l credentials.ymlで埋め込みます。
次の例を見てみます。
# hello.yml
jobs:
- name: hello-world
  plan:
  - task: say-hello
    config:
      platform: linux
      image_resource:
        type: docker-image
        source:
          repository: ubuntu
      params:
        MY_SECRET: ((my-secret))
      run:
        path: bash
        args:
        - -c
        - |
          set -e
          echo "MY_SECRET=${MY_SECRET}"
((my-secret))は次のcredentials.ymlで管理されます。
# credentials.yml
my-secret: P@$$w0rd
-lで設定します。
fly -t main sp -p hello -c hello.yml -l creds.yml
unpauseして実行してみます。
fly -t main up -p hello
fly -t main tj -j hello/hello-world --watch
実行結果は
started hello/hello-world #1

initializing
running bash -c set -e
echo "MY_SECRET=${MY_SECRET}"

MY_SECRET=P@$$w0rd
となります。
注意:
ビルドログは残るので、この例のようにCredentialsを出力するのは避けてください!
一見問題なさそうですが、実はこのやり方だとCredentialsが組み込まれた状態でパイプラインがDBに保存されます。
なので、fly get-pipelineでCredentialsが丸見えです。
$ fly -t main gp -p hello
groups: []
resources: []
resource_types: []
jobs:
- name: hello-world
  plan:
  - task: say-hello
    config:
      platform: linux
      image_resource:
        type: docker-image
        source:
          repository: ubuntu
      params:
        MY_SECRET: P@$$w0rd
      run:
        path: bash
        args:
        - -c
        - |
          set -e
          echo "MY_SECRET=${MY_SECRET}"
例えば複数ユーザーでConcourseチームを共有している場合、個人のパスワードなどをパイプラインに埋め込んでしまうと、同チームの他のユーザーに見えてしまいます。
このやり方でCredentialsを使用する場合は、チームで共有のBotアカウントなどを作成し、そちらをcredentials.ymlに記述する必要があります。
ConcourseのCredentials Management
本当の意味でのCredentials管理には-lは明らかに不適切です。Concourseでは外部のCredentialsサーバーと連携するCredentials Managementの仕組みが用意されています。
http://concourse.ci/creds.html
次の項目に設定されている((param))を適切に管理できるようになります。
sourceunderresourcesin a pipelinesourceunderresource_typesin a pipelinesourceunderimage_resourcein a task configparamsin a pipelineparamsin a task config
サポートされているCredentialsサーバーは
です。
Vaultはとても有名なプロダクトなので、すでにVaultを利用している方はこちらを選択すれば良いと思います。 CredHubはVaultに比べるとマイナーです。CredHubはCloud Foundry Foundationで開発されおり、BOSHやCloud FoundryのService BrokerのCredentials管理用途で開発されています。 UAAと連携できるなど、Cloud FoundryユーザーにはCredHubの方が馴染みがあるでしょう。
Vaultは機能豊富ですが、ConcourseのCredentials管理のみのために使うにはtoo muchなのと、Storage Backendとしてofficialにサポートされているのが、Consul、Filesystem、In-Memoryだけなので、 PostgreSQL、MySQLが使えるCredHubの方が手軽感があります。
以降ではCredHubとの連携について説明します。
CredHubのサポートはConcourse 3.5.0以降です。
CredHub連携の設定
設定方法はドキュメントに記述されています。
http://concourse.ci/creds.html#credhub
Concourseの起動時にATC側にCredHubの接続情報を設定する必要があります。
BOSHを使ったデプロイ方法を紹介します。ここではBOSH Director(CredHub + UAA設定済み)がデプロイ済みであることを前提とします。
まずは、CredHubなしのConcourseデプロイから始めます。
本線から外れますが、Concourse 3.6.0からconcourse-deploymentというBOSH manifest + ops-files (YAML差分ファイル)を管理するレポジトリができました。 これまでのようにドキュメントのサンプルマニフェストをコピペして環境に合わせて修正+バージョンアップの度に差分適用ということはしなくて良くなります。
concourse-deploymentにはBOSH Directorを使用したcluster版とDirector不要のSingle VMを作成するlite版が用意されています。 ここではcluster版を使用し、BOSH Directorが既に存在することを前提とします。以下の説明はBOSH DirectorにUAA + CredHubが設定されている環境(BOSH Lite)で試しています。
README通りの最小構成インストールを行います。
git clone git@github.com:concourse/concourse-deployment.git
# 執筆時点で 302bbbc556a54716338a5133949b514976a84515
bosh deploy -d concourse concourse-deployment/cluster/concourse.yml \
  -l concourse-deployment/versions.yml \
  -o concourse-deployment/cluster/operations/static-web.yml \
  -o concourse-deployment/cluster/operations/no-auth.yml \
  --var web_ip=10.244.0.120 \
  --var external_url=http://10.244.0.120:8080 \
  --var network_name=default \
  --var web_vm_type=default \
  --var db_vm_type=default \
  --var db_persistent_disk_type=default \
  --var worker_vm_type=default \
  --var deployment_name=concourse
# デモ用の認証なし設定です
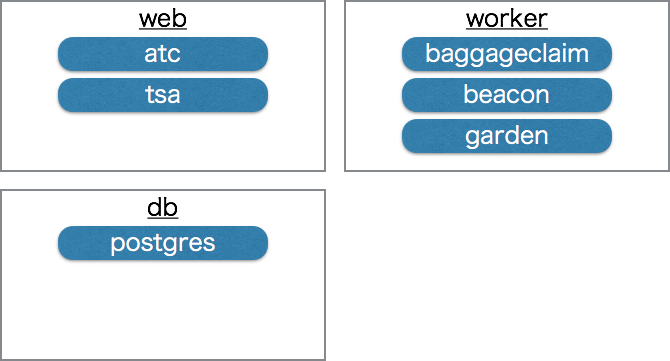
まずは次の状態ができています。
$ bosh -d concourse vms
Using environment '192.168.50.6' as client 'admin'

Task 43189. Done

Deployment 'concourse'

Instance                                     Process State  AZ  IPs           VM CID                                VM Type
db/9ec9a39f-f2a0-4e77-98be-013e02ba65dc      running        z1  10.244.0.131  2230d55b-c916-4c24-5b28-0c70e96033a5  default
web/9a84ace9-7e15-461e-b5cc-0828c090f33b     running        z1  10.244.0.120  902a5998-4102-4ed3-4ccb-57d98a918f37  default
worker/d17466e1-6552-474f-9361-f09ba68f08a2  running        z1  10.244.0.143  98890a0d-dcba-49c7-4891-e7b8a1a86711  default

3 vms

Succeeded
次にCredHubを設定します。ここではCredHubと既存のUAAを連携させます。 今回はCredHubをデプロイをConcourseと同じdeploymentの中に新規でデプロイします。バックエンドにはPostgreSQLを使用し、Concourse用のDBに相乗りします。
すなわち、次のような構成になります。
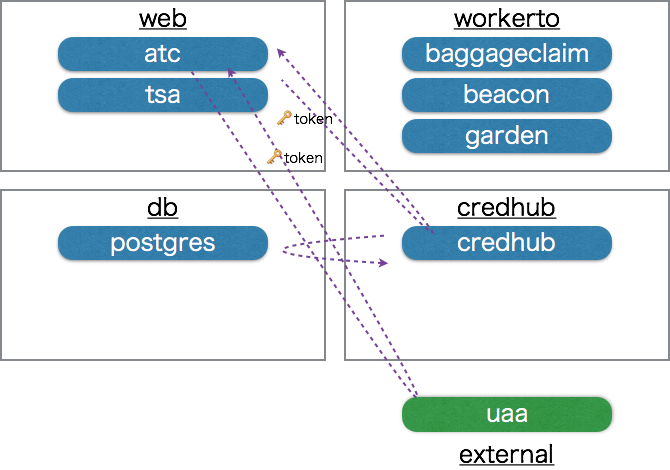
UAAも一緒にBOSHでデプロイできますが、 既存のUAA(Cloud Foundry Application Runtime内に存在)と連携するのが一番想定される利用シーンなので。UAAも一緒にデプロイする方法はまたいつか。
- CredHubのBOSH Releaseはpivotal-cf/credhub-releaseです。
- atcのCredHub連携の設定情報はこちらです。
UAAクライアントの登録
ここで、まずはatcをUAAのOAuth2クライアントとしてClient Credentials Grant Typeで登録する必要があります。
UAAのclientでauthoritiesにuaa.adminを持つclient(下の例ではuaa_admin)のtokenを使い、uaacコマンドで新規にclientを登録します。
uaac target https://(UAAのIP):(UAAのHTTPS Port) --skip-ssl-validation
uaac token client get uaa_admin -s (uaa_adminのclient secret)
PCFのERT(PAS)のUAAを使う場合は、client名は
adminでClient SecretはOps ManagerのERT(PAS) TileのCredentialsタブの"Admin Client Credentials"から取得できます。
atc_to_credhubという名前のクライアントを登録します。
UAAクライアントがCredHubリソースにアクセスするためにはcredhub.writeとcredhub.readauthoritiesが必要です。
uaac client add atc_to_credhub \
     --name atc_to_credhub \
     --secret (atc_to_credhubのclient secret) \
     --authorized_grant_types client_credentials \
     --authorities credhub.write,credhub.read \
     --access_token_validity 3600
client secretは適当な値を指定してください。
CredHubを有効にするops-fileの作成
CredHubのデプロイとatcにCredHubを設定するops-file (ops-files/concourse-credhub.yml) を作成します。
- type: replace
  path: /releases/-
  value:
    name: credhub
    url: https://bosh.io/d/github.com/pivotal-cf/credhub-release?v=1.6.5
    version: 1.6.5
    sha1: eda4e8873aa2dbfacb1857b175f761d2d0b64538

- type: replace
  path: /instance_groups/name=web/jobs/name=atc/properties/credhub?
  value:
    url: ((credhub_url))
    tls:
      insecure_skip_verify: true
      ca_cert: ((default-ca))
    client_id: ((credhub_client_id))
    client_secret: ((credhub_client_secret))

- type: replace
  path: /instance_groups/name=web:before
  value:
    name: credhub
    instances: 1
    vm_type: default
    azs: [z1]
    stemcell: trusty
    networks:
    - name: default
      static_ips: [((credhub_ip))]

    jobs:
    - name: credhub
      release: credhub
      properties:
        credhub:
          tls: ((credhub-tls))
          authentication:
            uaa:
              url: ((uaa-url))
              verification_key: ((uaa-jwt.public_key))
              ca_certs:
              - ((uaa-tls.ca))
          data_storage:
            type: postgres
            username: credhub
            password: ((credhub-db-password))
            host: ((postgres-ip))
            port: 5432
            database: credhub
            require_tls: false
          encryption:
            keys:
            - provider_name: int
              encryption_password: ((credhub-encryption-password))
              active: true
            providers:
            - name: int
              type: internal

- type: replace
  path: /instance_groups/name=db/networks/0/static_ips?
  value: [((postgres-ip))]

- type: replace
  path: /instance_groups/name=db/jobs/name=postgres/properties/databases/databases/-
  value:
    name: credhub

- type: replace
  path: /instance_groups/name=db/jobs/name=postgres/properties/databases/roles/-
  value:
    name: credhub
    password: ((credhub-db-password))

- type: replace
  path: /variables/-
  value:
    name: default-ca
    type: certificate
    options:
      is_ca: true
      common_name: ca

- type: replace
  path: /variables/-
  value:
    name: credhub-tls
    type: certificate
    options:
      ca: default-ca
      common_name: ((credhub-ip))
      alternative_names:
      - ((credhub-ip))
      - 127.0.0.1

- type: replace
  path: /variables/-
  value:
    name: credhub-db-password
    type: password

- type: replace
  path: /variables/-
  value:
    name: credhub-encryption-password
    type: password
    options:
      length: 40
AWSで作成する場合は、CredHubの
vm_typeをt2.medium以上にしてください。
このops fileを組み込んで、再度bosh deployします。
bosh deploy -d concourse concourse-deployment/cluster/concourse.yml \
  -l concourse-deployment/versions.yml \
  -o concourse-deployment/cluster/operations/static-web.yml \
  -o concourse-deployment/cluster/operations/no-auth.yml \
  -o ops-files/concourse-credhub.yml \
  --var web_ip=10.244.0.120 \
  --var external_url=http://10.244.0.120:8080 \
  --var network_name=default \
  --var web_vm_type=default \
  --var db_vm_type=default \
  --var db_persistent_disk_type=default \
  --var worker_vm_type=default \
  --var postgres-ip=10.244.0.124 \
  --var credhub_url=https://10.244.0.125:8844 \
  --var credhub-ip=10.244.0.125 \
  --var uaa-url=https://(UAAのIP):(UAAのHTTPS Port) \
  --var-file uaa-tls.ca=(UAAのCA証明書pemファイルパス) \
  --var-file uaa-jwt.public_key=(UAAのJWTの署名キーのpemファイルパス) \
  --var credhub_client_id=atc_to_credhub \
  --var credhub_client_secret=(atc_to_credhubのclient secret) \
  --var deployment_name=concourse \
  --no-redact
UAAのJWTの署名キーは
https://(UAAのIP):(UAAのHTTPS Port)/token_keysから取得可能です。curl -s -k https://(UAAのIP):(UAAのHTTPS Port)/token_keys | jq -r .keys[0].value > jwt-sign-key.pem
デプロイできると、次のようにcredhubインスタンスが立ち上がっているのがわかります。
$ bosh -d concourse vms
Using environment '192.168.50.6' as client 'admin'

Task 43204. Done

Deployment 'concourse'

Instance                                      Process State  AZ  IPs           VM CID                                VM Type
credhub/7f9d897a-afd0-4acf-a103-a88c97f7fd32  running        z1  10.244.0.125  cc065ca8-fb74-4b7c-43d2-df088edca871  default
db/9ec9a39f-f2a0-4e77-98be-013e02ba65dc       running        z1  10.244.0.124  214fd1fe-0193-4566-7c9f-3abca01beb94  default
web/9a84ace9-7e15-461e-b5cc-0828c090f33b      running        z1  10.244.0.120  902a5998-4102-4ed3-4ccb-57d98a918f37  default
worker/d17466e1-6552-474f-9361-f09ba68f08a2   running        z1  10.244.0.143  98890a0d-dcba-49c7-4891-e7b8a1a86711  default
これでConcourseとCredHubの連携ができました。
fly -t main login -c http://10.244.0.120:8080
でログインします。
CredHubからパイプラインのCredentials取得
いよいよConcourseからCredHubにアクセスします。
まずは、冒頭のhello.ymlを-lなしでセットし、ジョブを実行します。
fly -t main sp -p hello -c hello.yml
fly -t main up -p hello
fly -t main tj -j hello/hello-world --watch
結果は次のようになるでしょう。
$ fly -t main tj -j hello/hello-world --watch
started hello/hello-world #1

initializing
Expected to find variables: my-secret
errored
my-secretを設定していないので当然エラーです。
このmy-secretをCredHubに登録しましょう。
credhubコマンドを使用します。
credhubにatc_to_credhubのClient Credentialsでログインします。
credhub login -s 10.244.0.125:8844 --skip-tls-validation --client-name atc_to_credhub --client-secret (atc_to_credhubのclient secret)
--skip-tls-validationは非推奨で、--ca-cert=(UAAのCA証明書) --ca-cert=(CredHubのCA証明書)を設定するのが推奨です。
credhub findを実行すると登録されているCredentials一覧が見れます。まだ空です。
$ credhub find
credentials: []
Concourseは
/concourse/(team name)/(pipeline name)/(param name)/concourse/(team name)/(param name)
のどちらかのCredentialの取得を試みます。上が優先です。 チーム共通のパラメータは下のCredentialsに設定し、パイプライン固有のパラメータは上のCredentialsに設定するのが良いでしょう。
今回の例(my-secret)ではチーム共通パラメータとして、次のように設定します。
$ credhub generate -t password -n /concourse/main/my-secret
id: 8d2d5fbe-dd20-4e75-b38f-9e103dea0333
name: /concourse/main/my-secret
type: password
value: S9D0reqoZd6NlR1mbsXVVUP3I9Ywtm
version_created_at: 2017-12-19T06:05:57Z
これを設定した後、再度ジョブを実行すると、
$ fly -t main tj -j hello/hello-world --watch
started hello/hello-world #2

initializing
running bash -c set -e
echo "MY_SECRET=${MY_SECRET}"

MY_SECRET=S9D0reqoZd6NlR1mbsXVVUP3I9Ywtm
succeeded
取得できました。
Credentialsをrotateしてみましょう。
$ credhub regenerate -n /concourse/main/my-secret
id: db89b907-cf35-4fd8-b9d6-66a32f868726
name: /concourse/main/my-secret
type: password
value: Nzcw4hnE5ObHIZH3YGqgs1ILzwzvqu
version_created_at: 2017-12-19T06:08:58Z
再度ジョブを実行すると、
$ fly -t main tj -j hello/hello-world --watch
started hello/hello-world #3

initializing
running bash -c set -e
echo "MY_SECRET=${MY_SECRET}"

MY_SECRET=Nzcw4hnE5ObHIZH3YGqgs1ILzwzvqu
succeeded
rotateされた値が反映されました。
これでConcourseのパイプラインとCredentialsを分けることができました。
これで大体良さそうなのですが、まだ課題が残っています。
今回はCredHubにログインするのにatc_to_credhubクライアントのClient Credentialを使いました。
みんながこのClient Credentialを共有すると、このCredHubにアクセスできる人全員がCredentialsを参照可能になり、
元の問題を根本的には解決していません。
ここでCredHubのACL機能を使用します。
CredHubのACL
CredHubのACL機能はPhase1という開発状況ですが、一応今回の用途には利用可能でした。
https://github.com/cloudfoundry-incubator/credhub/blob/master/docs/authorization-phase1.md
この機能を使うと各Credentialに対して、
- UAAクライアント (atcに相当)
- UAAユーザー (concourseを使うユーザーに相当)
というActorそれぞれにreadやwriteと言ったpermissionを設定可能です。
この2つActorを使い分けます。
次の図のようにConcourse(atc)からはatc_to_credhubのClient Credentialsでアクセスし、ConcourseユーザーはResource Owner Passwordでアクセスするようにします。

各パイプラインのCredentialsはResource Owner Passwordで登録することにより、自分が設定したCredentialsは他のユーザーからは参照されなくなります。
また、各Credentialに対してatc_to_credhubからのreadを許可することでConcourseタスクからCredentialを参照可能になります。
このACL機能を有効にするにはcredhub jobのpropertiesにcredhub.authorization.acls.enabledをtrueにする必要があります。
このpropertyを設定するops file(ops-files/credhub-enable-acl.yml)を次のように作成します。
- type: replace
  path: /instance_groups/name=credhub/jobs/name=credhub/properties/credhub/authorization?/acls?/enabled?
  value: true
これを組み込んで再度bosh deploy
bosh deploy -d concourse concourse-deployment/cluster/concourse.yml \
  -l concourse-deployment/versions.yml \
  -o concourse-deployment/cluster/operations/static-web.yml \
  -o concourse-deployment/cluster/operations/no-auth.yml \
  -o ops-files/concourse-credhub.yml \
  -o ops-files/credhub-enable-acl.yml \
  --var web_ip=10.244.0.120 \
  --var external_url=http://10.244.0.120:8080 \
  --var network_name=default \
  --var web_vm_type=default \
  --var db_vm_type=default \
  --var db_persistent_disk_type=default \
  --var worker_vm_type=default \
  --var postgres-ip=10.244.0.124 \
  --var credhub_url=https://10.244.0.125:8844 \
  --var credhub-ip=10.244.0.125 \
  --var uaa-url=https://(UAAのIP):(UAAのHTTPS Port) \
  --var-file uaa-tls.ca=(UAAのCA証明書pemファイルパス) \
  --var-file uaa-jwt.public_key=(UAAのJWTの署名キーのpemファイルパス) \
  --var credhub_client_id=atc_to_credhub \
  --var credhub_client_secret=(atc_to_credhubのclient secret) \
  --var deployment_name=concourse \
  --no-redact
いったん、/concourse/main/my-secretを削除しておきます。
$ credhub delete -n /concourse/main/my-secret
Credential successfully deleted
UAAユーザー作成
uaac user addコマンドでUAAユーザーを作成します。credhub.readとcredhub.writeのGroupに所属する必要があります。
demo1とdemo2というユーザーを作成します。
# credhub.read, credhub.writeグループが存在しない場合は作成
uaac group add credhub.read
uaac group add credhub.write

# demo1ユーザーの作成及び、credhub.read/credhub.writeグループの設定
uaac user add demo1 --password demo1 --email demo1@example.com
uaac member add credhub.read demo1
uaac member add credhub.write demo1

# demo2ユーザーの作成及び、credhub.read/credhub.writeグループの設定
uaac user add demo2 --password demo2 --email demo2@example.com
uaac member add credhub.read demo2
uaac member add credhub.write demo2
CFのUAAを使う場合は、cfユーザーがUAAに登録されているので、
uaac member addをすれば良いです。
UAAに
credhub_cliというクライアントがいない場合は次のコマンドで作成してくださいuaac client add credhub_cli \ --name credhub_cli \ --secret "" \ --authorized_grant_types password,refresh_token \ --scope credhub.write,credhub.read \ --access_token_validity 3600 \ --refresh_token_validity 36000bosh-deploymentでBOSH+UAA+CredHub構成を作成している場合は、
credhub_cliクライアントは作成済みです。
UAAユーザーでCredential作成
先ほどはatc_to_credhubクライアントのClient Credentialでログインしましたけど、
今回はUAAユーザーのResource Owner Passwordでログインします。
credhub login -s 10.244.0.125:8844 --skip-tls-validation --username demo1 --password demo1
client-name/client-secretではなくusername/passwordを指定します。
demo1のResource Owner Passwordで/concourse/main/my-secretを作成します。
$ credhub generate -t password -n /concourse/main/my-secret
id: 70eeef24-9588-4c79-b32c-1dfaead55130
name: /concourse/main/my-secret
type: password
value: NNAlffTHs16HLe5IErwZ3LEOlK2X4i
version_created_at: 2017-12-19T10:05:59Z
この状態で、タスクを実行すると、
$ fly -t main tj -j hello/hello-world --watch
started hello/hello-world #4

initializing
Expected to find variables: my-secret
errored
エラーになります。エラーメッセージがわかりにくいですが、
atc_to_credhubの権限で/concourse/main/my-secretにアクセスできないため、Credentialが見つかりませんでした。
Permissionの追加
ACLはPermission APIで設定可能です。
CredHub CLI 1.5.1ではサブコマンドとして用意されていないので、curlで直接REST APIを叩く必要があります...
まずは/concourse/main/my-secretのPermissionを確認します。
$ curl -k -H "Authorization: $(credhub --token)" $(credhub api)/api/v1/permissions?credential_name=/concourse/main/my-secret
{"credential_name":"/concourse/main/my-secret","permissions":[{"actor":"uaa-user:0d9c6701-c3df-4c2e-936c-8c48e551e764","operations":["read","write","delete","read_acl","write_acl"]}]}
整形すると
{
  "credential_name": "/concourse/main/my-secret",
  "permissions": [
    {
      "actor": "uaa-user:0d9c6701-c3df-4c2e-936c-8c48e551e764",
      "operations": [
        "read",
        "write",
        "delete",
        "read_acl",
        "write_acl"
      ]
    }
  ]
}
です。
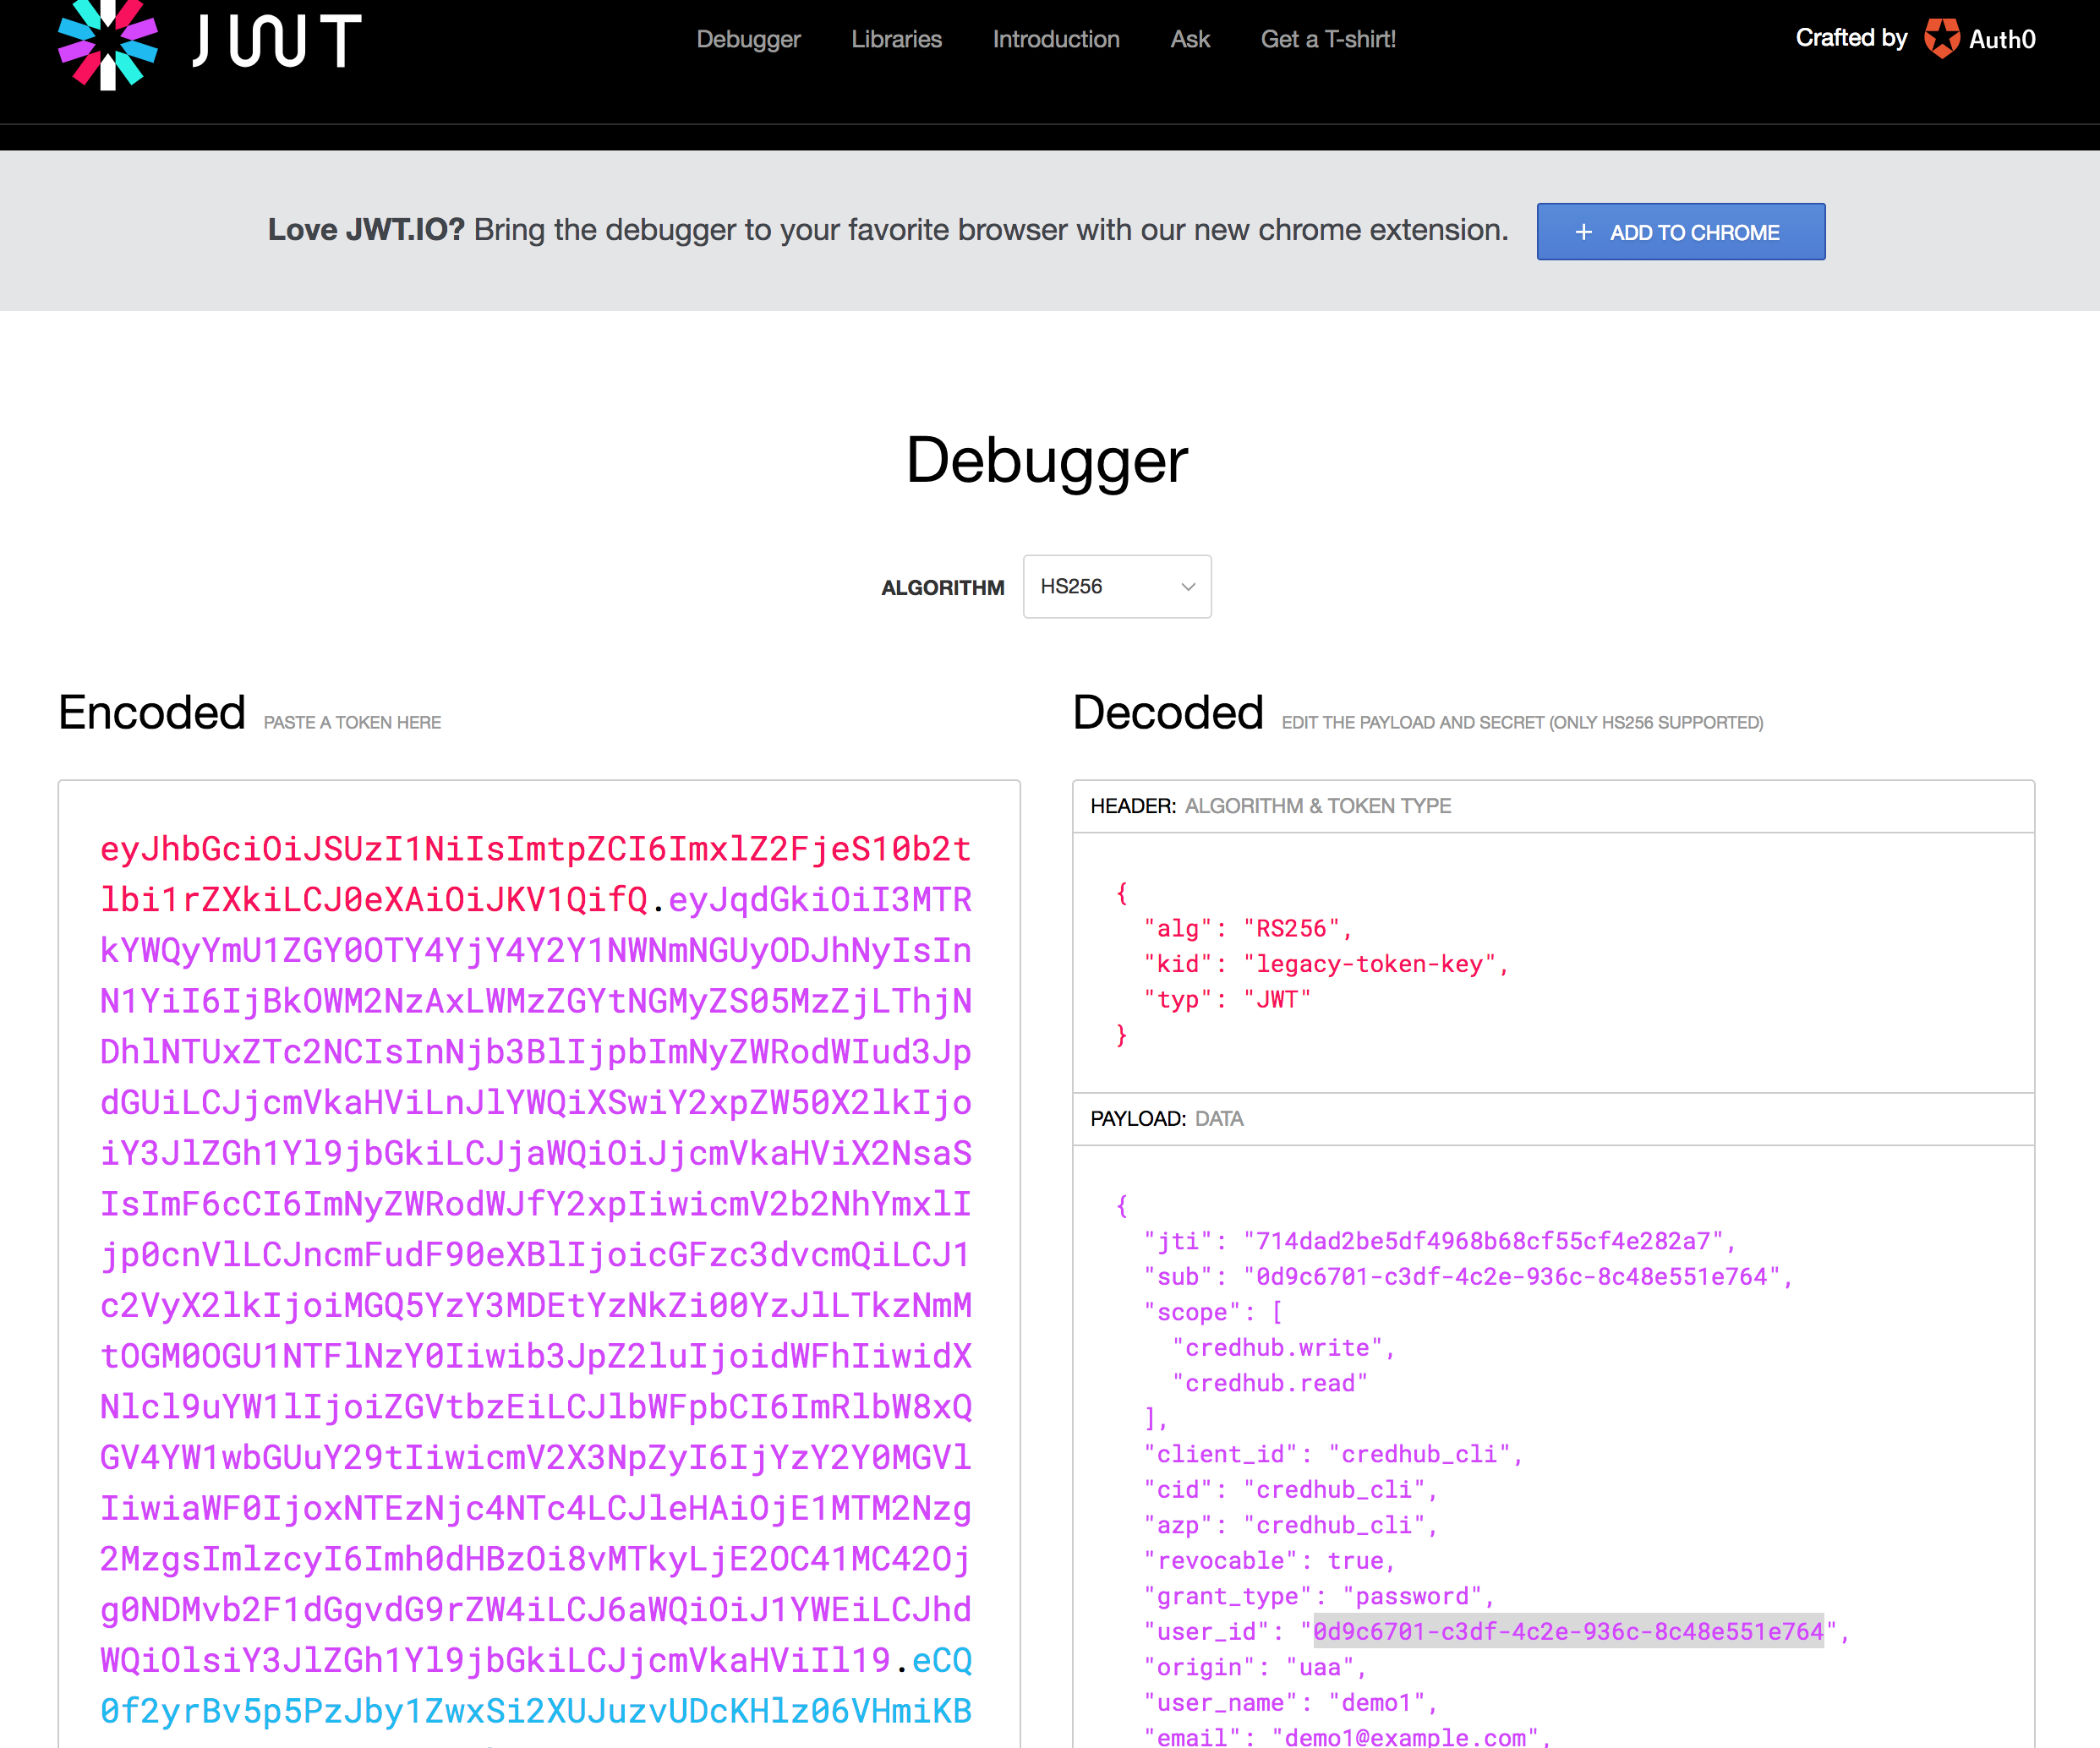
余談ですが、
actorの部分はuaa-user:(UAA TokenのJWTのuser_id)です。tokenは
credhub --tokenの結果をhttps://jwt.ioに貼り付ければ確認できます。
ここにatc_to_credhubクライアントがアクセスできるように設定します。UAAクライアントの場合、actorにはuaa-client:(Client ID)を設定します。
curl -k -v -H "Authorization: $(credhub --token)" $(credhub api)/api/v1/permissions?credential_name=/concourse/main/my-secret \
     -H "Content-Type: application/json" \
     -d '{
      "credential_name": "/concourse/main/my-secret",
      "permissions": [
      {
        "actor": "uaa-client:atc_to_credhub",
        "operations": ["read"]
      }]
     }'
再度、/concourse/main/my-secretのPermissionを確認します。
$ curl -s -k -H "Authorization: $(credhub --token)" $(credhub api)/api/v1/permissions?credential_name=/concourse/main/my-secret | jq .
{
  "credential_name": "/concourse/main/my-secret",
  "permissions": [
    {
      "actor": "uaa-user:0d9c6701-c3df-4c2e-936c-8c48e551e764",
      "operations": [
        "read",
        "write",
        "delete",
        "read_acl",
        "write_acl"
      ]
    },
    {
      "actor": "uaa-client:atc_to_credhub",
      "operations": [
        "read"
      ]
    }
  ]
}
この状態で再度タスクを実行すると、
$ fly -t main tj -j hello/hello-world --watch
started hello/hello-world #5

initializing
running bash -c set -e
echo "MY_SECRET=${MY_SECRET}"

MY_SECRET=NNAlffTHs16HLe5IErwZ3LEOlK2X4i
succeeded
Credentialにアクセスできました!
ではユーザーdemo2に切り替えてみます。
credhub login -s 10.244.0.125:8844 --skip-tls-validation --username demo2 --password demo2
このユーザーで/concourse/main/my-secretにアクセスすると
$ credhub get -n /concourse/main/my-secret
The request could not be completed because the credential does not exist or you do not have sufficient authorization.
権限エラーになりました。
これで無事にACLの設定ができました。
まとめ
- ConcourseのCredentials Managementを説明しました
- BOSHでConcourse + CredHubをデプロイする方法を説明しました
- CredHubでACLを設定する方法を説明しました