---
title: Cloud Native BuildpacksでSpring BootアプリのGraalVM Native Imageを作成しKnativeにデプロイする
tags: ["Cloud Native Buildpacks", "Spring Boot", "GraalVM", "Docker", "Knative", "cert-manager"]
categories: ["Dev", "Infrastructure", "CloudNativeBuildpacks", "SpringBoot", "GraalVM", "Knative"]
date: 2020-09-21T11:14:36Z
updated: 2020-09-22T15:56:36Z
---
[前の記事](/entries/547)でCloud Native BuildpacksでSpring BootアプリのGraalVM Native Imageを作成する方法を紹介しました。
本記事ではこのNative Imageを[Knative](https://knative.dev)にデプロイし、相性が良いことを確認します。
**目次**
### アプリケーションの作成
[この記事](/entries/547)と同じです。
```
curl https://start.spring.io/starter.tgz \
-s \
-d javaVersion=11 \
-d artifactId=hello-world \
-d bootVersion=2.4.0-M2 \
-d baseDir=hello-world \
-d dependencies=webflux,actuator \
-d packageName=com.example \
-d applicationName=HelloWorldApplication | tar -xzvf -
cd hello-world
cat <<'EOF' > src/main/java/com/example/HelloWorldApplication.java
package com.example;
import org.springframework.boot.SpringApplication;
import org.springframework.boot.autoconfigure.SpringBootApplication;
import org.springframework.web.bind.annotation.GetMapping;
import org.springframework.web.bind.annotation.RestController;
@SpringBootApplication(proxyBeanMethods = false)
@RestController
public class HelloWorldApplication {
@GetMapping("/")
public String hello() {
return "Hello World!";
}
public static void main(String[] args) {
SpringApplication.run(HelloWorldApplication.class, args);
}
}
EOF
sed -i '' -e 's|spring-boot-maven-plugin|spring-boot-maven-pluginpaketobuildpacks/builder:tiny1-Dspring.native.remove-yaml-support=true -Dspring.spel.ignore=true -Dspring.xml.ignore=true -Dspring.spel.ignore=true|' pom.xml
./mvnw spring-boot:build-image -Dspring-boot.build-image.imageName=making/hello-world
```
> Note: 自分の環境だと`./mvnw spring-boot:build-image`でイメージを作成する時間のうち、初回は5分くらいがgraalvmのダウンロード時間です。
> 2回目以降はキャッシュされますが、イメージ名を変えると再度ダウンロードが行われます。この時間を省略するには、初めからgraalvmを同梱したbuildpackが必要です。
> プロプライエタリな[Java Native Image Buildpack for VMware Tanzu](https://network.pivotal.io/products/tanzu-java-native-image-buildpack)(`registry.pivotal.io/tanzu-java-native-image-buildpack/java-native-image:3.4.1`)はこの用途に使えます。
> [VMware Tanzu Network](https://network.pivotal.io)のアカウントを作成して、`docker login registry.pivotal.io`すれば、イメージをpullできます。
> VMware Tanzu NetworkではBuilderは用意されていないので、このBuildpackを含むBuilderを自分で作成する必要があります。
> Builderの作成方法は[こちらの記事](https://blog.ik.am/entries/542)を参考にしてください。
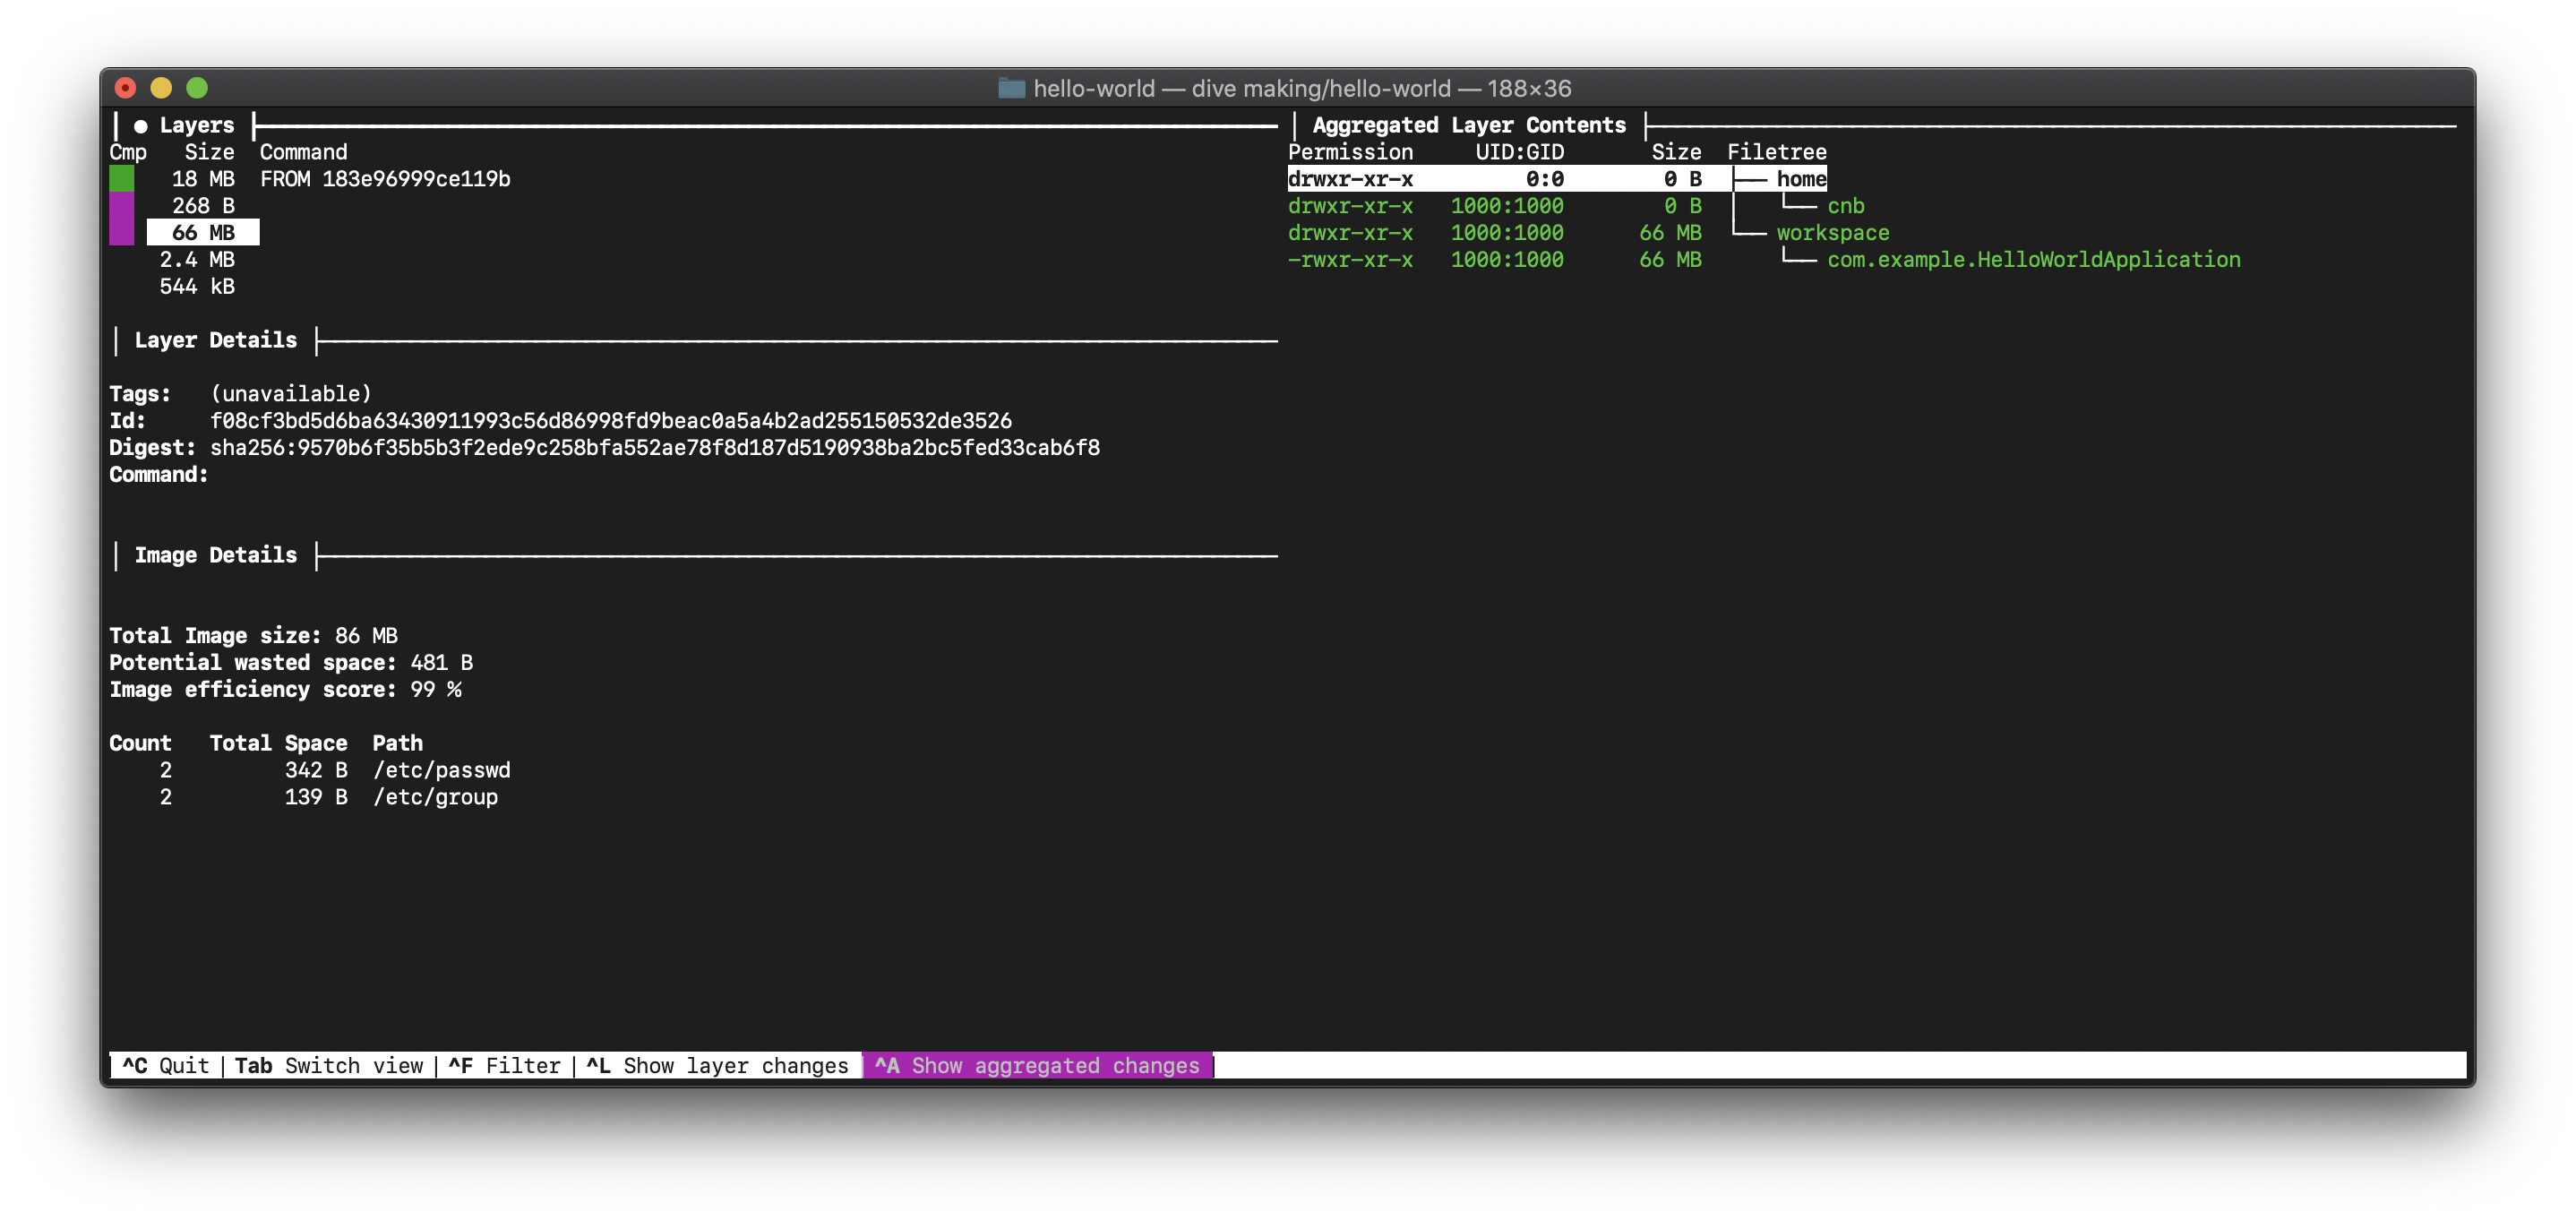
作成したイメージを確認します。`tiny` Stackを使用しているので、サイズは小さいです。
```
$ docker image ls making/hello-world
REPOSITORY TAG IMAGE ID CREATED SIZE
making/hello-world latest 3f581955b4b7 40 years ago 86.2MB
```
[`dive`](https://github.com/wagoodman/dive)でイメージレイヤーを確認すると、18MBがOS部分で66MBがnative image部分であることがわかります。
まずはこのイメージを`docker run`で起動します。
```
$ docker run --rm -p 8080:8080 making/hello-world
. ____ _ __ _ _
/\\ / ___'_ __ _ _(_)_ __ __ _ \ \ \ \
( ( )\___ | '_ | '_| | '_ \/ _` | \ \ \ \
\\/ ___)| |_)| | | | | || (_| | ) ) ) )
' |____| .__|_| |_|_| |_\__, | / / / /
=========|_|==============|___/=/_/_/_/
:: Spring Boot ::
2020-09-21 09:28:20.747 INFO 1 --- [ main] com.example.HelloWorldApplication : Starting HelloWorldApplication using Java 11.0.8 on cbf8dc7af660 with PID 1 (/workspace/com.example.HelloWorldApplication started by cnb in /workspace)
2020-09-21 09:28:20.747 INFO 1 --- [ main] com.example.HelloWorldApplication : No active profile set, falling back to default profiles: default
2020-09-21 09:28:20.811 INFO 1 --- [ main] o.s.b.a.e.web.EndpointLinksResolver : Exposing 2 endpoint(s) beneath base path '/actuator'
2020-09-21 09:28:20.817 WARN 1 --- [ main] i.m.c.i.binder.jvm.JvmGcMetrics : GC notifications will not be available because MemoryPoolMXBeans are not provided by the JVM
2020-09-21 09:28:20.825 WARN 1 --- [ main] io.netty.channel.DefaultChannelId : Failed to find the current process ID from ''; using a random value: -401303669
2020-09-21 09:28:20.827 INFO 1 --- [ main] o.s.b.web.embedded.netty.NettyWebServer : Netty started on port(s): 8080
2020-09-21 09:28:20.829 INFO 1 --- [ main] com.example.HelloWorldApplication : Started HelloWorldApplication in 0.091 seconds (JVM running for 0.095)
```
8080ポートにアクセスして"Hello World!"が返ることを確認します。
```
$ curl -s http://localhost:8080
Hello World!
```
### Knativeのインストール
次のこのイメージを[Knative](https://knative.dev)にデプロイします。
ここではKnativeをDocker for Macにデプロイする例を紹介します。Kubernetes 1.16です。
```
$ kubectl get node -o wide
NAME STATUS ROLES AGE VERSION INTERNAL-IP EXTERNAL-IP OS-IMAGE KERNEL-VERSION CONTAINER-RUNTIME
docker-desktop Ready master 2m39s v1.16.6-beta.0 192.168.65.3 Docker Desktop 4.19.76-linuxkit docker://19.3.12
```
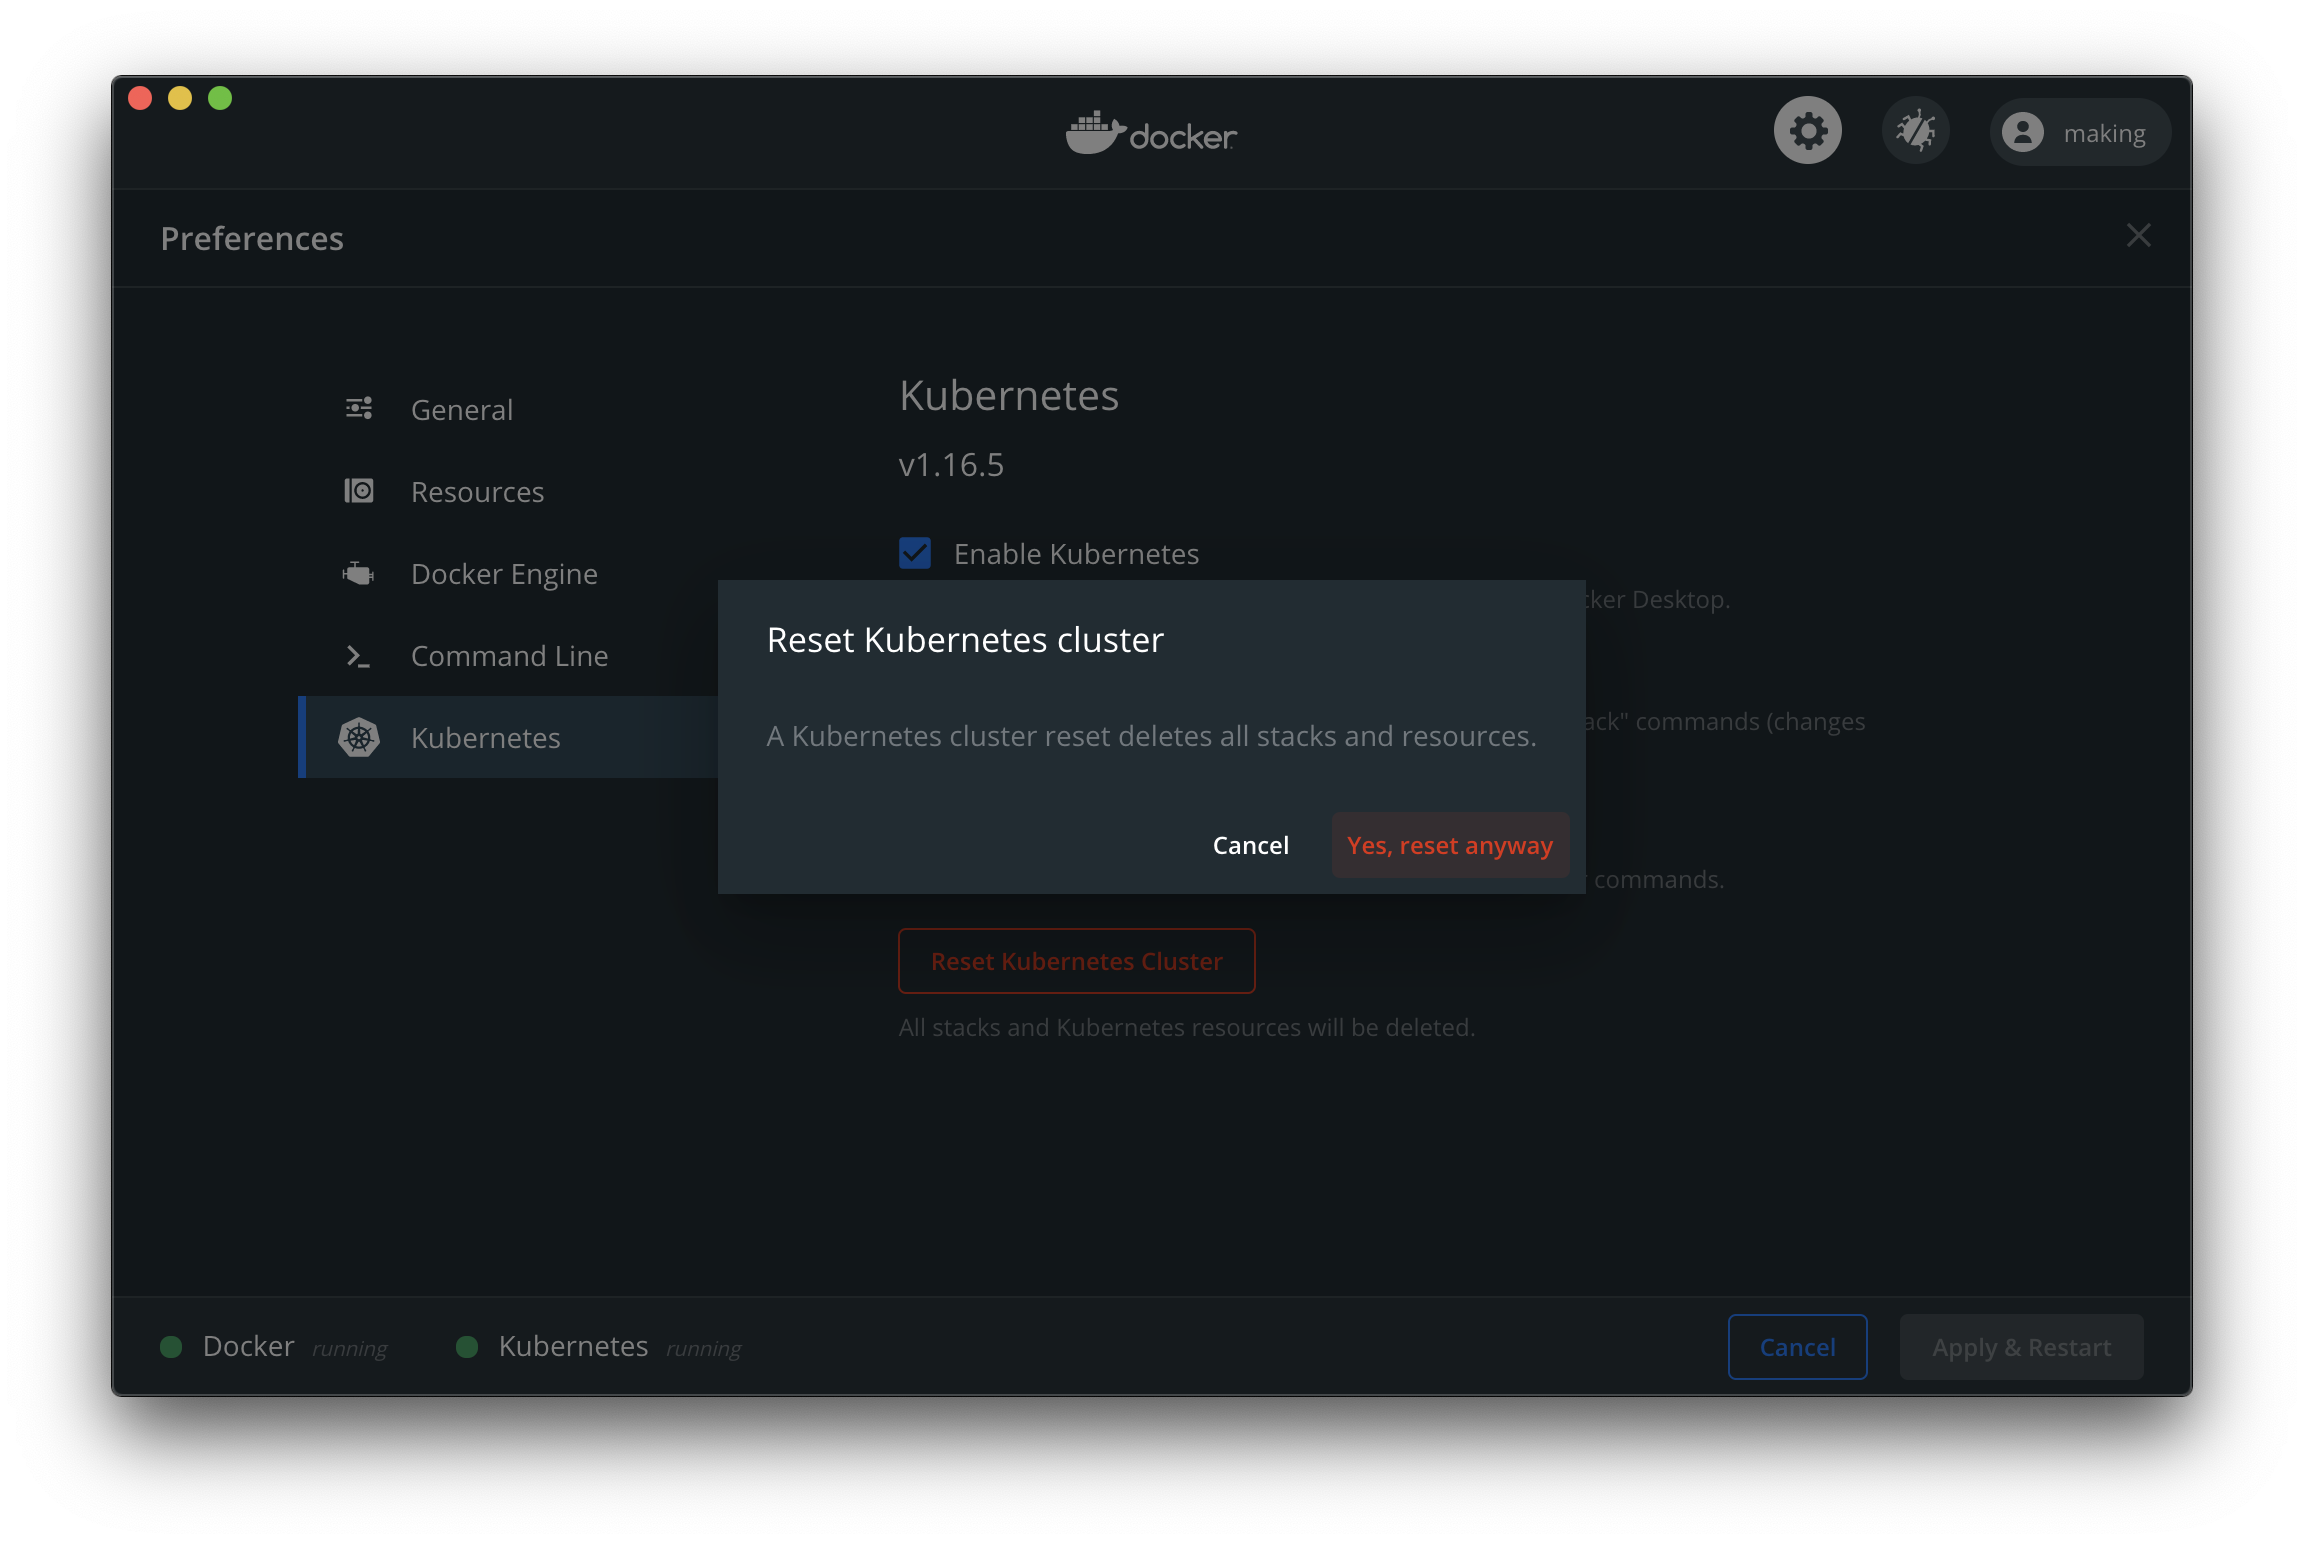
"Reset Kubernetes Cluster"をクリックして一旦環境をクリーンアップします。
[cert-manager](https://cert-manager.io)を使わない場合と使う場合、それぞれ紹介します。
Network LayerにはStableな[Istio](https://istio.io)を使用します。
`kubectl`の他に次のCLIをインストールしてください。
* [`istioctl`](https://istio.io/latest/docs/ops/diagnostic-tools/istioctl) (`brew install istioctl`)
* [`kn`](https://knative.dev/docs/install/install-kn) (`brew install knative/client/kn`)
* [`vegeta`](https://github.com/tsenart/vegeta) (`brew install vegeta`)
次のバージョンで動作確認しています。
```
$ kubectl version --client
Client Version: version.Info{Major:"1", Minor:"18", GitVersion:"v1.18.5", GitCommit:"e6503f8d8f769ace2f338794c914a96fc335df0f", GitTreeState:"clean", BuildDate:"2020-07-04T15:01:15Z", GoVersion:"go1.14.4", Compiler:"gc", Platform:"darwin/amd64"}
$ istioctl version --remote=false
1.7.2
$ kn version
Version: v0.17.0
Build Date: 2020-08-26 11:08:52
Git Revision: 8fcd25c3
Supported APIs:
* Serving
- serving.knative.dev/v1 (knative-serving v0.17.0)
* Eventing
- sources.knative.dev/v1alpha2 (knative-eventing v0.17.0)
- eventing.knative.dev/v1beta1 (knative-eventing v0.17.0)
$ vegeta -version
Version: 12.8.3
Commit:
Runtime: go1.14 darwin/amd64
Date: 2020-03-25T14:41:40Z
```
#### cert-managerを使わない場合
次のコマンドでKnativeとIstioをインストールします。
```
kubectl apply -f https://github.com/knative/serving/releases/download/v0.17.0/serving-crds.yaml
kubectl apply -f https://github.com/knative/serving/releases/download/v0.17.0/serving-core.yaml
istioctl install -y
kubectl apply -f https://github.com/knative/net-istio/releases/download/v0.17.0/release.yaml
```
Pod一覧は次のようになります。
```
$ kubectl get pod -A
NAMESPACE NAME READY STATUS RESTARTS AGE
docker compose-78f95d4f8c-w4wrz 1/1 Running 0 58m
docker compose-api-6ffb89dc58-lr9pk 1/1 Running 0 58m
istio-system istio-ingressgateway-855cb8cb9c-jjxt5 1/1 Running 0 24s
istio-system istiod-5f4bd68b45-bm8qn 1/1 Running 0 28s
knative-serving activator-68cbc9b5c7-mtkfg 1/1 Running 0 31s
knative-serving autoscaler-5cf649dbb-zbfkb 1/1 Running 0 31s
knative-serving controller-bc8d75cbc-ws68r 1/1 Running 0 31s
knative-serving istio-webhook-6dd89ff45d-247nl 1/1 Running 0 16s
knative-serving networking-istio-5d68bb7d56-r2t5x 1/1 Running 0 16s
knative-serving webhook-85758f4589-knj5q 1/1 Running 0 31s
kube-system coredns-5644d7b6d9-pxpsd 1/1 Running 0 59m
kube-system coredns-5644d7b6d9-wrgr7 1/1 Running 0 59m
kube-system etcd-docker-desktop 1/1 Running 0 58m
kube-system kube-apiserver-docker-desktop 1/1 Running 0 58m
kube-system kube-controller-manager-docker-desktop 1/1 Running 0 58m
kube-system kube-proxy-lpfkf 1/1 Running 0 59m
kube-system kube-scheduler-docker-desktop 1/1 Running 0 58m
kube-system storage-provisioner 1/1 Running 0 58m
kube-system vpnkit-controller 1/1 Running 0 58m
```
`istio-system` Namespaceに`istio-ingressgateway`という名前のServiceが作成されます。
Docker for Macの場合、`type: LoadBalancer`なServiceのExternal IPは`localhost`になります。
```
$ kubectl get -n istio-system service istio-ingressgateway
NAME TYPE CLUSTER-IP EXTERNAL-IP PORT(S) AGE
istio-ingressgateway LoadBalancer 10.99.131.155 localhost 15021:30391/TCP,80:30649/TCP,443:30572/TCP,15443:32059/TCP 15m
```
ここではカスタムドメインに`local.maki.lol`を使用します。`*.local.maki.lol`が`127.0.0.1`に解決されます。
```
kubectl patch configmap/config-domain -n knative-serving --type merge --patch '{"data":{"local.maki.lol":""}}'
```
`local.maki.lol`ではなく、`vcap.me`も利用可能です。
次に`kn`コマンドで作成したアプリケーションをデプロイします。
```
kn service create demo --image making/hello-world --env MANAGEMENT_ENDPOINTS_WEB_EXPOSURE_INCLUDE='*'
```
次のように出力されればOKです。
```
Creating service 'demo' in namespace 'default':
0.031s The Configuration is still working to reflect the latest desired specification.
0.087s The Route is still working to reflect the latest desired specification.
0.120s Configuration "demo" is waiting for a Revision to become ready.
15.434s ...
15.472s Ingress has not yet been reconciled.
15.591s Waiting for load balancer to be ready
15.741s Ready to serve.
Service 'demo' created to latest revision 'demo-mdysv-1' is available at URL:
http://demo.default.local.maki.lol
```
エンドポイントにアクセスして、"Hello World!"が返ることを確認します。
```
$ curl http://demo.default.local.maki.lol
Hello World!
```
1分ほどアクセスがなければPodは自動で削除されます。native-imageの場合、0インスタンスから1インスタンスの立ち上がりが速いです。
次のGifアニメでデモを示します。
Podが存在しない状態から2-3秒で画面が表示されます。
次にAuto Scalingを試します。[Vegeta](https://github.com/tsenart/vegeta)を使って負荷をかけます。
Podの立ち上がりを次のGifアニメでデモを示します。

```
$ echo "GET http://demo.default.local.maki.lol" | vegeta attack -duration=10s -rate=200 | tee results.bin | vegeta report
Requests [total, rate, throughput] 2000, 200.12, 200.04
Duration [total, attack, wait] 9.998s, 9.994s, 4.083ms
Latencies [min, mean, 50, 90, 95, 99, max] 2.494ms, 489.215ms, 3.959ms, 2.038s, 2.551s, 2.977s, 3.095s
Bytes In [total, mean] 24000, 12.00
Bytes Out [total, mean] 0, 0.00
Success [ratio] 100.00%
Status Codes [code:count] 200:2000
Error Set:
```
レスポンスは100%成功です。0 -> 1のスケールアウト時のレスポンスに約3秒(Max Latency)かかっていることがわかります。50パーセンタイル(中央値)は3.959msなので、立ち上がってしまえば十分レスポンスが速いことがわかります。
#### cert-managerを使う場合
cert-managerを使えば、デプロイしたサービスにLet's Encryptの証明書を自動で設定することができます。
cert-managerは[この記事](/entries/530)のようにインストールしてください。`letsencrypt`という名前の`ClusterIssuer`オブジェクトができている前提です。
"Reset Kubernetes Cluster"をクリックして一旦環境をクリーンアップした状態で始めます。
次のコマンドでKnativeとIstioをインストールします。
```
kubectl apply -f https://github.com/knative/serving/releases/download/v0.17.0/serving-crds.yaml
kubectl apply -f https://github.com/knative/serving/releases/download/v0.17.0/serving-core.yaml
istioctl install -y
kubectl apply -f https://github.com/knative/net-istio/releases/download/v0.17.0/release.yaml
```
Pod一覧は次のようになります。
```
$ kubectl get pod -A
NAMESPACE NAME READY STATUS RESTARTS AGE
cert-manager cert-manager-58f6cf4b79-xb4nr 1/1 Running 0 2m21s
cert-manager cert-manager-cainjector-cdb5d697c-6hdsc 1/1 Running 0 2m21s
cert-manager cert-manager-webhook-565d8c759b-9rtds 1/1 Running 0 2m21s
docker compose-78f95d4f8c-gcxtt 1/1 Running 0 3m51s
docker compose-api-6ffb89dc58-hqlcw 1/1 Running 0 3m51s
istio-system istio-ingressgateway-855cb8cb9c-4r7tg 1/1 Running 0 81s
istio-system istiod-5f4bd68b45-gvj9g 1/1 Running 0 87s
knative-serving activator-68cbc9b5c7-dttf8 1/1 Running 0 89s
knative-serving autoscaler-5cf649dbb-lhx7w 1/1 Running 0 89s
knative-serving controller-bc8d75cbc-z6cd9 1/1 Running 0 89s
knative-serving istio-webhook-6dd89ff45d-pnmdt 1/1 Running 0 74s
knative-serving networking-istio-5d68bb7d56-sdgcj 1/1 Running 0 74s
knative-serving webhook-85758f4589-ztvmd 1/1 Running 0 89s
kube-system coredns-5644d7b6d9-2sfgb 1/1 Running 0 5m8s
kube-system coredns-5644d7b6d9-nv7qm 1/1 Running 0 5m8s
kube-system etcd-docker-desktop 1/1 Running 0 3m53s
kube-system kube-apiserver-docker-desktop 1/1 Running 0 4m18s
kube-system kube-controller-manager-docker-desktop 1/1 Running 0 3m53s
kube-system kube-proxy-tswjt 1/1 Running 0 5m8s
kube-system kube-scheduler-docker-desktop 1/1 Running 0 4m11s
kube-system storage-provisioner 1/1 Running 0 3m52s
kube-system vpnkit-controller 1/1 Running 0 3m52s
```
`istio-system` Namespaceに`istio-ingressgateway`という名前のServiceが作成されます。
Docker for Macの場合、`type: LoadBalancer`なServiceのExternal IPは`localhost`になります。
```
$ kubectl get -n istio-system service istio-ingressgateway
NAME TYPE CLUSTER-IP EXTERNAL-IP PORT(S) AGE
istio-ingressgateway LoadBalancer 10.99.131.155 localhost 15021:30391/TCP,80:30649/TCP,443:30572/TCP,15443:32059/TCP 15m
```
ここではカスタムドメインに`local.maki.lol`を使用します。`*.local.maki.lol`が`127.0.0.1`に解決されます。
このカスタムドメインでLet's Encryptの証明書を発行できるのは、ドメイン所有者の筆者だけなので、この手順を試す場合は独自ドメインに変更してください。
```
kubectl patch configmap/config-domain -n knative-serving --type merge --patch '{"data":{"local.maki.lol":""}}'
```
cert-manager連携をインストールします。
```
kubectl apply -f https://github.com/knative/net-certmanager/releases/download/v0.17.0/release.yaml
kubectl apply -f https://github.com/knative/serving/releases/download/v0.17.0/serving-nscert.yaml
kubectl patch configmap/config-certmanager -n knative-serving --type merge --patch '{"data":{"issuerRef":"kind: ClusterIssuer\nname: letsencrypt"}}'
kubectl patch configmap/config-network -n knative-serving --type merge --patch '{"data":{"autoTLS": "Enabled", "httpProtocol": "Redirected"}}'
```
次に`kn`コマンドで作成したアプリケーションをデプロイします。
```
kn service create demo --image making/hello-world --env MANAGEMENT_ENDPOINTS_WEB_EXPOSURE_INCLUDE='*'
```
次のように出力されればOKです。
```
Creating service 'demo' in namespace 'default':
0.026s The Configuration is still working to reflect the latest desired specification.
0.055s The Route is still working to reflect the latest desired specification.
0.095s Configuration "demo" is waiting for a Revision to become ready.
9.023s ...
9.071s Ingress has not yet been reconciled.
9.161s Certificate default.local.maki.lol is not ready.
68.206s Ingress has not yet been reconciled.
68.281s Ready to serve.
Service 'demo' created to latest revision 'demo-xjqks-1' is available at URL:
https://demo.default.local.maki.lol
```
エンドポイントにアクセスして、"Hello World!"が返ることを確認します。
```
$ curl https://demo.default.local.maki.lol
Hello World!
```
0インスタンスから1インスタンスの立ち上がりを次のGifアニメでデモを示します。
Podが存在しない状態から2-3秒で画面が表示されます。
次にAuto Scalingを試します。Podの立ち上がりを次のGifアニメでデモを示します。
```
$ echo "GET https://demo.default.local.maki.lol" | vegeta attack -duration=10s -rate=200 | tee results.bin | vegeta report
Requests [total, rate, throughput] 2000, 200.10, 200.03
Duration [total, attack, wait] 9.999s, 9.995s, 3.811ms
Latencies [min, mean, 50, 90, 95, 99, max] 2.523ms, 610.734ms, 4.93ms, 2.42s, 2.786s, 3.318s, 3.436s
Bytes In [total, mean] 24000, 12.00
Bytes Out [total, mean] 0, 0.00
Success [ratio] 100.00%
Status Codes [code:count] 200:2000
Error Set:
```
レスポンスは100%成功です。0 -> 1のスケールアウト時のレスポンスに約3.5秒(Max Latency)かかっていることがわかります。50パーセンタイル(中央値)は4.93msなので、立ち上がってしまえば十分レスポンスが速いことがわかります。
### ExternalDNSが設定されている場合
独自ドメインを使っていて、[ExternalDNS](https://github.com/kubernetes-sigs/external-dns)がインストールされている場合は、次のアノテーションを設定すればIsto Ingres GatewayへのAレコードを自動でDNSに登録できます。
独自ドメインが`kn.maki.lol`の場合、
```
kubectl annotate -n istio-system service istio-ingressgateway "external-dns.alpha.kubernetes.io/hostname=*.kn.maki.lol."
kubectl annotate -n istio-system service istio-ingressgateway "external-dns.alpha.kubernetes.io/ttl=60"
```
---
Cloud Native BuildpacksでSpring BootアプリのGraalVM native imageを作成しKnativeにデプロイしました。
Native ImageはKnativeのようなプラットフォームと相性が良いです。
Native Image化の詳細とロードマップは[SpringOne](https://springone.io)の"The Path Towards Spring Boot Native Applications"というセッションで説明されています。こちらも参照してください。
* 動画: https://springone.io/post-event/sessions/the-path-towards-spring-boot-native-applications
* スライド: https://www.slideshare.net/Pivotal/the-path-towards-spring-boot-native-applications