---
title: Spring IntegrationでPollingベースのOutboxパターンを実装する
tags: ["Spring Boot", "Spring Integration", "Java", "Outbox"]
categories: ["Programming", "Java", "org", "springframework", "integration", "jdbc"]
date: 2023-05-29T09:36:46Z
updated: 2023-06-01T01:59:50Z
---
この記事ではSpring IntegrationでPollingベースのOutboxパターンを実装する方法を紹介します。
**目次**
### Outboxパターンとは
[Outboxパターン](https://microservices.io/patterns/data/transactional-outbox.html) (正確には "Transactional outbox" )はChris Richardsonがまとめた[マイクロサービスパターン](https://microservices.io/patterns/index.html)の一つです。
> 以下の書籍で詳しく説明されています
> [](https://www.amazon.co.jp/dp/4295008583?&linkCode=ll1&tag=ikam-22&linkId=fc242fe990b15216c9bbc30f6258f62e&language=ja_JP&ref_=as_li_ss_tl)
> [マイクロサービスパターン 実践的システムデザインのためのコード解説](https://www.amazon.co.jp/dp/4295008583?&linkCode=ll1&tag=ikam-22&linkId=fc242fe990b15216c9bbc30f6258f62e&language=ja_JP&ref_=as_li_ss_tl)
ある処理からデータベースの更新**と**Message Broker(RabbitMQ, Kafkaなど)へのメッセージ送信を行う場合に、"Atomicity"(原子性)を保つための実装パターンです。2 Phase Commitを行わない前提です。
Outboxパターンを使わずにデータベースの更新とMessage Brokerへのメッセージ送信を行うとどうなるでしょうか。以下の2つのパターンが考えられます。
1. データベースのトランザクションをコミットしてからMessage Brokerへメッセージ送信
1. Message Brokerへメッセージ送信してからデータベースのトランザクションをコミット
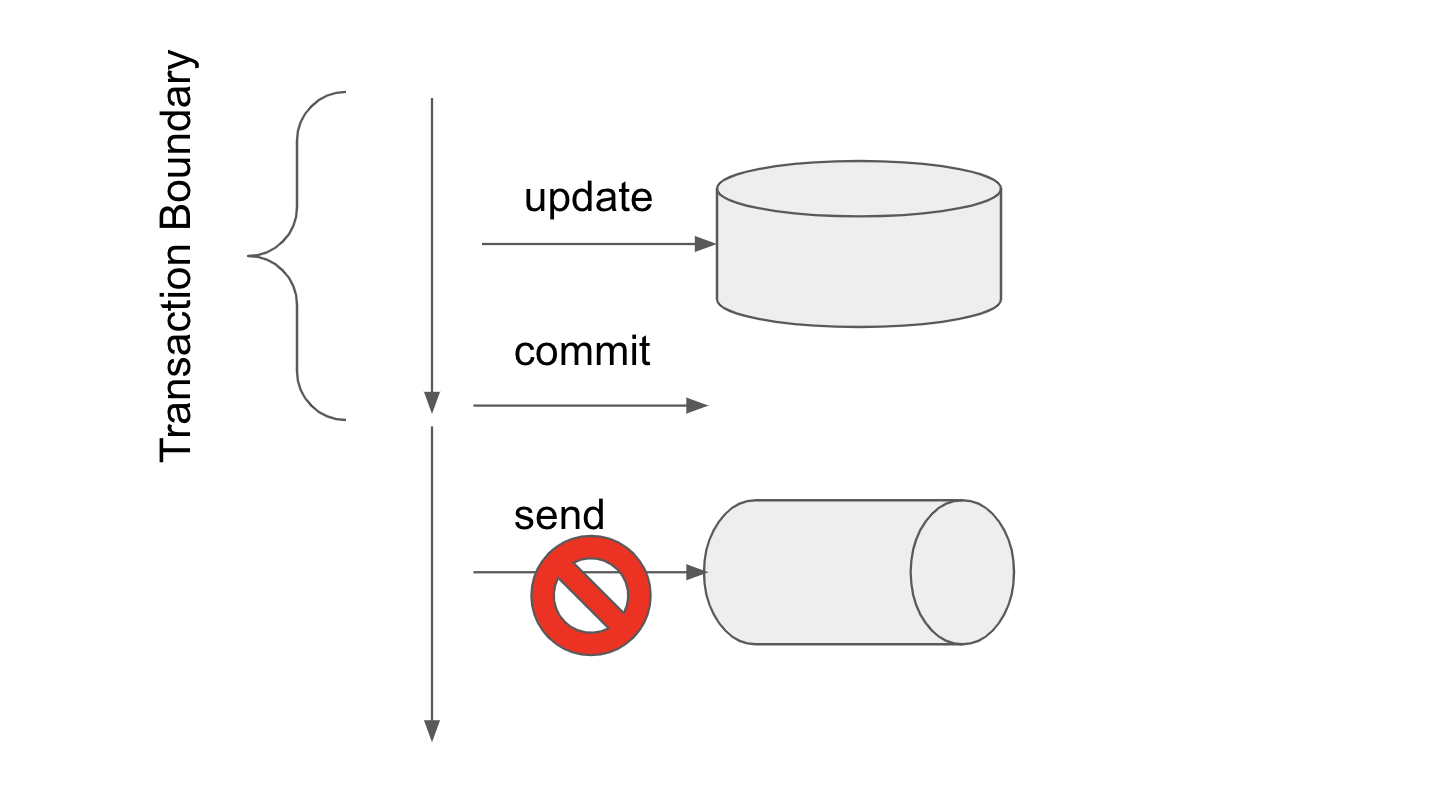
先にデータベースのコミットを行う場合、次の図のように、コミット後にメッセージの送信が失敗すると、データベースの更新だけが確定されてしまいます。
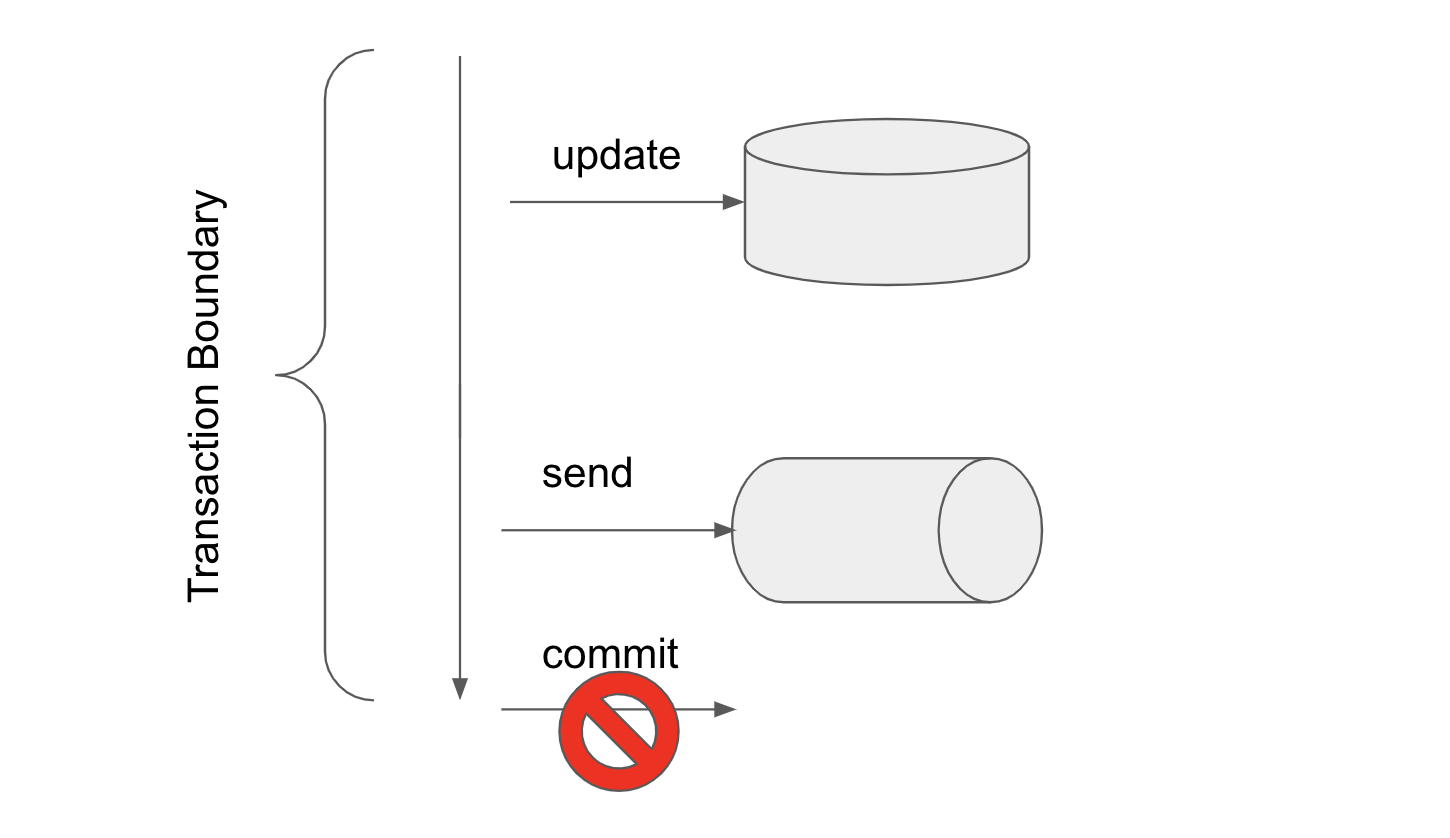
 また、メッセージを送信してからデータベースのトランザクションを行う場合、次の図のように、メッセージ送信後にトランザクションのコミットに失敗すると、メッセージだけが送信されてしまいます。
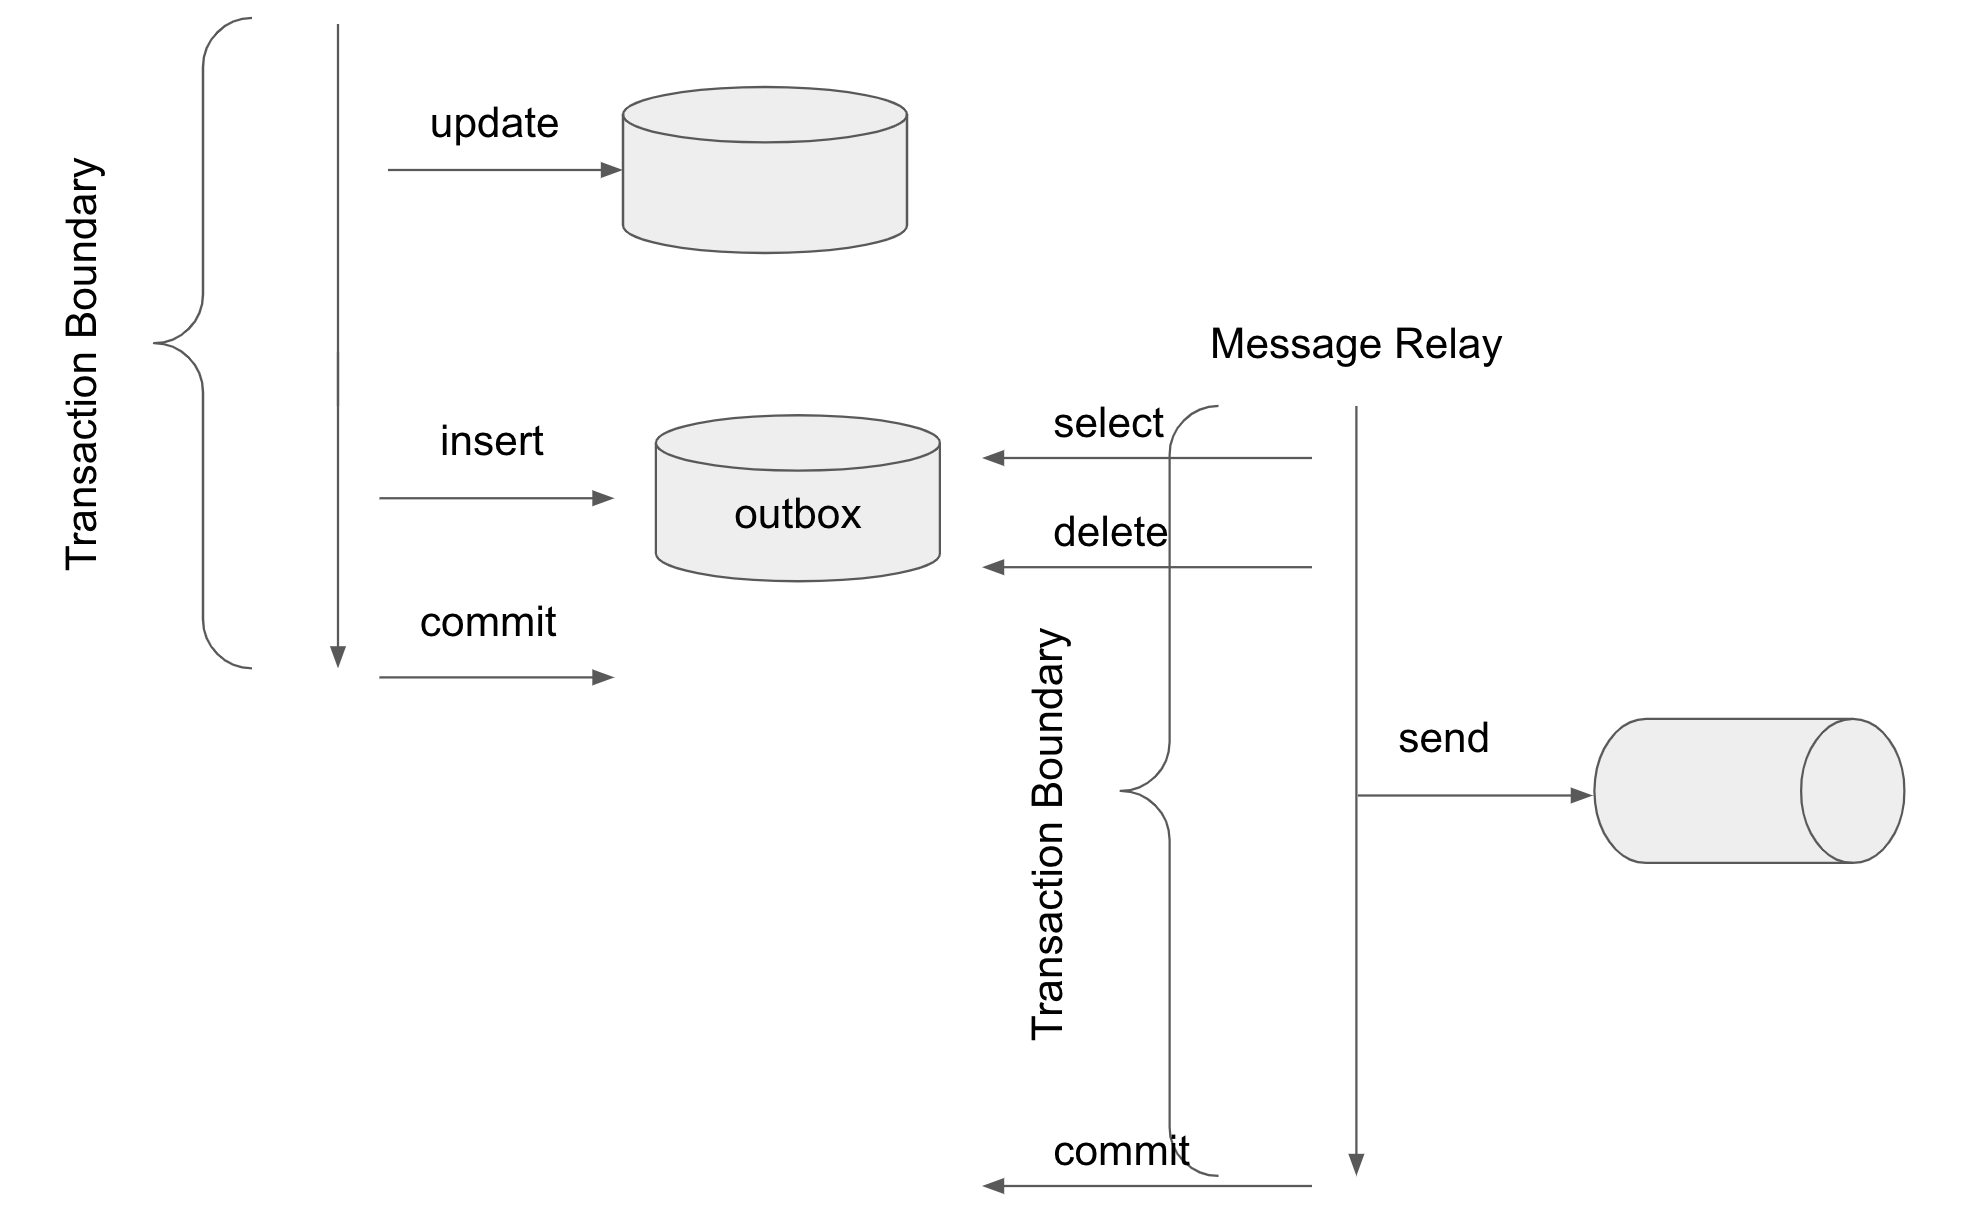
 このような問題を解決するために、データベースを更新したならメッセージも必ず(少なくとも)一回送信されることを保証できるよう次の図のように実装するのがOutboxパターンです。
 Outboxパターンではデータベース書き込み時にはメッセージの送信は行わず、代わりに同じデーターベース内の"outbox"と呼ばれるテーブルにメッセージ送信したい内容をINSERTします。
outboxテーブルへの書き込みは主処理と同一トランザクション内で行われるので、原子性は担保されます。
outboxに書き込まれた情報は"Message Relay"と呼ばれる処理で読み取られ、Message Brokerへメッセージ送信されます。
読み取った情報は削除されます。メッセージ送信後にトランザクションがコミットされれば、outboxにデータが書き込まれれば、少なくとも一回はメッセージを送信できることを保証できます。
トランザクションのコミットに失敗する場合は、outboxにデータが残るため、再びMessage Relayによる処理が行われて、メッセージが再送信される可能性があります。
したがって、メッセージ受信側は1回以上メッセージを受信することを念頭に冪等性を意識する必要があります。
outboxテーブルからメッセージを読み取る方法でOutboxパターンのアークテクチャーが変わります。
[マイクロサービスパターン](https://microservices.io/patterns/data/transactional-outbox.html)では読み取り方法として
* [Transaction logベース (Transaction log tailing)](https://microservices.io/patterns/data/transaction-log-tailing.html)
* [Pollingベース (Polling publisher)](https://microservices.io/patterns/data/polling-publisher.html)
の2種類が説明されています。
Transaction logベースの手法は、PostgreSQLのWAL (Write Ahead Log)やMySQLのbinlog、あるいはAWS DynamoDB table streamsなどを利用して、outboxの変更をデータベース側で検知します。
この手法を使った有名なライブラリとして[Debezium](https://debezium.io/)がよく知られています。
この手法は、後述のPollingベースの手法よりも良いパフォーマンスが期待できます。一方で、データベース製品毎に異なる特別な設定が必要(あるいは特別な機能を持つデータベースが必要)だったり、Debeziumのようなライブラリ導入のコストがかかります。
Pollingベースの手法は、次の図のようにシンプルにoutboxテーブルを定期的にselect (for update)して新しいレコードが追加されていないか確認します。処理済みのデータはdeleteします。
SQLだけで実装できるのでデータベースの特別な設定が不要で、シンプルに実装できます。一方、定期的にoutboxテーブルに対してselectを実行するため、データベースへの負荷が大きく、パフォーマンスに影響を及ぼす可能性があります。
Outboxパターンではデータベース書き込み時にはメッセージの送信は行わず、代わりに同じデーターベース内の"outbox"と呼ばれるテーブルにメッセージ送信したい内容をINSERTします。
outboxテーブルへの書き込みは主処理と同一トランザクション内で行われるので、原子性は担保されます。
outboxに書き込まれた情報は"Message Relay"と呼ばれる処理で読み取られ、Message Brokerへメッセージ送信されます。
読み取った情報は削除されます。メッセージ送信後にトランザクションがコミットされれば、outboxにデータが書き込まれれば、少なくとも一回はメッセージを送信できることを保証できます。
トランザクションのコミットに失敗する場合は、outboxにデータが残るため、再びMessage Relayによる処理が行われて、メッセージが再送信される可能性があります。
したがって、メッセージ受信側は1回以上メッセージを受信することを念頭に冪等性を意識する必要があります。
outboxテーブルからメッセージを読み取る方法でOutboxパターンのアークテクチャーが変わります。
[マイクロサービスパターン](https://microservices.io/patterns/data/transactional-outbox.html)では読み取り方法として
* [Transaction logベース (Transaction log tailing)](https://microservices.io/patterns/data/transaction-log-tailing.html)
* [Pollingベース (Polling publisher)](https://microservices.io/patterns/data/polling-publisher.html)
の2種類が説明されています。
Transaction logベースの手法は、PostgreSQLのWAL (Write Ahead Log)やMySQLのbinlog、あるいはAWS DynamoDB table streamsなどを利用して、outboxの変更をデータベース側で検知します。
この手法を使った有名なライブラリとして[Debezium](https://debezium.io/)がよく知られています。
この手法は、後述のPollingベースの手法よりも良いパフォーマンスが期待できます。一方で、データベース製品毎に異なる特別な設定が必要(あるいは特別な機能を持つデータベースが必要)だったり、Debeziumのようなライブラリ導入のコストがかかります。
Pollingベースの手法は、次の図のようにシンプルにoutboxテーブルを定期的にselect (for update)して新しいレコードが追加されていないか確認します。処理済みのデータはdeleteします。
SQLだけで実装できるのでデータベースの特別な設定が不要で、シンプルに実装できます。一方、定期的にoutboxテーブルに対してselectを実行するため、データベースへの負荷が大きく、パフォーマンスに影響を及ぼす可能性があります。
 本記事では後者のPollingベースによるOutboxパターンを使用します。
### Spring IntegrationによるOutboxパターン
Spring Integrationのリードである[Artem Bilan](https://spring.io/team/artembilan)によるBlog Post "[Introducing Microservices Patterns with Spring Integration](https://spring.io/blog/2023/01/25/introducing-microservices-patterns-with-spring-integration)" にて、Spring IntegrationでOutboxパターンを実装するサンプルが紹介されました。
サンプルのソースコードは以下です。Spring IntegrationだけでシンプルにOutboxパターンが実装できています。
本記事では後者のPollingベースによるOutboxパターンを使用します。
### Spring IntegrationによるOutboxパターン
Spring Integrationのリードである[Artem Bilan](https://spring.io/team/artembilan)によるBlog Post "[Introducing Microservices Patterns with Spring Integration](https://spring.io/blog/2023/01/25/introducing-microservices-patterns-with-spring-integration)" にて、Spring IntegrationでOutboxパターンを実装するサンプルが紹介されました。
サンプルのソースコードは以下です。Spring IntegrationだけでシンプルにOutboxパターンが実装できています。
https://github.com/artembilan/microservices-patterns-spring-integration/tree/main/outbox
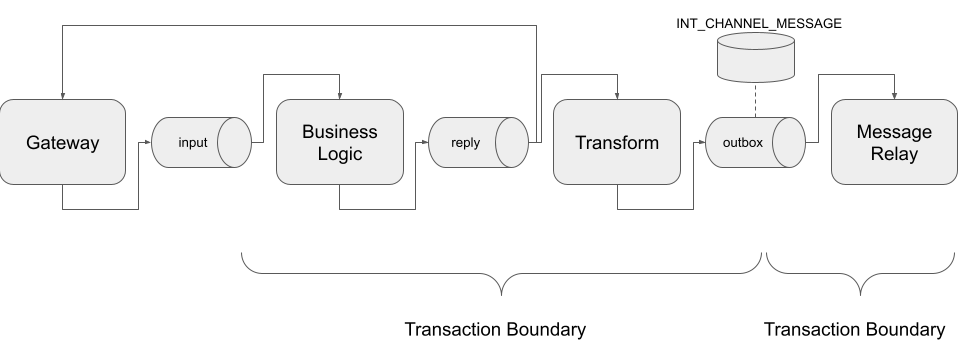
Spring Integrationはメッセージングの抽象化フレームワークです。EndpointをMessageChannelで繋いでフローを定義し、Messageを送受信できます。
InboundとなるEndpointから送られたMessageがMessageChannelへ送られ、Endpointで処理され、またMessageChanelに渡され、OutboundのEndpointで送信されます。
Spring Integrationで次のようなフローを定義すればOutboxパターンを実装できます。図の四角がEndpoint、筒がMessageChannelです(上の図では筒がMessage Brokerを表現していたので紛らわしいかもしれません...)。

ここでポイントとなるのが"outbox"と名付けられたMessageChannelです。
[MessageChannel](https://docs.spring.io/spring-integration/docs/current/reference/html/core.html#channel)はデフォルトではインメモリでMessageを伝送しますが、[JdbcChannelMessageStore](https://docs.spring.io/spring-integration/docs/current/reference/html/jdbc.html#jdbc-message-store-channels)を使ってMessageChannelのバックエンドにJDBCを使用することもできます。
このMessageChannelはPollableな[QueueChannel](https://docs.spring.io/spring-integration/docs/current/reference/html/core.html#channel-implementations-queuechannel)実装です。
このMessageChannelがまさに"outbox"テーブルとして利用可能です。実体としては[`INT_CHANNEL_MESSAGE`](https://github.com/spring-projects/spring-integration/blob/main/spring-integration-jdbc/src/main/resources/org/springframework/integration/jdbc/schema-postgresql.sql#L39-L48)テーブルが[マイクロサービスパターン](https://microservices.io/patterns/data/transactional-outbox.html)"outbox"テーブルに相当します。
Spring Integrationを使用すれば、Outboxパターンにおけるoutboxへのメッセージの書き込みとoutboxからのメッセージのpollingはMessageChannelで隠蔽されており、実装する必要がありません。
あとは下の図のようにビジネスロジックとoutboxへの書き込み、および、outboxからのメッセージの取り出しとMessage Brokerへメッセージ送信処理(Message Relay)をそれぞれ同一トランザクション内で行われるようにSpring Integrationのフローを定義すればOutboxパターンが実装できます。
### サンプルアプリの実装
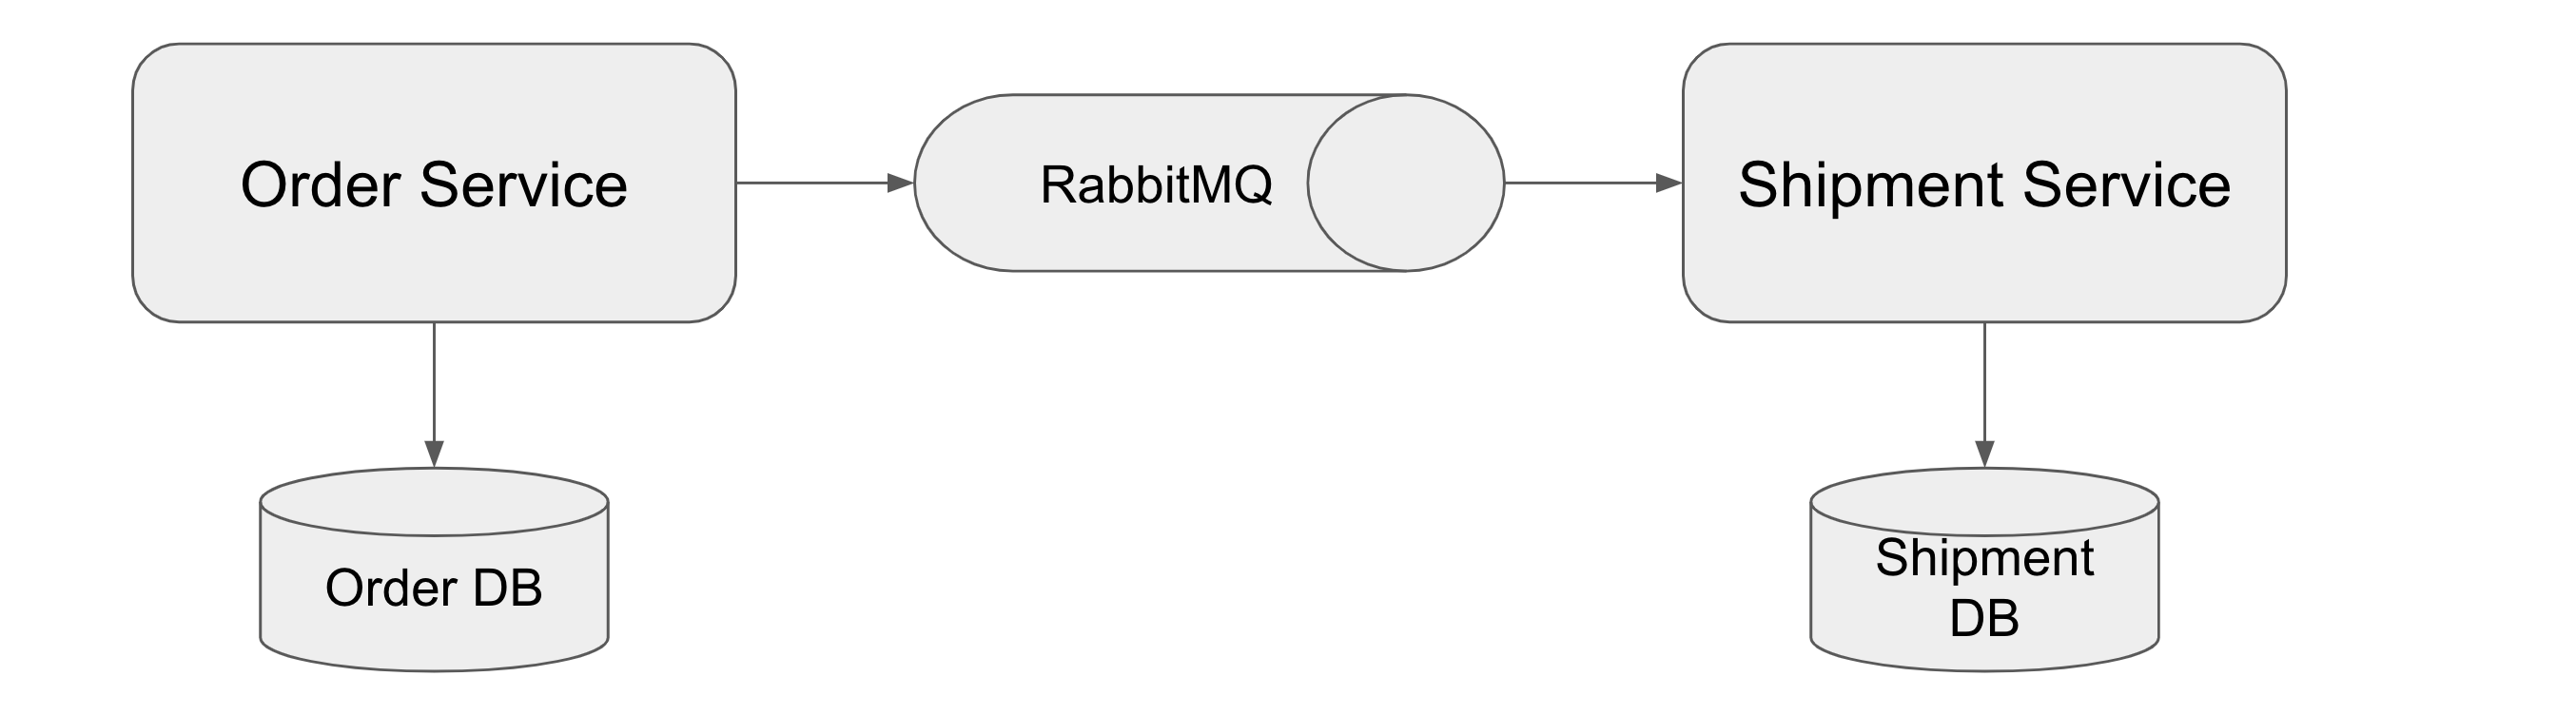
上記のフローを利用したサンプルアプリを実装してみました。下の図のようにOrder Serviceはメッセージブローカーを経由してShipment Serviceへメッセージを送信します。それと同時にOrder DBへの更新も行います。この二つの更新をOutboxパターンで実装合います。
今回はメッセージブローカーに、セットアップが容易なRabbitMQを利用しました。
> ℹ️ 後述するように、今回のデモのようなケースではパーティションニングに対応したメッセージブローカーを使用した方が適切で、[RabbitMQ Streams](https://www.rabbitmq.com/streams.html)の[Super Streams](https://www.rabbitmq.com/streams.html#super-streams)(あるいはKafka)を使った方が良かったのですが、
> 記事執筆時点ではspring-rabbitmq-streamはObservailityが[未対応](https://github.com/spring-projects/spring-amqp/issues/2467)だったので、Outboxパターンの実装にフォーカスできるように普通のRabbitMQを使用しました。
 サンプルコードは https://github.com/making/outbox-pattern-demo です。Debeziumの[outboxサンプル](https://github.com/debezium/debezium-examples/tree/main/outbox)も参考にしました。(Outboxパターンの実装がメインであるため、Order ServiceとShipment Service自体の実装はダミーです。)
フローの入り口となるGatewayとして、次のインタフェースを定義します。注文処理を行う`placeOrder`メソッドと注文をキャンセルする`cancelOrder`メソッドがあります。
`placeOrder`は双方向のメッセージングで入力が`order.create`チャネルに送られ、出力が`order.create.reply`から返ります。`cancelOrder`は一方向のメッセージングで、入力が`order.cancel`チャネルに送られ、出力はありません。
```java
@MessagingGateway
public interface OrderGateway {
@Gateway(requestChannel = "order.create", replyChannel = "order.create.reply")
Order placeOrder(Order order);
@Gateway(requestChannel = "order.cancel")
void cancelOrder(Long orderId);
}
```
Gatewayへの入力は次のようにシンプルに`@RestController`で実装します。
```java
@RestController
public class OrderController {
private final OrderGateway orderGateway;
private final Clock clock;
private final Logger log = LoggerFactory.getLogger(OrderController.class);
public OrderController(OrderGateway orderGateway, Clock clock) {
this.orderGateway = orderGateway;
this.clock = clock;
}
@PostMapping(path = "/orders")
public Order placeOrder(@RequestBody OrderRequest orderRequest) {
final Order newOrder = orderRequest.newOrder(this.clock);
final Order order = this.orderGateway.placeOrder(newOrder);
log.info("Created {}", order);
return order;
}
@DeleteMapping(path = "/orders/{orderId}")
public void cancelOrder(@PathVariable Long orderId) {
this.orderGateway.cancelOrder(orderId);
log.info("Cancelled {}", orderId);
}
}
```
OrderをOrder DBに保存したり、更新したりする処理は次の`OrderService`と`OrderRepository`で行います。
```java
@Service
@Transactional
@Observed
public class OrderService {
private final OrderRepository orderRepository;
public OrderService(OrderRepository orderRepository) {
this.orderRepository = orderRepository;
}
public Order create(Order order) {
return this.orderRepository.save(order);
}
public int cancel(Long orderId) {
return this.orderRepository.updateStatus(orderId, OrderStatus.CANCELLED);
}
}
```
```java
public interface OrderRepository extends ListCrudRepository {
@Modifying
@Query("UPDATE Order SET status=:status WHERE orderId=:orderId AND status <> :status")
int updateStatus(Long orderId, OrderStatus status);
}
```
`order.create`チャネルからの`outbox`までのメッセージングのフローを次のように定義します。
```java
@Bean
public IntegrationFlow orderCreateFlow(OrderService orderService) {
return IntegrationFlow.from("order.create")
.routeToRecipients(routes -> routes.transactional() // (1)
.recipientFlow(f -> f.handle((order, headers) -> orderService.create(order)) // (2)
.channel(c -> c.publishSubscribe("order.create.reply")) // (3)
.transform(OrderEvents.Created::from) // (4)
.enrichHeaders(h -> h.header("eventType", "order_created")) // (5)
.channel("outbox"))) // (6)
.get();
}
```
| 番号 | 説明 |
| -- | -- |
| (1) | [Artemのサンプル](https://github.com/artembilan/microservices-patterns-spring-integration/tree/main/outbox)のように[Recipient List Router](https://docs.spring.io/spring-integration/docs/current/reference/html/message-routing.html#router-implementations-recipientlistrouter)のトランザクション処理を使用して、`order.create`チャネルからメッセージを受信して、`outbox`チャネルに送信するまでの処理が同一トランザクション上で行われるようになります。 |
| (2) | `OrderService#create` を呼び出すだけのMesageHandlerを作成します。 |
| (3) | (2)のEndpointの出力チャネルからのメッセージをGatewayのreplyとフローの次のEndpoint(`transform`)へ同時に送れるようにPub/Sub型のMessageChannelを定義し、`order.create.reply`と名付けます。デフォルトのMessageChannel実装である`DirectChannel`は同時に1つのSubscriberしかメッセージが送信されない(round-robbinされる)ので、複数のSubscriberに対応した`PublishSubscribeChannel`を使用します。 |
| (4) | (2)のEndpointの結果のメッセージのPayloadを`Order`インスタンスからShipment Serviceに送る`OrderEvents.Created`インスタンスに変換します。 |
| (5) | eventTypeをヘッダーに設定します。 |
| (6) | (5)のEndpointの出力チャネルを`outbox`(後に定義)にします。 |
`outbox`チャネルからAMQP(RabbitMQ)へ送信するまでのフローを次のように定義します。このフローがOutboxパターンにおける、Message Relayに相当します。
```java
@Bean
public IntegrationFlow messageRelayFlow(MessageHandler amqpHandler) {
return IntegrationFlow.from("outbox")
.handle(amqpHandler, e -> e.poller(poller -> poller.fixedDelay(3_000, 3_000).transactional())) // (1)
.get();
}
@Bean
public MessageHandler amqpHandler(AmqpTemplate amqpTemplate, ObjectMapper objectMapper) {
final MessageHandler messageHandler = Amqp.outboundAdapter(amqpTemplate)
.exchangeName("order")
.routingKey("event")
.getObject(); // (2)
final Logger log = LoggerFactory.getLogger("amqpHandler");
return message -> { // (3)
final JsonNode payload = objectMapper.convertValue(message.getPayload(), JsonNode.class);
log.info("Send {}", payload);
messageHandler.handleMessage(MessageBuilder.createMessage(payload, message.getHeaders()));
};
}
```
| 番号 | 説明 |
| -- | -- |
| (1) | `outbox`チャネルからメッセージを受信して`amqpHandler`で処理します。`outbox`からの受信はPollingで行い、Polling間隔は3000msです。`transactional()`を設定することで、`outbox`からのメッセージのselectおよびdeleteとMeeageHandlerの処理は同一トランザクション上で行われます。 |
| (2) | AMQP(RabbitMQ)へメッセージを送信するMessageHandelerを定義します。 |
| (3) | (2)のMessageHandelerに対して、受信側が扱いやすいように`JsonNode`型にPayloadを変換する処理をラップして返します。 |
[JdbcChannelMessageStore](https://docs.spring.io/spring-integration/docs/current/reference/html/jdbc.html#jdbc-message-store-channels)を使った`outbox`チャネルの定義は次のとおりです。
```java
@Bean
public JdbcChannelMessageStore jdbcChannelMessageStore(DataSource dataSource) {
final JdbcChannelMessageStore jdbcChannelMessageStore = new JdbcChannelMessageStore(dataSource);
jdbcChannelMessageStore.setChannelMessageStoreQueryProvider(new PostgresChannelMessageStoreQueryProvider());
return jdbcChannelMessageStore;
}
@Bean
public QueueChannel outbox(JdbcChannelMessageStore jdbcChannelMessageStore) {
return MessageChannels.queue(jdbcChannelMessageStore, "outbox").getObject();
}
```
Similarly, we can define the flow of messaging from the `order.cancel` channel to `outbox` as follows: This flow corresponds to the Message Relay in the Outbox pattern.
```java
@Bean
public IntegrationFlow orderCancelFlow(OrderService orderService, Clock clock) {
return IntegrationFlow.from("order.cancel")
.routeToRecipients(
routes -> routes.transactional().recipientFlow(f -> f.handle((orderId, headers) -> {
final int updated = orderService.cancel(orderId);
return updated > 0 ? orderId : null; // (1)
}).transform(
orderId -> new OrderEvents.Cancelled(orderId,
clock.instant().atOffset(ZoneOffset.UTC))) // (2)
.enrichHeaders(h -> h.header("eventType", "order_cancelled"))
.channel("outbox")))
.get();
}
```
| 番号 | 説明 |
| -- | -- |
| (1) | `OrderService#cancel` を呼び出すのMesageHandlerを作成します。更新件数が0、つまり更新対象が存在しない場合はメッセージを破棄します。 |
| (2) | (2)のEndpointの結果のメッセージのPayloadを`Order`インスタンスからShipment Serviceに送る`OrderEvents.Cancelled`インスタンスに変換します。 |
ここまでのフローを図示すると、次の図のようになります(`enrichHeaders`のEndpointは省略してあります)。

受信側は次のようなコードになります。
```java
@Component
@Observed
public class OrderListener {
private final ShipmentService shipmentService;
private final ObjectMapper objectMapper;
private final Logger log = LoggerFactory.getLogger(OrderListener.class);
public OrderListener(ShipmentService shipmentService, ObjectMapper objectMapper) {
this.shipmentService = shipmentService;
this.objectMapper = objectMapper;
}
@RabbitListener(queues = "order.event")
public void handleOrderEvent(JsonNode payload, @Header("eventType") String eventType) {
switch (eventType) {
case "order_created" -> {
final OrderEvents.Created event = this.objectMapper.convertValue(payload, OrderEvents.Created.class);
this.shipmentService.orderCreated(event);
}
case "order_cancelled" -> {
final OrderEvents.Cancelled event = this.objectMapper.convertValue(payload,
OrderEvents.Cancelled.class);
this.shipmentService.orderCancelled(event);
}
default -> log.warn("Unknown Event Type: {}", eventType);
}
}
}
```
### サンプルアプリの起動
ではサンプルアプリを起動して、OrderControllerにリクエストを送ってみましょう。Java 17+とDockerおよびDocker Composeが必要です。
```
git clone https://github.com/making/outbox-pattern-demo
cd outbox-pattern-demo
```
まずは次のコマンドでOrder Serviceを起動します。
```
./mvnw clean spring-boot:run -f order-service -Dspring-boot.run.arguments=--spring.docker.compose.file=$(pwd)/docker-compose.yaml
```
Spring Boot 3.1で導入された[Docker Composeサポート](https://docs.spring.io/spring-boot/docs/current/reference/html/features.html#features.docker-compose)を使用しているので、自動でDocker Composeが起動し、PostgresSQL * 2、RabbitMQ、Zipkinが立ち上がります。
アプリが起動すると、3秒ごとに次のようなDEBUGログが出力されます。これはMessage Relay側で"outbox"テーブルをポーリングする際のSQLログです。`INT_CHANNEL_MESSAGE`テーブルに対して`SELECT ... FOR UPDATE`が実行されていることがわかります。
```
2023-05-30T19:39:34.648+09:00 DEBUG [order-service,,] 15244 --- [ scheduling-1] o.s.orm.jpa.JpaTransactionManager : Creating new transaction with name [org.springframework.integration.endpoint.AbstractPollingEndpoint$$Lambda$1931/0x0000000801799a30.call]: PROPAGATION_REQUIRED,ISOLATION_DEFAULT
2023-05-30T19:39:34.649+09:00 DEBUG [order-service,,] 15244 --- [ scheduling-1] o.s.orm.jpa.JpaTransactionManager : Opened new EntityManager [SessionImpl(665386702)] for JPA transaction
2023-05-30T19:39:34.651+09:00 DEBUG [order-service,6475d266281a7d296e14099b15056603,6e14099b15056603] 15244 --- [ scheduling-1] o.s.orm.jpa.JpaTransactionManager : Exposing JPA transaction as JDBC [org.springframework.orm.jpa.vendor.HibernateJpaDialect$HibernateConnectionHandle@719fa2ea]
2023-05-30T19:39:34.652+09:00 DEBUG [order-service,6475d266281a7d296e14099b15056603,6e14099b15056603] 15244 --- [ scheduling-1] o.s.jdbc.core.JdbcTemplate : Executing prepared SQL query
2023-05-30T19:39:34.652+09:00 DEBUG [order-service,6475d266281a7d296e14099b15056603,6e14099b15056603] 15244 --- [ scheduling-1] o.s.jdbc.core.JdbcTemplate : Executing prepared SQL statement [SELECT INT_CHANNEL_MESSAGE.MESSAGE_ID, INT_CHANNEL_MESSAGE.MESSAGE_BYTES from INT_CHANNEL_MESSAGE where INT_CHANNEL_MESSAGE.GROUP_KEY = ? and INT_CHANNEL_MESSAGE.REGION = ? order by CREATED_DATE, MESSAGE_SEQUENCE LIMIT 1 FOR UPDATE]
2023-05-30T19:39:35.655+09:00 DEBUG [order-service,6475d266281a7d296e14099b15056603,6e14099b15056603] 15244 --- [ scheduling-1] o.s.jdbc.core.JdbcTemplate : Executing prepared SQL query
2023-05-30T19:39:35.655+09:00 DEBUG [order-service,6475d266281a7d296e14099b15056603,6e14099b15056603] 15244 --- [ scheduling-1] o.s.jdbc.core.JdbcTemplate : Executing prepared SQL statement [SELECT INT_CHANNEL_MESSAGE.MESSAGE_ID, INT_CHANNEL_MESSAGE.MESSAGE_BYTES from INT_CHANNEL_MESSAGE where INT_CHANNEL_MESSAGE.GROUP_KEY = ? and INT_CHANNEL_MESSAGE.REGION = ? order by CREATED_DATE, MESSAGE_SEQUENCE LIMIT 1 FOR UPDATE]
2023-05-30T19:39:35.658+09:00 DEBUG [order-service,6475d266281a7d296e14099b15056603,6e14099b15056603] 15244 --- [ scheduling-1] o.s.orm.jpa.JpaTransactionManager : Initiating transaction commit
2023-05-30T19:39:35.658+09:00 DEBUG [order-service,6475d266281a7d296e14099b15056603,6e14099b15056603] 15244 --- [ scheduling-1] o.s.orm.jpa.JpaTransactionManager : Committing JPA transaction on EntityManager [SessionImpl(665386702)]
2023-05-30T19:39:35.660+09:00 DEBUG [order-service,6475d266281a7d296e14099b15056603,6e14099b15056603] 15244 --- [ scheduling-1] o.s.orm.jpa.JpaTransactionManager : Closing JPA EntityManager [SessionImpl(665386702)] after transaction
```
次に、次のコマンドでShipment Serviceを起動します。
```
./mvnw clean spring-boot:run -f shipment-service -Dspring-boot.run.arguments=--spring.docker.compose.file=$(pwd)/docker-compose.yaml
```
Order Serviceに注文リクエストを送ります。
```
curl -s localhost:8080/orders -d "{\"amount\":50}" -H "content-type:application/json"
```
Order Service側に次のようなログが出力されます。
```
2023-05-30T19:40:05.034+09:00 DEBUG [order-service,6475d2851c60c07b94f48ba27be40330,5e0461918b9baeab] 15244 --- [nio-8080-exec-1] o.s.orm.jpa.JpaTransactionManager : Found thread-bound EntityManager [SessionImpl(621471343)] for JPA transaction
2023-05-30T19:40:05.034+09:00 DEBUG [order-service,6475d2851c60c07b94f48ba27be40330,5e0461918b9baeab] 15244 --- [nio-8080-exec-1] o.s.orm.jpa.JpaTransactionManager : Creating new transaction with name [org.springframework.integration.router.RecipientListRouter.handleMessage]: PROPAGATION_REQUIRED,ISOLATION_DEFAULT
2023-05-30T19:40:05.037+09:00 DEBUG [order-service,6475d2851c60c07b94f48ba27be40330,749b60ad16fa0f18] 15244 --- [nio-8080-exec-1] o.s.orm.jpa.JpaTransactionManager : Exposing JPA transaction as JDBC [org.springframework.orm.jpa.vendor.HibernateJpaDialect$HibernateConnectionHandle@76bd8f3]
2023-05-30T19:40:05.038+09:00 DEBUG [order-service,6475d2851c60c07b94f48ba27be40330,749b60ad16fa0f18] 15244 --- [nio-8080-exec-1] o.s.orm.jpa.JpaTransactionManager : Found thread-bound EntityManager [SessionImpl(621471343)] for JPA transaction
2023-05-30T19:40:05.038+09:00 DEBUG [order-service,6475d2851c60c07b94f48ba27be40330,749b60ad16fa0f18] 15244 --- [nio-8080-exec-1] o.s.orm.jpa.JpaTransactionManager : Participating in existing transaction
2023-05-30T19:40:05.046+09:00 DEBUG [order-service,6475d2851c60c07b94f48ba27be40330,797bb7fc586708fc] 15244 --- [nio-8080-exec-1] o.s.orm.jpa.JpaTransactionManager : Found thread-bound EntityManager [SessionImpl(621471343)] for JPA transaction
2023-05-30T19:40:05.046+09:00 DEBUG [order-service,6475d2851c60c07b94f48ba27be40330,797bb7fc586708fc] 15244 --- [nio-8080-exec-1] o.s.orm.jpa.JpaTransactionManager : Participating in existing transaction
2023-05-30T19:40:05.061+09:00 DEBUG [order-service,6475d2851c60c07b94f48ba27be40330,797bb7fc586708fc] 15244 --- [nio-8080-exec-1] org.hibernate.SQL : insert into "order" (amount,order_date,status) values (?,?,?)
2023-05-30T19:40:05.077+09:00 DEBUG [order-service,6475d2851c60c07b94f48ba27be40330,33749e49f54ae50b] 15244 --- [nio-8080-exec-1] o.s.jdbc.core.JdbcTemplate : Executing prepared SQL update
2023-05-30T19:40:05.077+09:00 DEBUG [order-service,6475d2851c60c07b94f48ba27be40330,33749e49f54ae50b] 15244 --- [nio-8080-exec-1] o.s.jdbc.core.JdbcTemplate : Executing prepared SQL statement [INSERT into INT_CHANNEL_MESSAGE(MESSAGE_ID, GROUP_KEY, REGION, CREATED_DATE, MESSAGE_PRIORITY, MESSAGE_BYTES) values (?, ?, ?, ?, ?, ?)]
2023-05-30T19:40:05.090+09:00 DEBUG [order-service,6475d2851c60c07b94f48ba27be40330,749b60ad16fa0f18] 15244 --- [nio-8080-exec-1] o.s.orm.jpa.JpaTransactionManager : Initiating transaction commit
2023-05-30T19:40:05.091+09:00 DEBUG [order-service,6475d2851c60c07b94f48ba27be40330,749b60ad16fa0f18] 15244 --- [nio-8080-exec-1] o.s.orm.jpa.JpaTransactionManager : Committing JPA transaction on EntityManager [SessionImpl(621471343)]
2023-05-30T19:40:05.097+09:00 DEBUG [order-service,6475d2851c60c07b94f48ba27be40330,749b60ad16fa0f18] 15244 --- [nio-8080-exec-1] o.s.orm.jpa.JpaTransactionManager : Not closing pre-bound JPA EntityManager after transaction
2023-05-30T19:40:05.097+09:00 INFO [order-service,6475d2851c60c07b94f48ba27be40330,94f48ba27be40330] 15244 --- [nio-8080-exec-1] c.e.outbox.order.web.OrderController : Created Order{orderId=1, amount=50, status=CREATED, orderDate=2023-05-30T10:40:05.027954Z}
2023-05-30T19:40:05.125+09:00 INFO [order-service,6475d2851c60c07b94f48ba27be40330,5e0461918b9baeab] 15244 --- [nio-8080-exec-1] accesslog : remote=127.0.0.1 ts="2023-05-30T10:40:05.004566Z" method=POST url="http://localhost:8080/orders" status=200 ua="curl/7.87.0" response_time=120
```
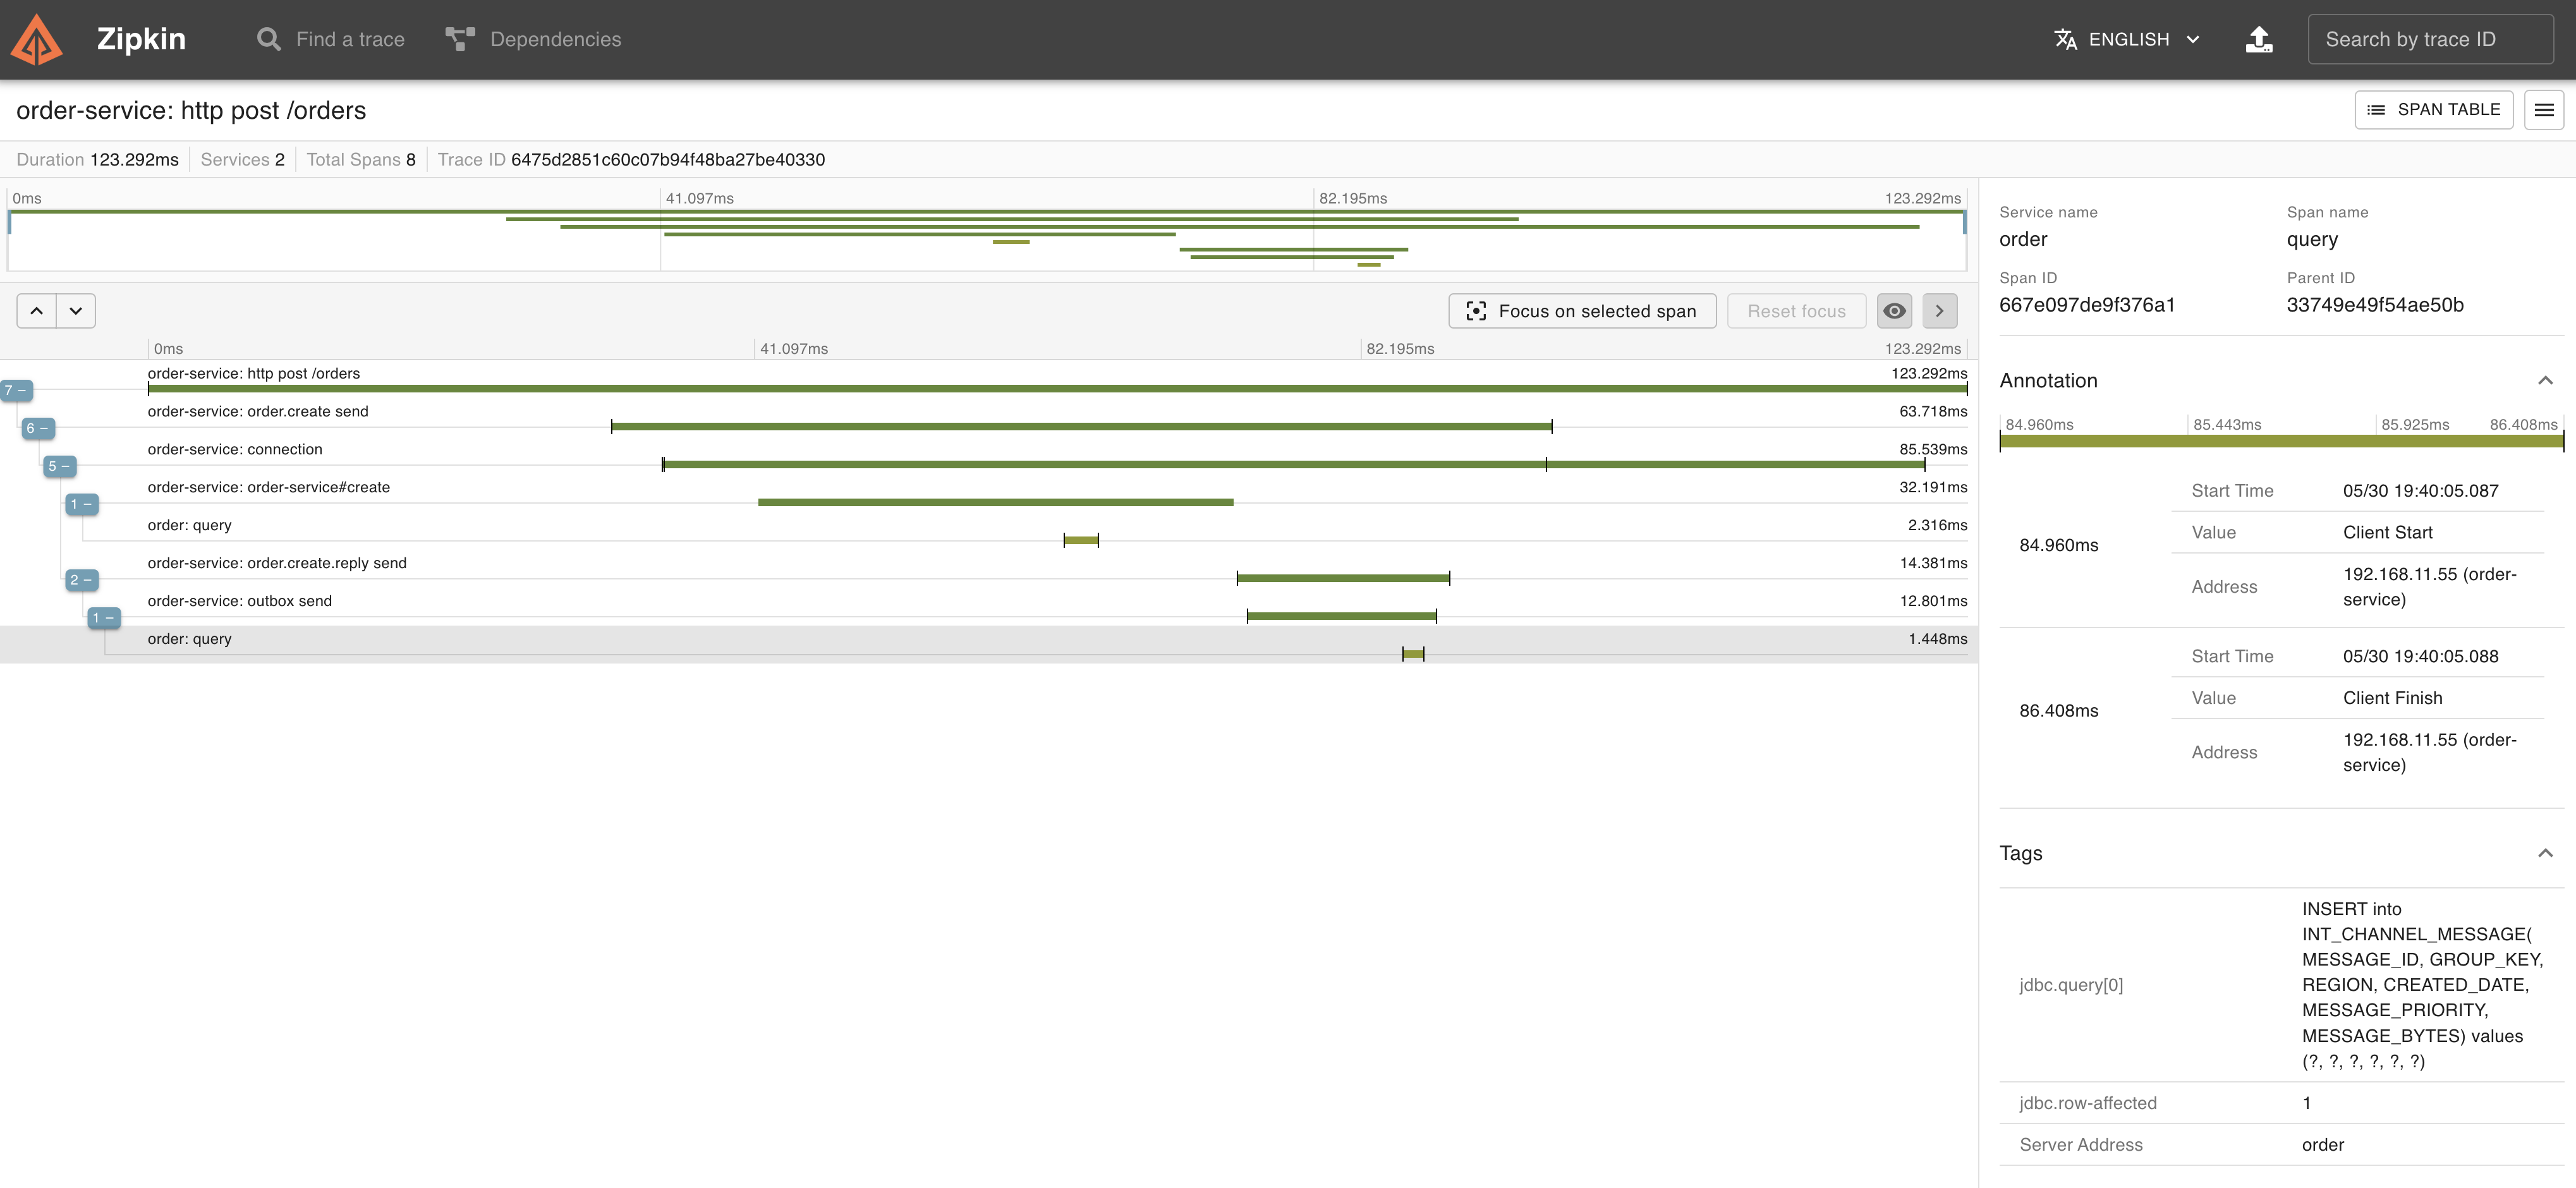
トランザクションが開始された後、`insert into "order" ...`と`INSERT into INT_CHANNEL_MESSAGE ...`が実行されて、その後にトランザクションがコミットされていることがわかります。これらの一連の処理はTrace ID `6475d2851c60c07b94f48ba27be40330` でトレースされています。
Zipkinで`6475d2851c60c07b94f48ba27be40330`のTraceを見てみましょう。
HTTPのPOSTリクエスト処理がトレースされています。
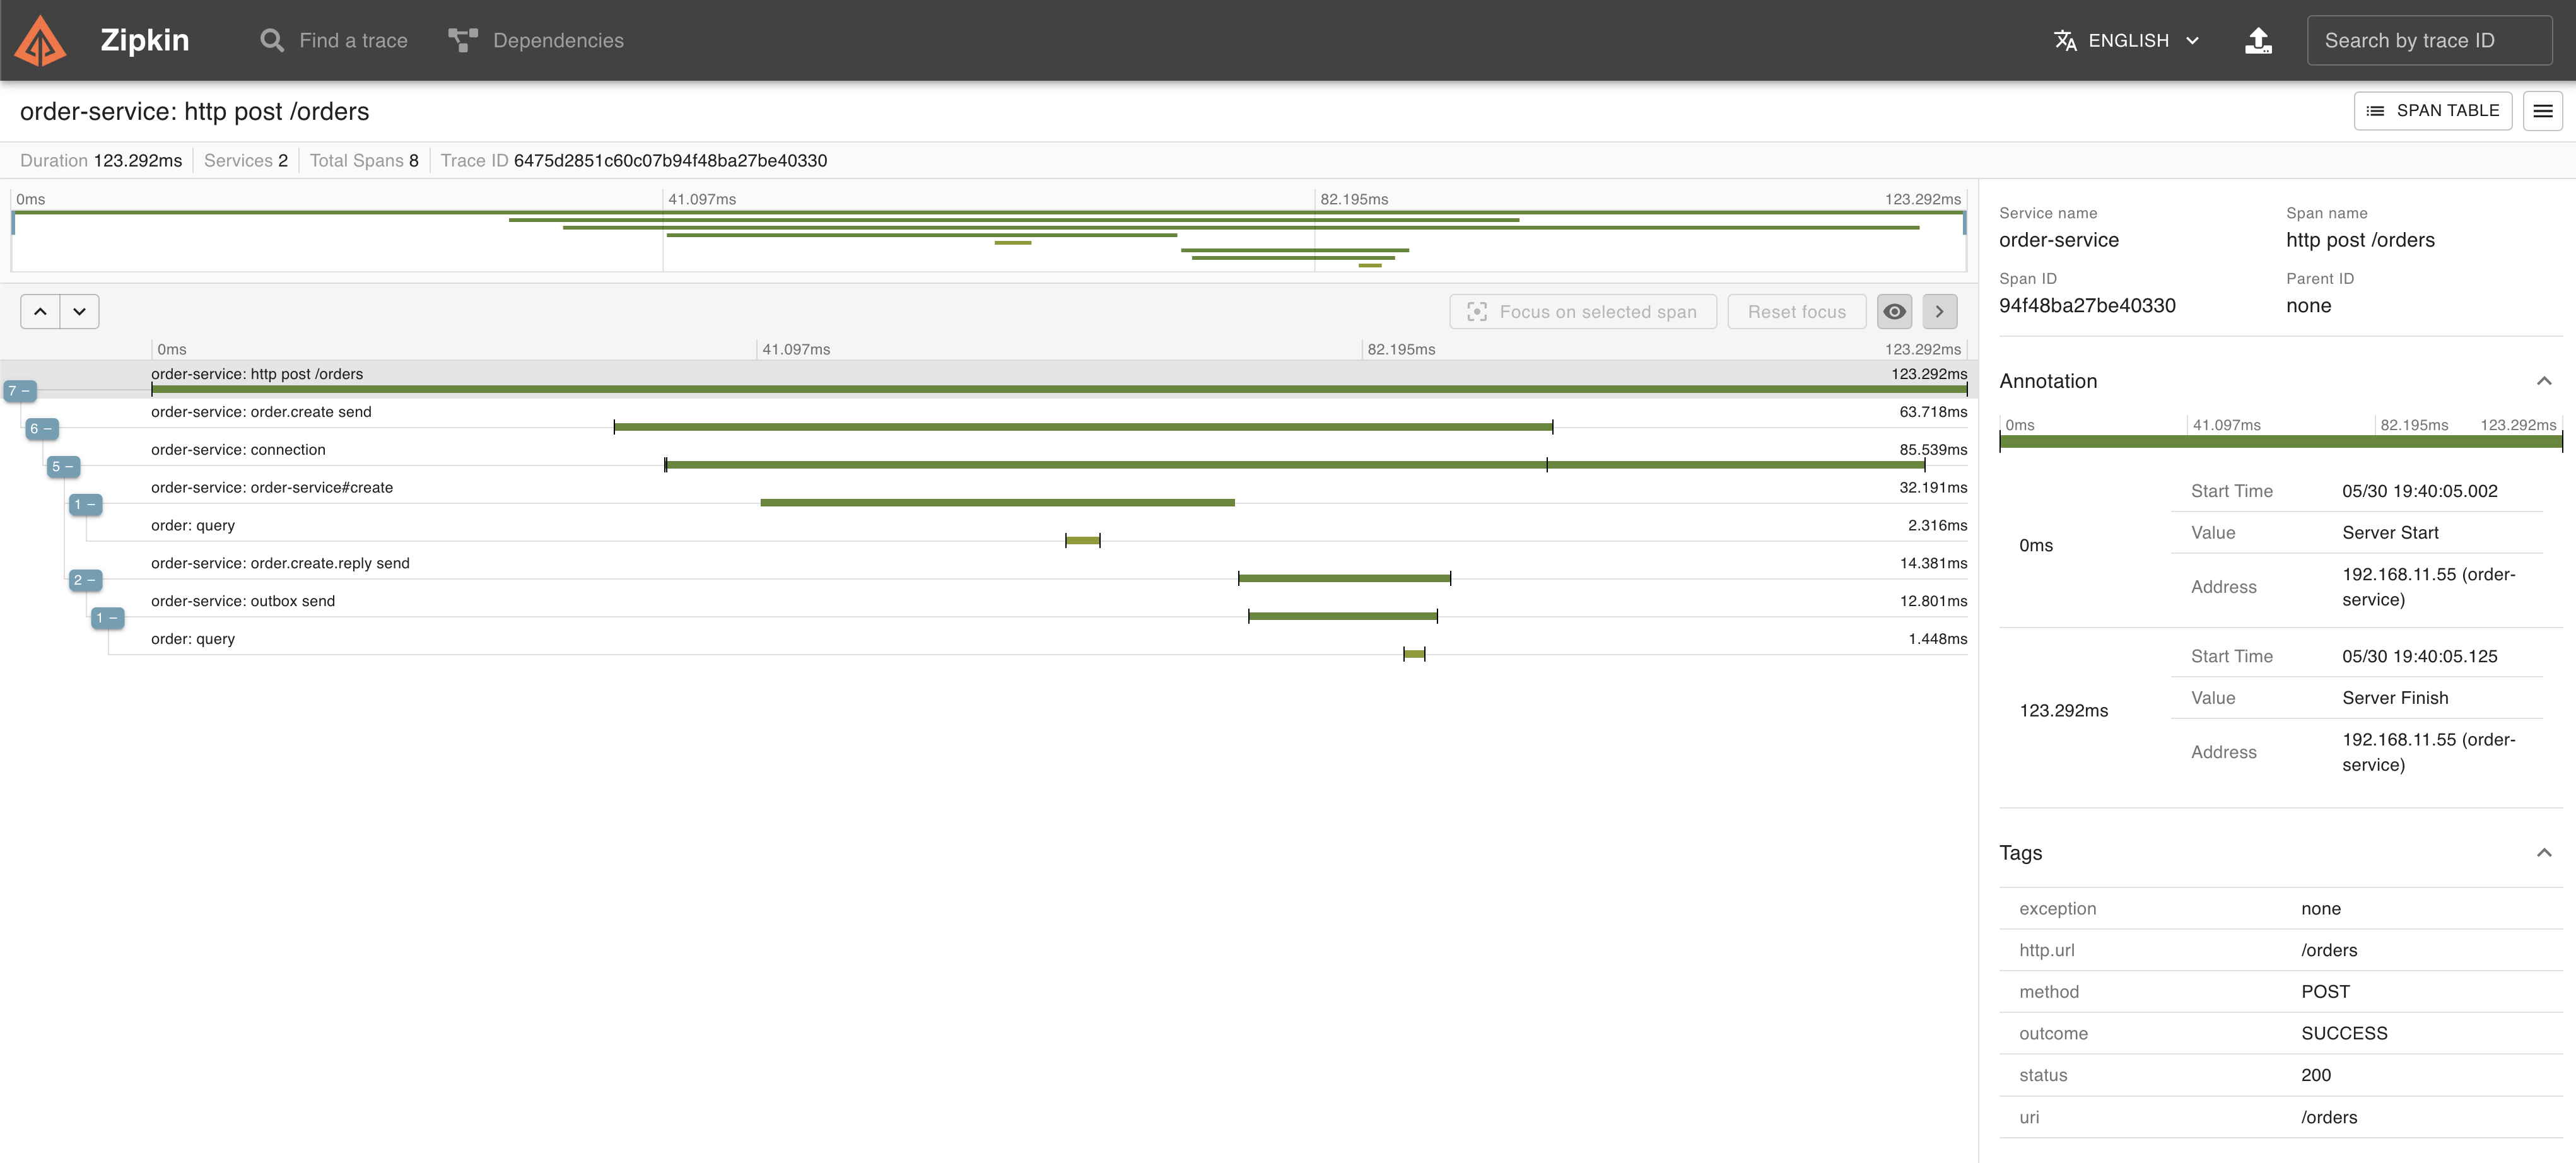 Span Nameが`connection`になっているのがトランザクション処理を行っているSpanです。
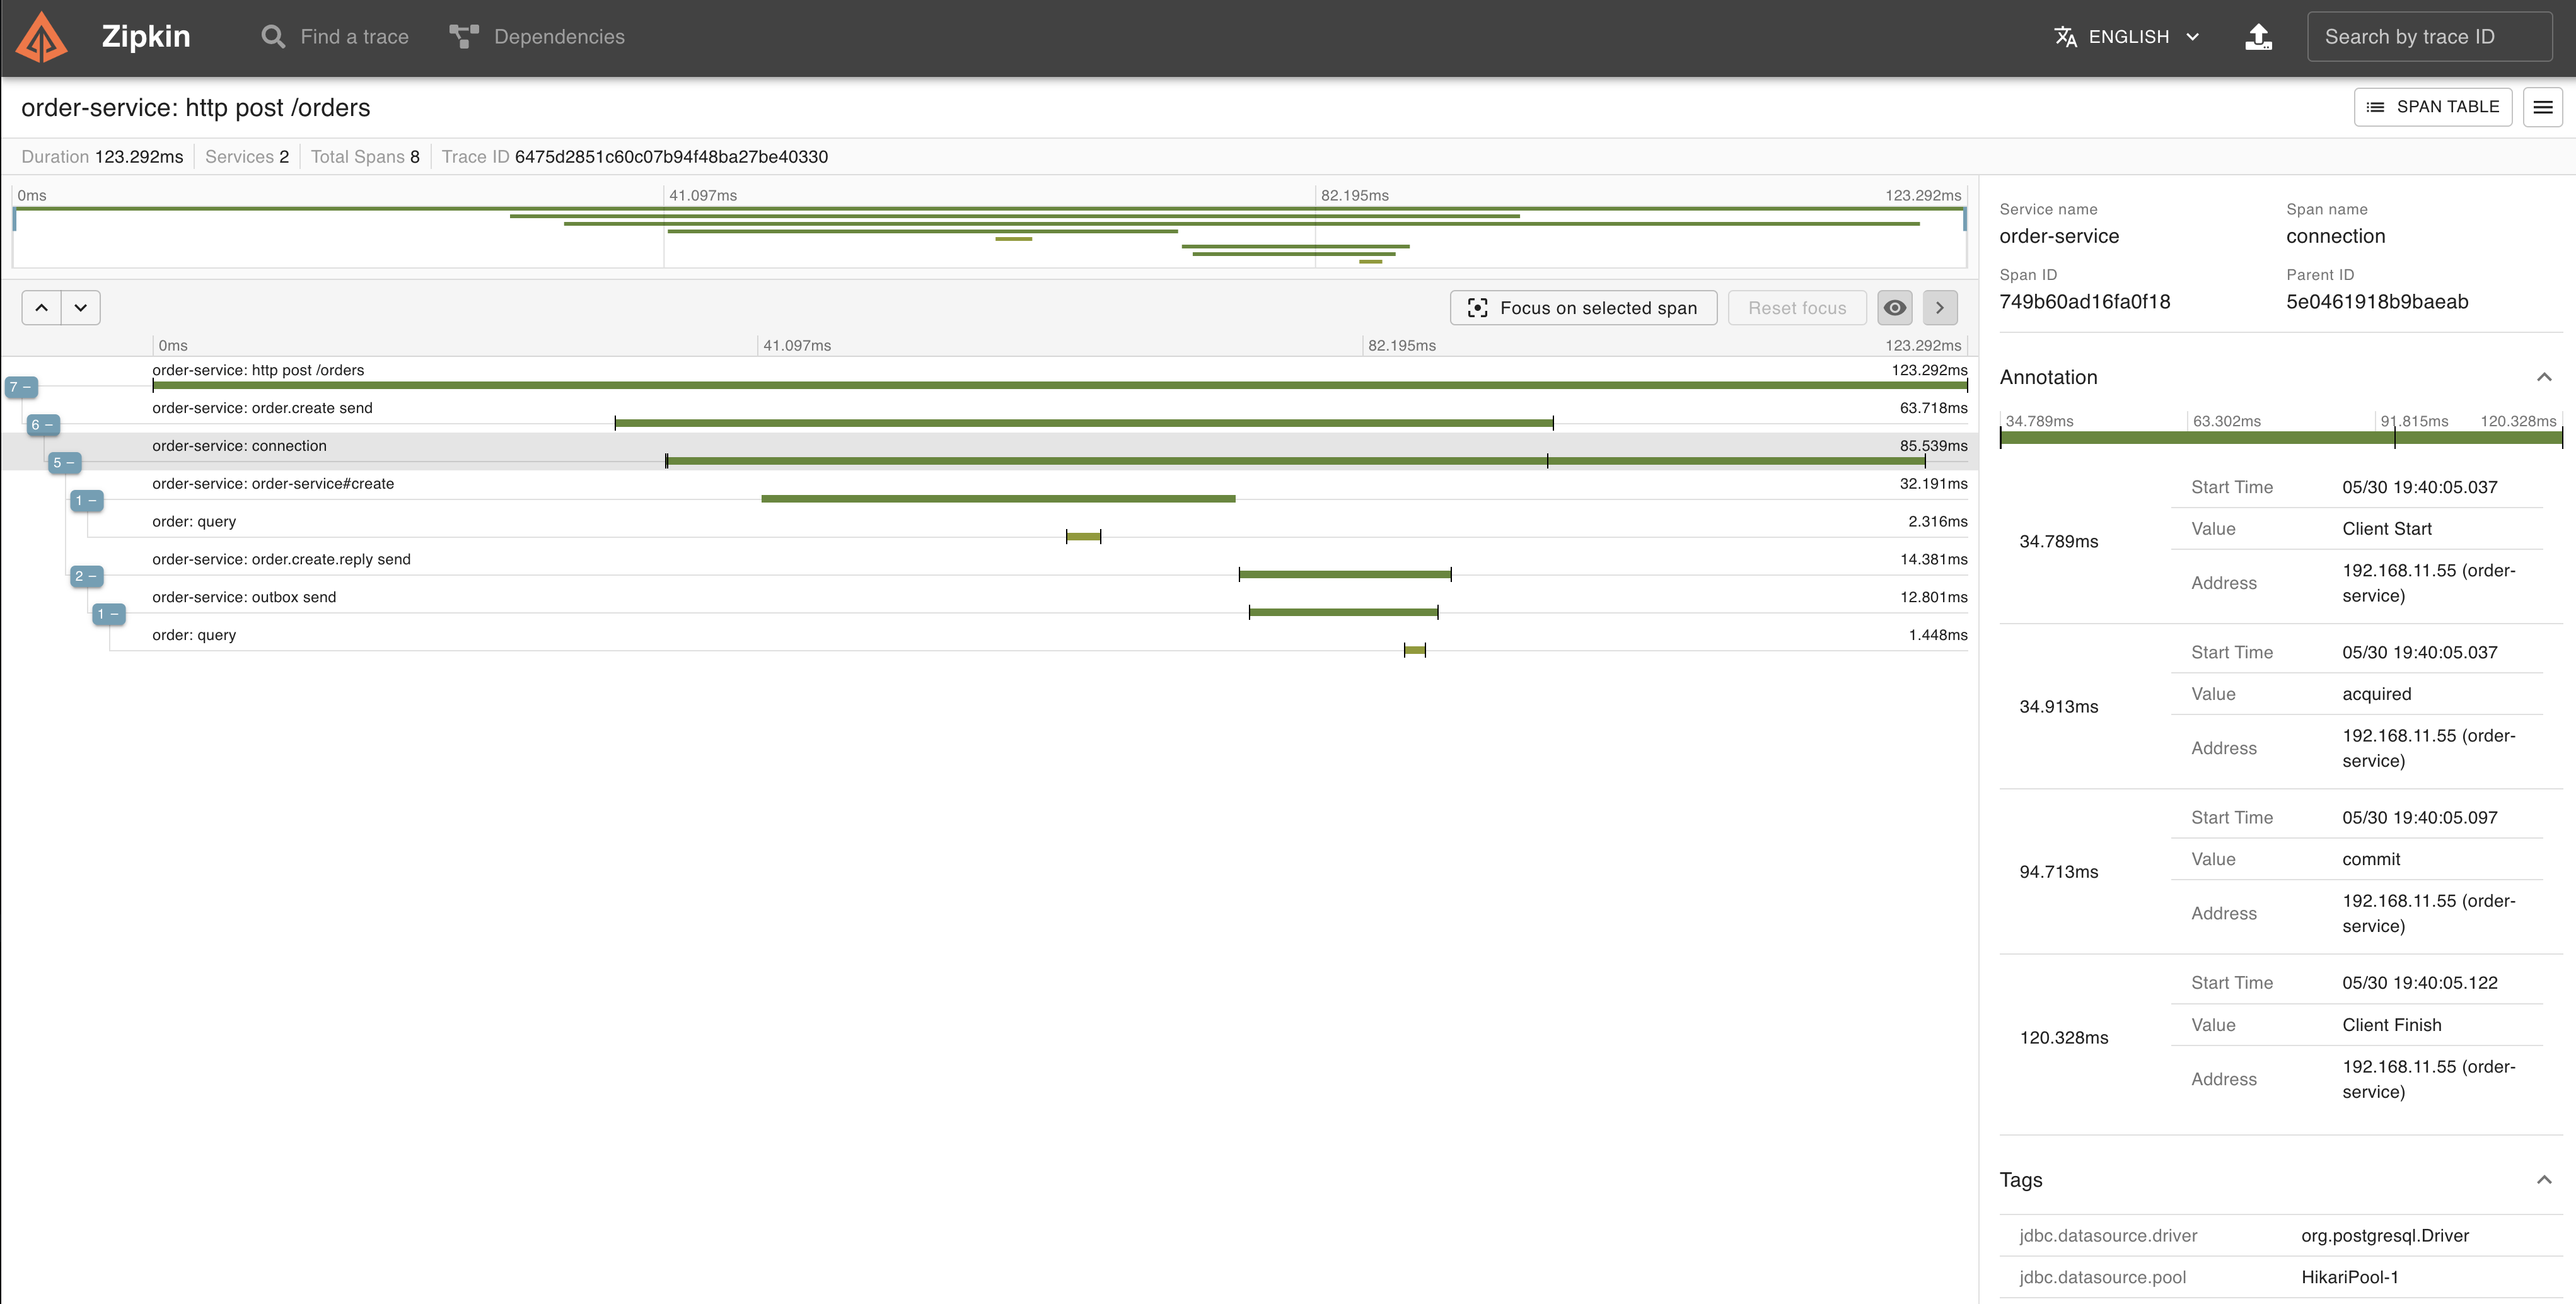 このトランザクション内で、`insert into "order" ...`と、
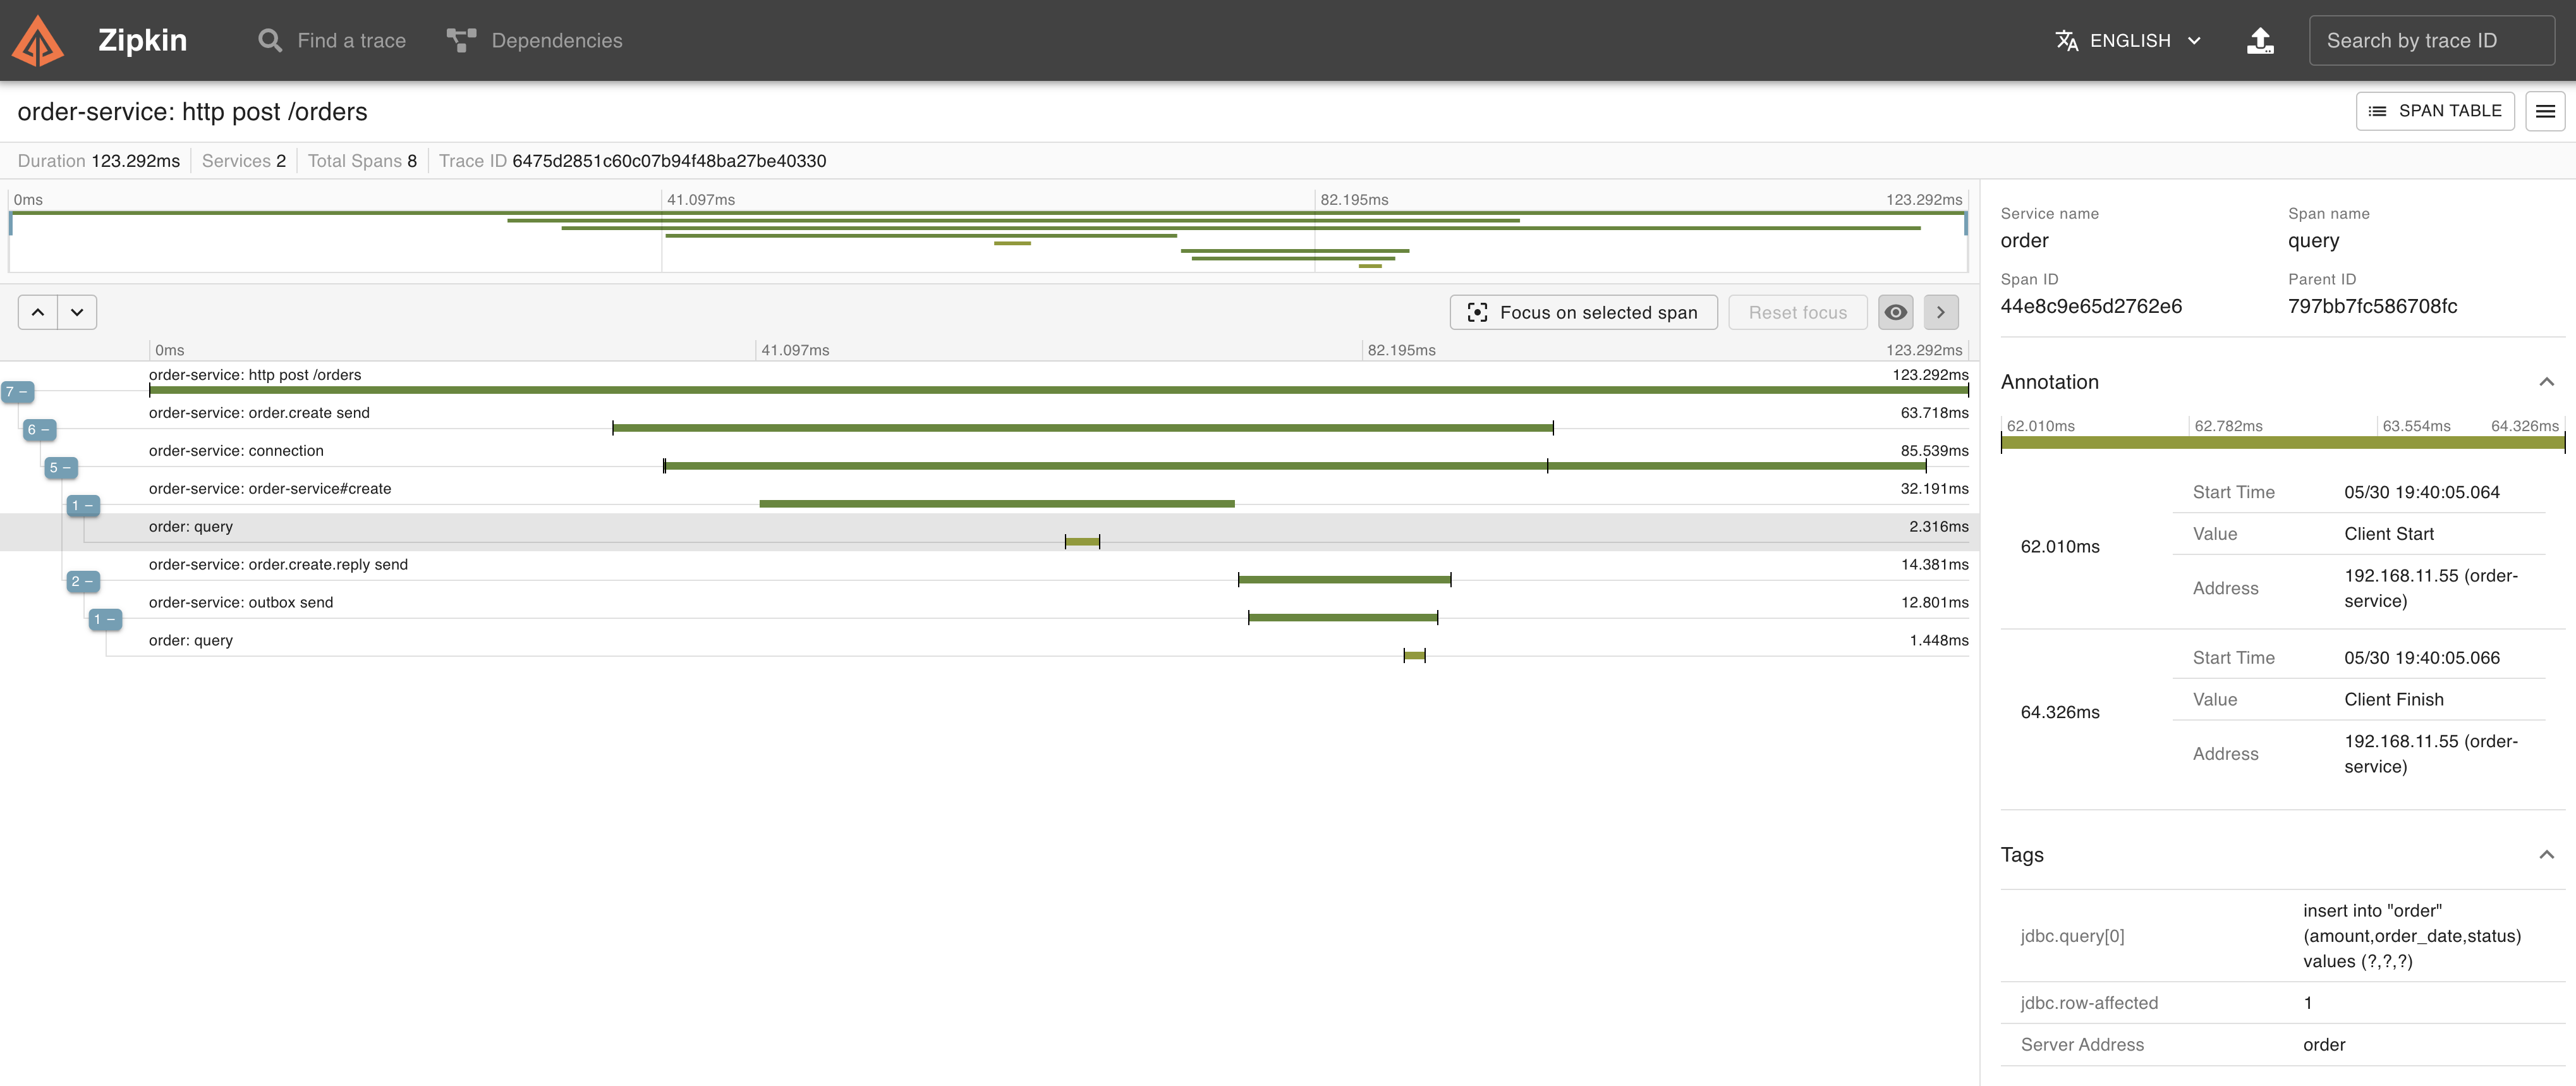 `INSERT into INT_CHANNEL_MESSAGE ...`が実行されていることがTraceからもわかります。
 しばらくしてOrder ServiceのMessage Relay側の処理のログも出力されます。
```
2023-05-30T19:40:06.755+09:00 DEBUG [order-service,6475d28681fab3a59d13cb361f68e48d,9d13cb361f68e48d] 15244 --- [ scheduling-1] o.s.orm.jpa.JpaTransactionManager : Exposing JPA transaction as JDBC [org.springframework.orm.jpa.vendor.HibernateJpaDialect$HibernateConnectionHandle@bf6fa00]
2023-05-30T19:40:06.755+09:00 DEBUG [order-service,6475d28681fab3a59d13cb361f68e48d,9d13cb361f68e48d] 15244 --- [ scheduling-1] o.s.jdbc.core.JdbcTemplate : Executing prepared SQL query
2023-05-30T19:40:06.755+09:00 DEBUG [order-service,6475d28681fab3a59d13cb361f68e48d,9d13cb361f68e48d] 15244 --- [ scheduling-1] o.s.jdbc.core.JdbcTemplate : Executing prepared SQL statement [SELECT INT_CHANNEL_MESSAGE.MESSAGE_ID, INT_CHANNEL_MESSAGE.MESSAGE_BYTES from INT_CHANNEL_MESSAGE where INT_CHANNEL_MESSAGE.GROUP_KEY = ? and INT_CHANNEL_MESSAGE.REGION = ? order by CREATED_DATE, MESSAGE_SEQUENCE LIMIT 1 FOR UPDATE]
2023-05-30T19:40:06.763+09:00 DEBUG [order-service,6475d28681fab3a59d13cb361f68e48d,9d13cb361f68e48d] 15244 --- [ scheduling-1] o.s.jdbc.core.JdbcTemplate : Executing prepared SQL update
2023-05-30T19:40:06.763+09:00 DEBUG [order-service,6475d28681fab3a59d13cb361f68e48d,9d13cb361f68e48d] 15244 --- [ scheduling-1] o.s.jdbc.core.JdbcTemplate : Executing prepared SQL statement [DELETE from INT_CHANNEL_MESSAGE where MESSAGE_ID=? and GROUP_KEY=? and REGION=?]
2023-05-30T19:40:06.769+09:00 INFO [order-service,6475d28681fab3a59d13cb361f68e48d,9d13cb361f68e48d] 15244 --- [ scheduling-1] amqpHandler : Send {"orderId":1,"amount":5E+1,"orderDate":"2023-05-30T10:40:05.027954Z"}
2023-05-30T19:40:06.778+09:00 INFO [order-service,6475d28681fab3a59d13cb361f68e48d,9d13cb361f68e48d] 15244 --- [ scheduling-1] o.s.a.r.c.CachingConnectionFactory : Attempting to connect to: [127.0.0.1:5672]
2023-05-30T19:40:06.809+09:00 INFO [order-service,6475d28681fab3a59d13cb361f68e48d,9d13cb361f68e48d] 15244 --- [ scheduling-1] o.s.a.r.c.CachingConnectionFactory : Created new connection: rabbitConnectionFactory#5b115d71:0/SimpleConnection@19e406fa [delegate=amqp://guest@127.0.0.1:5672/, localPort=54381]
2023-05-30T19:40:06.831+09:00 DEBUG [order-service,6475d28681fab3a59d13cb361f68e48d,9d13cb361f68e48d] 15244 --- [ scheduling-1] o.s.orm.jpa.JpaTransactionManager : Initiating transaction commit
2023-05-30T19:40:06.831+09:00 DEBUG [order-service,6475d28681fab3a59d13cb361f68e48d,9d13cb361f68e48d] 15244 --- [ scheduling-1] o.s.orm.jpa.JpaTransactionManager : Committing JPA transaction on EntityManager [SessionImpl(1566708299)]
2023-05-30T19:40:06.834+09:00 DEBUG [order-service,6475d28681fab3a59d13cb361f68e48d,9d13cb361f68e48d] 15244 --- [ scheduling-1] o.s.orm.jpa.JpaTransactionManager : Closing JPA EntityManager [SessionImpl(1566708299)] after transaction
```
トランザクションが開始された後、`SELECT ... from INT_CHANNEL_MESSAGE ... FOR UPDATE`と`DELETE from INT_CHANNEL_MESSAGE ...`が実行され、RabbitMQにメッセージが送信された後に、トランザクションがコミットされていることがわかります。
Message Relay側の処理はPOSTリクエスト処理とは別のTrace ID (`6475d28681fab3a59d13cb361f68e48d`)でトレースされています。
Shipment Service側には次のログが出力されています。こちらはメッセージ送信と同じTrace ID (`6475d28681fab3a59d13cb361f68e48d`) でトレースされています。
```
2023-05-30T19:40:06.864+09:00 INFO [shipment-service,6475d28681fab3a59d13cb361f68e48d,2c76e61f1852629c] 15275 --- [ntContainer#0-1] c.e.outbox.shipment.ShipmentService : Created order: Created[orderId=1, amount=50.0, orderDate=2023-05-30T10:40:05.027954Z]
2023-05-30T19:40:06.882+09:00 DEBUG [shipment-service,6475d28681fab3a59d13cb361f68e48d,2c76e61f1852629c] 15275 --- [ntContainer#0-1] org.hibernate.SQL : insert into shipment (order_date,order_id) values (?,?)
2023-05-30T19:40:06.900+09:00 INFO [shipment-service,6475d28681fab3a59d13cb361f68e48d,2c76e61f1852629c] 15275 --- [ntContainer#0-1] c.e.outbox.shipment.ShipmentService : Create shipment: Shipment{shipmentId=1, orderId=1, orderDate=2023-05-30T10:40:05.027954Z}
```
Zipkinで`6475d28681fab3a59d13cb361f68e48d`のTraceを見てみましょう。
Order ServiceのMessage Relay側の処理とShipment Serviceのメッセージ受信処理がトレースされています。
しばらくしてOrder ServiceのMessage Relay側の処理のログも出力されます。
```
2023-05-30T19:40:06.755+09:00 DEBUG [order-service,6475d28681fab3a59d13cb361f68e48d,9d13cb361f68e48d] 15244 --- [ scheduling-1] o.s.orm.jpa.JpaTransactionManager : Exposing JPA transaction as JDBC [org.springframework.orm.jpa.vendor.HibernateJpaDialect$HibernateConnectionHandle@bf6fa00]
2023-05-30T19:40:06.755+09:00 DEBUG [order-service,6475d28681fab3a59d13cb361f68e48d,9d13cb361f68e48d] 15244 --- [ scheduling-1] o.s.jdbc.core.JdbcTemplate : Executing prepared SQL query
2023-05-30T19:40:06.755+09:00 DEBUG [order-service,6475d28681fab3a59d13cb361f68e48d,9d13cb361f68e48d] 15244 --- [ scheduling-1] o.s.jdbc.core.JdbcTemplate : Executing prepared SQL statement [SELECT INT_CHANNEL_MESSAGE.MESSAGE_ID, INT_CHANNEL_MESSAGE.MESSAGE_BYTES from INT_CHANNEL_MESSAGE where INT_CHANNEL_MESSAGE.GROUP_KEY = ? and INT_CHANNEL_MESSAGE.REGION = ? order by CREATED_DATE, MESSAGE_SEQUENCE LIMIT 1 FOR UPDATE]
2023-05-30T19:40:06.763+09:00 DEBUG [order-service,6475d28681fab3a59d13cb361f68e48d,9d13cb361f68e48d] 15244 --- [ scheduling-1] o.s.jdbc.core.JdbcTemplate : Executing prepared SQL update
2023-05-30T19:40:06.763+09:00 DEBUG [order-service,6475d28681fab3a59d13cb361f68e48d,9d13cb361f68e48d] 15244 --- [ scheduling-1] o.s.jdbc.core.JdbcTemplate : Executing prepared SQL statement [DELETE from INT_CHANNEL_MESSAGE where MESSAGE_ID=? and GROUP_KEY=? and REGION=?]
2023-05-30T19:40:06.769+09:00 INFO [order-service,6475d28681fab3a59d13cb361f68e48d,9d13cb361f68e48d] 15244 --- [ scheduling-1] amqpHandler : Send {"orderId":1,"amount":5E+1,"orderDate":"2023-05-30T10:40:05.027954Z"}
2023-05-30T19:40:06.778+09:00 INFO [order-service,6475d28681fab3a59d13cb361f68e48d,9d13cb361f68e48d] 15244 --- [ scheduling-1] o.s.a.r.c.CachingConnectionFactory : Attempting to connect to: [127.0.0.1:5672]
2023-05-30T19:40:06.809+09:00 INFO [order-service,6475d28681fab3a59d13cb361f68e48d,9d13cb361f68e48d] 15244 --- [ scheduling-1] o.s.a.r.c.CachingConnectionFactory : Created new connection: rabbitConnectionFactory#5b115d71:0/SimpleConnection@19e406fa [delegate=amqp://guest@127.0.0.1:5672/, localPort=54381]
2023-05-30T19:40:06.831+09:00 DEBUG [order-service,6475d28681fab3a59d13cb361f68e48d,9d13cb361f68e48d] 15244 --- [ scheduling-1] o.s.orm.jpa.JpaTransactionManager : Initiating transaction commit
2023-05-30T19:40:06.831+09:00 DEBUG [order-service,6475d28681fab3a59d13cb361f68e48d,9d13cb361f68e48d] 15244 --- [ scheduling-1] o.s.orm.jpa.JpaTransactionManager : Committing JPA transaction on EntityManager [SessionImpl(1566708299)]
2023-05-30T19:40:06.834+09:00 DEBUG [order-service,6475d28681fab3a59d13cb361f68e48d,9d13cb361f68e48d] 15244 --- [ scheduling-1] o.s.orm.jpa.JpaTransactionManager : Closing JPA EntityManager [SessionImpl(1566708299)] after transaction
```
トランザクションが開始された後、`SELECT ... from INT_CHANNEL_MESSAGE ... FOR UPDATE`と`DELETE from INT_CHANNEL_MESSAGE ...`が実行され、RabbitMQにメッセージが送信された後に、トランザクションがコミットされていることがわかります。
Message Relay側の処理はPOSTリクエスト処理とは別のTrace ID (`6475d28681fab3a59d13cb361f68e48d`)でトレースされています。
Shipment Service側には次のログが出力されています。こちらはメッセージ送信と同じTrace ID (`6475d28681fab3a59d13cb361f68e48d`) でトレースされています。
```
2023-05-30T19:40:06.864+09:00 INFO [shipment-service,6475d28681fab3a59d13cb361f68e48d,2c76e61f1852629c] 15275 --- [ntContainer#0-1] c.e.outbox.shipment.ShipmentService : Created order: Created[orderId=1, amount=50.0, orderDate=2023-05-30T10:40:05.027954Z]
2023-05-30T19:40:06.882+09:00 DEBUG [shipment-service,6475d28681fab3a59d13cb361f68e48d,2c76e61f1852629c] 15275 --- [ntContainer#0-1] org.hibernate.SQL : insert into shipment (order_date,order_id) values (?,?)
2023-05-30T19:40:06.900+09:00 INFO [shipment-service,6475d28681fab3a59d13cb361f68e48d,2c76e61f1852629c] 15275 --- [ntContainer#0-1] c.e.outbox.shipment.ShipmentService : Create shipment: Shipment{shipmentId=1, orderId=1, orderDate=2023-05-30T10:40:05.027954Z}
```
Zipkinで`6475d28681fab3a59d13cb361f68e48d`のTraceを見てみましょう。
Order ServiceのMessage Relay側の処理とShipment Serviceのメッセージ受信処理がトレースされています。
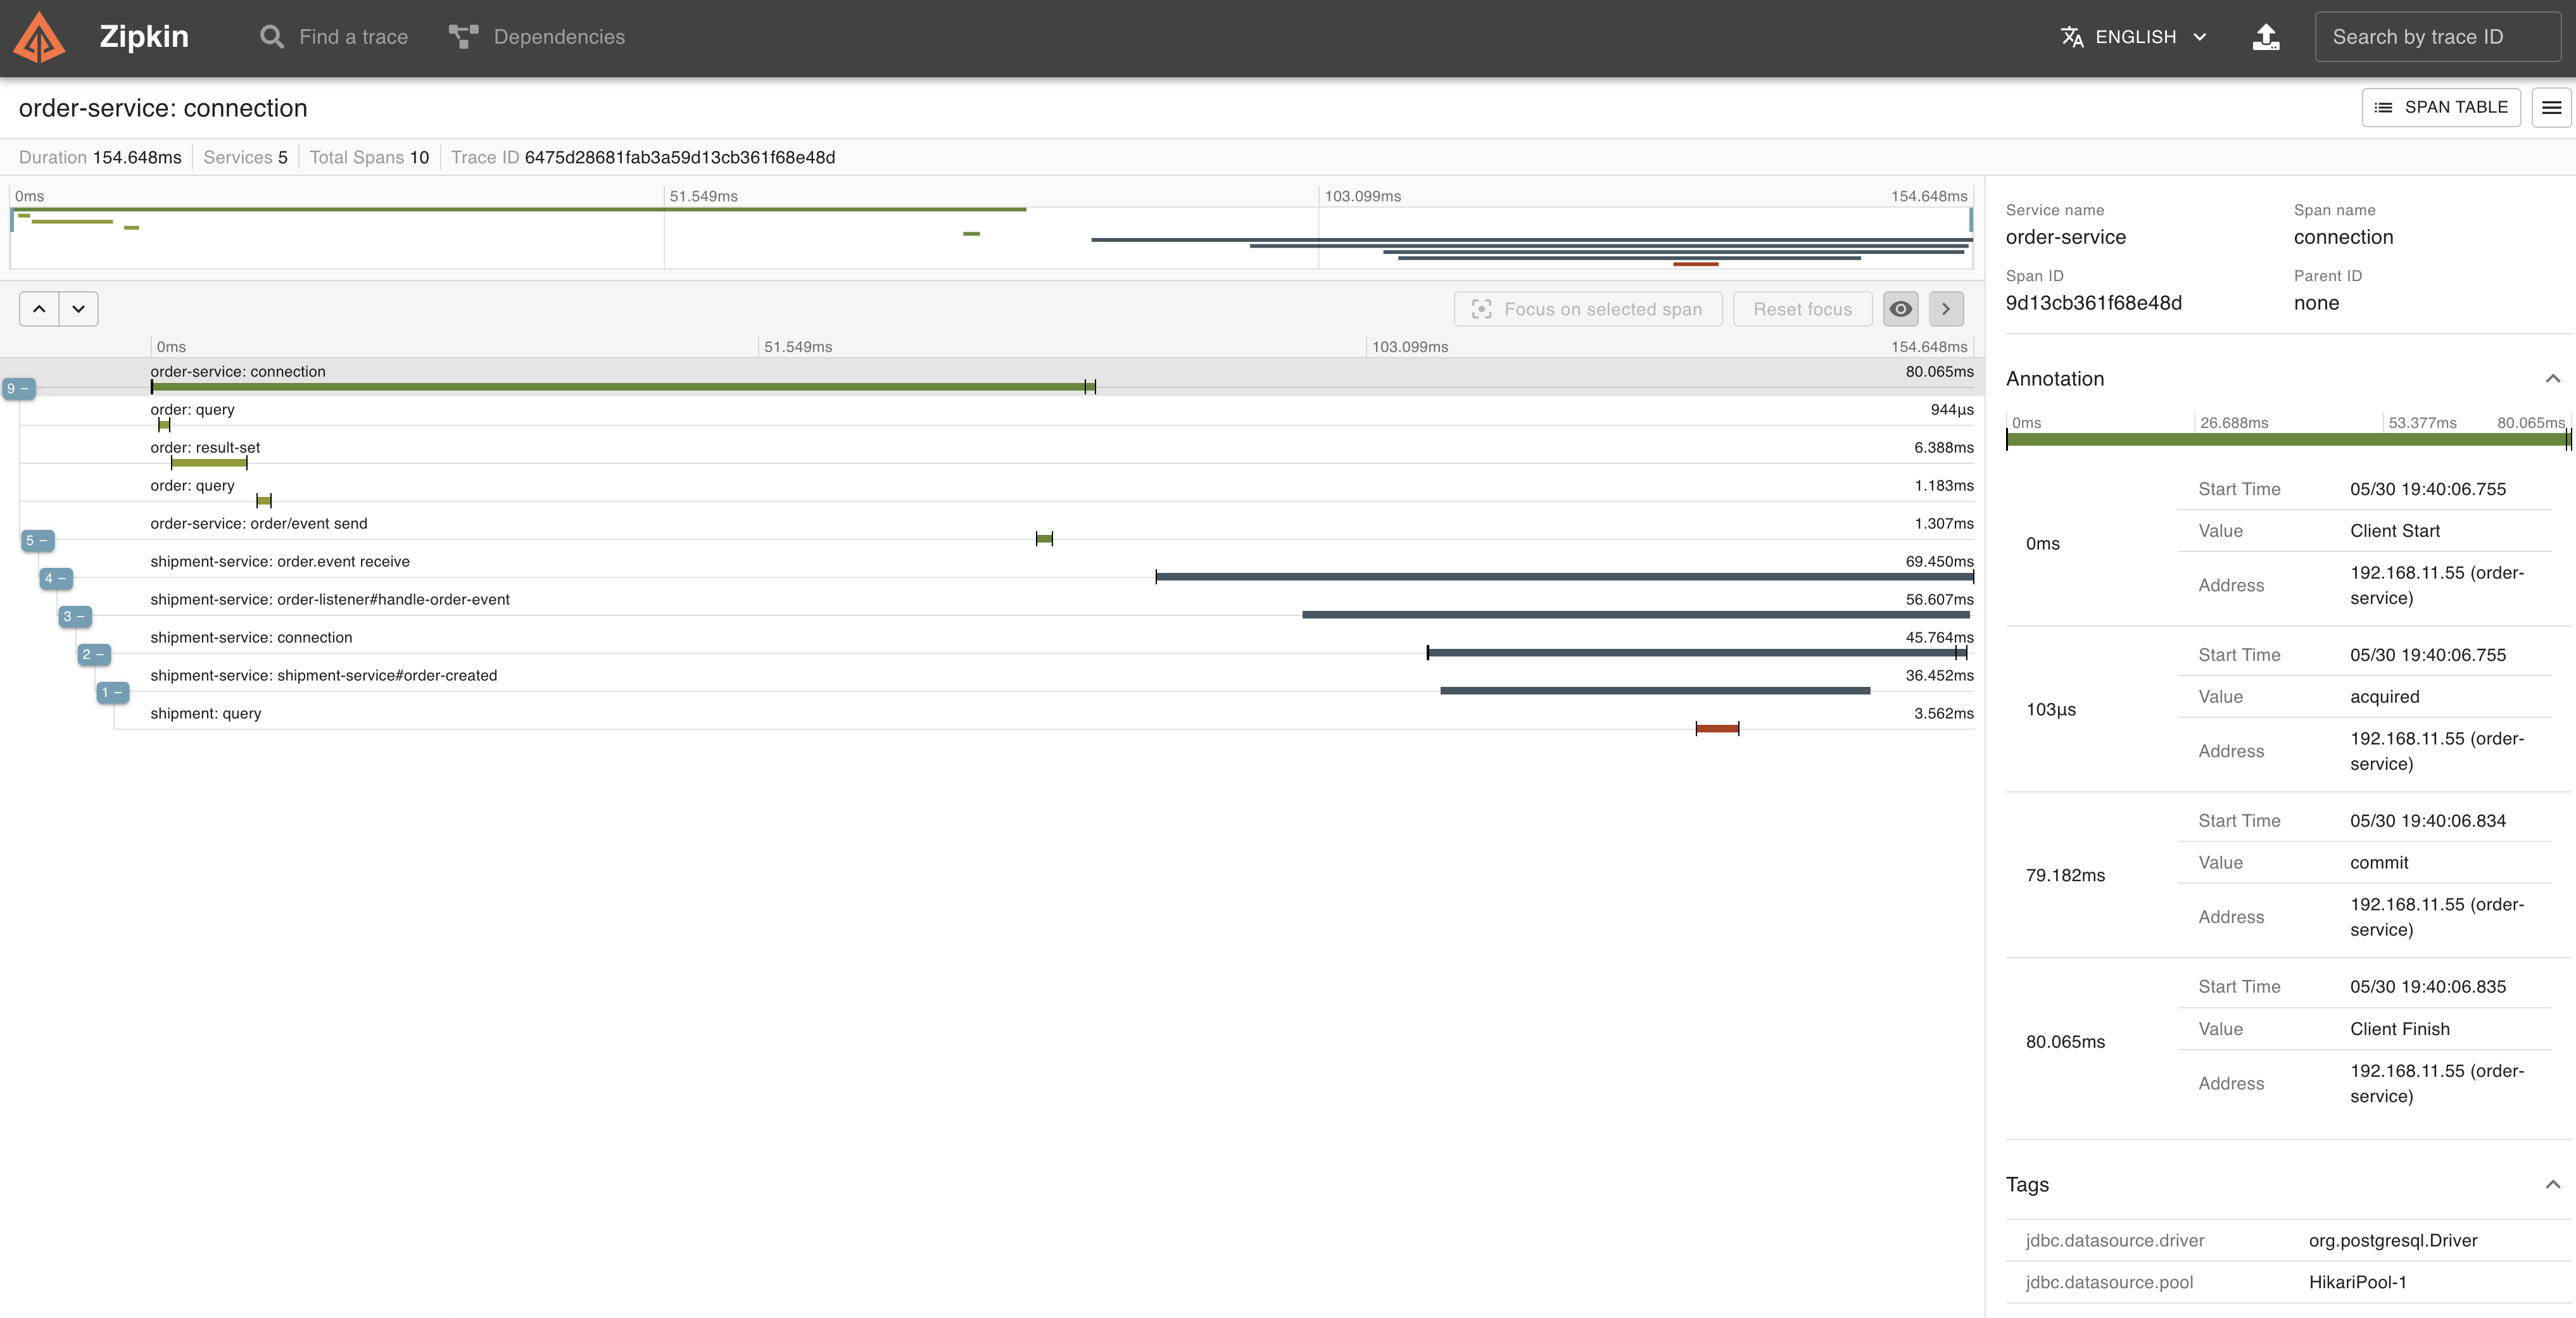 Message Relay側の処理の`connection` Span (=トランザクション)の中で、`SELECT ... from INT_CHANNEL_MESSAGE ... FOR UPDATE`と
 `DELETE from INT_CHANNEL_MESSAGE ...`が実行され、
 また、メッセージの送信も同一トランザクション内で実行されていることがTraceからもわかります。
 ---
Spring IntegrationだけでOutboxパターンが実装できました。
---
Spring IntegrationだけでOutboxパターンが実装できました。
今回の方法は、他の手法に比べて、Spring Integrationの知識があれば、既存の仕組みだけでシンプルにOutboxパターンが実装できるのがメリットです。
Pollingにかかる負荷が気になるところですが、PostgreSQL限定にはなりますが、outboxのMessageChannel実装として、"[PostgreSQL: Receiving Push Notifications](https://docs.spring.io/spring-integration/docs/current/reference/html/jdbc.html#postgresql-push)" の`PostgresSubscribableChannel`を使用すればPollingの負荷をなくせるかもしれません。
> 以前に`PostgresSubscribableChannel`を試したときはトランザクションに対応していなかったので、今回の実装で採用しませんでしたが、ドキュメントを見ると6.0.5からトランザクションに対応したようなので、再度試してみたいと思います。
### (余談) Partitionの対応
Outboxパターンの話とは直接関係ないかもしれませんが、Eventをメッセージ送信したい場合に、Partitionサポートが欲しい場合があります。
メッセージ受信側がスケールアウトした際に、受信メッセージの処理が並列に行われます。今回の実装ではどのインスタンスで処理されるかわかりません。
例えば、同じ注文IDや同じ顧客IDのメッセージは同じインスタンスで順番に処理させたい場合には、IDとインスタンスを対応させる必要があります。
通常のRabbitMQで実装する場合は、複数のキューを定義して、routing keyでIDとキューを関連付けする必要があります。
[Spring Cloud Stream](https://spring.io/projects/spring-cloud-stream)を使用した場合はこの作業は[Partitionサポート](https://docs.spring.io/spring-cloud-stream/docs/current/reference/html/spring-cloud-stream.html#spring-cloud-stream-overview-partitioning)によって透過的に行われます。
[RabbitMQ Streams](https://www.rabbitmq.com/streams.html)を使用する場合は、RabbitMQ 3.11でサポートされた[Single Active Consumer](https://www.rabbitmq.com/streams.html#single-active-consumer)と[Super Streams](https://www.rabbitmq.com/streams.html#super-streams)で対応できます。
https://github.com/acogoluegnes/rabbitmq-stream-single-active-consumer のサンプルがわかりやすいです。Spring AMQPやSpring IntegationもSuper Streamsに対応しているので、今度試してみようと思います。
あるいはApache Kafkaを使った場合はnativeにPatitionをサポートしているので、RabbitMQの代わりにKafkaを使用しても良いでしょう。([Artemのサンプル](https://github.com/artembilan/microservices-patterns-spring-integration/tree/main/outbox)ではKafkaが使用されています。)
---
**P.S.**
[PartitinonedChannel](https://docs.spring.io/spring-integration/docs/6.1.0/reference/html/channel.html#partitioned-channel)がSpring Integration 6.1で導入されていました!
また、Artemによると[Debeziumのサポート](https://github.com/spring-projects/spring-integration/commit/8b004e9ec2be349cd112c84ba7075e84f1eaa232)も導入されるようです。