自宅サーバーにK3sとSynology CSI Driverをインストールメモ
今まで自宅サーバーにはMicrok8sをインストールしてKubernetesクラスターを構築していましたが、今回はK3sをインストールしてみたので、そのメモ。 Synology CSI Driverを使いたかったのですが、Microk8sだとうまく動作しなかったので、実績のあるK3sを試してみました。
Controlplane(兼Worker)ノード1台(192.168.100.50)、Workerノード2台(192.168.100.51,192.168.100.52)の計3台構成でセットアップしました。
Controlplaneノードのセットアップ
まずはControlplaneノードにK3sをインストールします。192.168.11.50のサーバー上で
curl -sfL https://get.k3s.io | INSTALL_K3S_VERSION=v1.35.1+k3s1 \
  K3S_TOKEN=CHANGEME \
  sh -s - server \
  --node-ip=192.168.100.50 \
  --node-name=192.168.100.50 \
  --advertise-address=192.168.100.50 \
  --disable=traefik \
  --disable=local-storage
状態を確認します。
$ sudo systemctl status k3s | cat
● k3s.service - Lightweight Kubernetes
     Loaded: loaded (/etc/systemd/system/k3s.service; enabled; preset: enabled)
     Active: active (running) since Mon 2026-03-02 01:16:57 UTC; 44s ago
       Docs: https://k3s.io
    Process: 4048483 ExecStartPre=/sbin/modprobe br_netfilter (code=exited, status=0/SUCCESS)
    Process: 4048484 ExecStartPre=/sbin/modprobe overlay (code=exited, status=0/SUCCESS)
   Main PID: 4048486 (k3s-server)
      Tasks: 53
     Memory: 799.8M (peak: 800.5M)
        CPU: 18.873s
     CGroup: /system.slice/k3s.service
             ├─4048486 "/usr/local/bin/k3s server"
             ├─4048506 "containerd "
             ├─4048850 /var/lib/rancher/k3s/data/3b8ce3dcb1e1c49c523944bbb534b4c6eddd3f27edc542c5109b7a51ef7fa3f4/bin/containerd-shim-runc-v2 -namespace k8s.io -id d7e77a5d7999a677473d51fd57b56b3e89dacd0284ba5a341f4ab2cdec5db353 -address /run/k3s/containerd/containerd.sock
             └─4048852 /var/lib/rancher/k3s/data/3b8ce3dcb1e1c49c523944bbb534b4c6eddd3f27edc542c5109b7a51ef7fa3f4/bin/containerd-shim-runc-v2 -namespace k8s.io -id 88228a2229353f99ee8defe34a7fa7497a02c225fac451c087324be315603dc4 -address /run/k3s/containerd/containerd.sock

Mar 02 01:17:04 apricot k3s[4048486]:  >
Mar 02 01:17:04 apricot k3s[4048486]: I0302 01:17:04.219794 4048486 controller.go:109] OpenAPI AggregationController: action for item v1beta1.metrics.k8s.io: Rate Limited Requeue.
Mar 02 01:17:08 apricot k3s[4048486]: I0302 01:17:08.298964 4048486 kuberuntime_manager.go:2062] "Updating runtime config through cri with podcidr" CIDR="10.42.0.0/24"
Mar 02 01:17:08 apricot k3s[4048486]: I0302 01:17:08.300170 4048486 kubelet_network.go:47] "Updating Pod CIDR" originalPodCIDR="" newPodCIDR="10.42.0.0/24"
Mar 02 01:17:08 apricot k3s[4048486]: time="2026-03-02T01:17:08Z" level=info msg="Starting network policy controller version v2.6.3-k3s1, built on 2026-02-12T23:46:55Z, go1.25.6"
Mar 02 01:17:08 apricot k3s[4048486]: I0302 01:17:08.792556 4048486 network_policy_controller.go:164] Starting network policy controller
Mar 02 01:17:08 apricot k3s[4048486]: I0302 01:17:08.854866 4048486 network_policy_controller.go:179] Starting network policy controller full sync goroutine
Mar 02 01:17:13 apricot k3s[4048486]: I0302 01:17:13.085374 4048486 pod_startup_latency_tracker.go:108] "Observed pod startup duration" pod="kube-system/coredns-7566b5ff58-vrs2k" podStartSLOduration=5.422428666 podStartE2EDuration="10.085351425s" podCreationTimestamp="2026-03-02 01:17:03 +0000 UTC" firstStartedPulling="2026-03-02 01:17:07.541643538 +0000 UTC m=+15.837752781" lastFinishedPulling="2026-03-02 01:17:12.204566293 +0000 UTC m=+20.500675540" observedRunningTime="2026-03-02 01:17:13.084998533 +0000 UTC m=+21.381107810" watchObservedRunningTime="2026-03-02 01:17:13.085351425 +0000 UTC m=+21.381460689"
Mar 02 01:17:32 apricot k3s[4048486]: I0302 01:17:32.096785 4048486 pod_startup_latency_tracker.go:108] "Observed pod startup duration" pod="kube-system/metrics-server-786d997795-6mjkg" podStartSLOduration=23.628488248 podStartE2EDuration="29.096767377s" podCreationTimestamp="2026-03-02 01:17:03 +0000 UTC" firstStartedPulling="2026-03-02 01:17:07.541467397 +0000 UTC m=+15.837576639" lastFinishedPulling="2026-03-02 01:17:13.009746529 +0000 UTC m=+21.305855768" observedRunningTime="2026-03-02 01:17:14.076915593 +0000 UTC m=+22.373024848" watchObservedRunningTime="2026-03-02 01:17:32.096767377 +0000 UTC m=+40.392876627"
Mar 02 01:17:32 apricot k3s[4048486]: I0302 01:17:32.155898 4048486 handler.go:304] Adding GroupVersion metrics.k8s.io v1beta1 to ResourceManager
kubeconfigをコピーします。
sudo cp /etc/rancher/k3s/k3s.yaml ~/.kube/config
sudo chown $USER:$USER ~/.kube/config
chmod 600 ~/.kube/config
NodeとPodの状態を確認します。
NAME                  STATUS   ROLES           AGE   VERSION        INTERNAL-IP      EXTERNAL-IP   OS-IMAGE             KERNEL-VERSION     CONTAINER-RUNTIME
node/192.168.100.50   Ready    control-plane   70s   v1.35.1+k3s1   192.168.100.50   <none>        Ubuntu 24.04.2 LTS   6.8.0-90-generic   containerd://2.1.5-k3s1

NAMESPACE     NAME                                  READY   STATUS    RESTARTS   AGE   IP          NODE             NOMINATED NODE   READINESS GATES
kube-system   pod/coredns-7566b5ff58-vrs2k          1/1     Running   0          65s   10.42.0.2   192.168.100.50   <none>           <none>
kube-system   pod/metrics-server-786d997795-6mjkg   1/1     Running   0          65s   10.42.0.3   192.168.100.50   <none>           <none>
Workerノードのセットアップ
Worker 1台目 (192.168.11.51)をセットアップします。192.168.11.51のサーバー上で次を実行します。
curl -sfL https://get.k3s.io | INSTALL_K3S_VERSION=v1.35.1+k3s1 \
  K3S_URL=https://192.168.100.50:6443 \
  K3S_TOKEN=CHANGEME \
  sh -s - agent \
  --node-ip=192.168.100.51 \
  --node-name=192.168.100.51
Controlplane(192.168.11.50)のサーバー上でNodeとPodの状態を確認します。
$ kubectl get node,pod -owide -A
NAME                    STATUS   ROLES           AGE    VERSION        INTERNAL-IP      EXTERNAL-IP   OS-IMAGE             KERNEL-VERSION     CONTAINER-RUNTIME
node/192.168.100.50     Ready    control-plane   6m1s   v1.35.1+k3s1   192.168.100.50   <none>        Ubuntu 24.04.2 LTS   6.8.0-90-generic   containerd://2.1.5-k3s1
node/192.168.100.51     Ready    <none>          44s    v1.35.1+k3s1   192.168.100.51   <none>        Ubuntu 24.04.2 LTS   6.8.0-88-generic   containerd://2.1.5-k3s1

NAMESPACE     NAME                                  READY   STATUS    RESTARTS   AGE     IP          NODE             NOMINATED NODE   READINESS GATES
kube-system   pod/coredns-7566b5ff58-vrs2k          1/1     Running   0          5m56s   10.42.0.2   192.168.100.50   <none>           <none>
kube-system   pod/metrics-server-786d997795-6mjkg   1/1     Running   0          5m56s   10.42.0.3   192.168.100.50   <none>           <none>
Worker 2台目 (192.168.11.52)をセットアップします。192.168.11.52のサーバー上で次を実行します。
curl -sfL https://get.k3s.io | INSTALL_K3S_VERSION=v1.35.1+k3s1 \
  K3S_URL=https://192.168.100.50:6443 \
  K3S_TOKEN=CHANGEME \
  sh -s - agent \
  --node-ip=192.168.100.52 \
  --node-name=192.168.100.52
Controlplane(192.168.11.50)のサーバー上でNodeとPodの状態を確認します。
$ kubectl get node,pod -owide -A
NAME                  STATUS   ROLES           AGE     VERSION        INTERNAL-IP      EXTERNAL-IP   OS-IMAGE             KERNEL-VERSION      CONTAINER-RUNTIME
node/192.168.100.50   Ready    control-plane   8m39s   v1.35.1+k3s1   192.168.100.50   <none>        Ubuntu 24.04.2 LTS   6.8.0-90-generic    containerd://2.1.5-k3s1
node/192.168.100.51   Ready    <none>          3m22s   v1.35.1+k3s1   192.168.100.51   <none>        Ubuntu 24.04.2 LTS   6.8.0-88-generic    containerd://2.1.5-k3s1
node/192.168.100.52   Ready    <none>          12s     v1.35.1+k3s1   192.168.100.52   <none>        Ubuntu 24.04.2 LTS   6.8.0-101-generic   containerd://2.1.5-k3s1

NAMESPACE     NAME                                  READY   STATUS    RESTARTS   AGE     IP          NODE             NOMINATED NODE   READINESS GATES
kube-system   pod/coredns-7566b5ff58-vrs2k          1/1     Running   0          8m34s   10.42.0.2   192.168.100.50   <none>           <none>
kube-system   pod/metrics-server-786d997795-6mjkg   1/1     Running   0          8m34s   10.42.0.3   192.168.100.50   <none>           <none>
Synology CSI Driverのインストール
次にSynology CSI Driverをインストールします。次のようにマニフェストを用意します。
git clone https://github.com/SynologyOpenSource/synology-csi.git -b v1.2.1
cd synology-csi
cp config/client-info-template.yml config/client-info.yml
vim config/client-info.yml
client-info.ymlにSynology NASの情報を設定します。
Storage Classの設定ファイルを編集します。
vim deploy/kubernetes/v1.20/storage-class.yml
次の設定にします。
apiVersion: storage.k8s.io/v1
kind: StorageClass
metadata:
  name: synology-iscsi-storage
  annotations:
    storageclass.kubernetes.io/is-default-class: "true"
provisioner: csi.san.synology.com
parameters:
  fsType: 'btrfs'
  dsm: '192.168.100.200'
  location: '/volume1'
  formatOptions: '--nodiscard'
reclaimPolicy: Delete
allowVolumeExpansion: true
次のコマンドでSynology CSI Driverをインストールします。
./scripts/deploy.sh install --basic
次のような出力が得られます。
==== Creates namespace and secrets, then installs synology-csi ====
Current Server Version: v1.35.1+k3s1
Deploy Version: v1.20
namespace/synology-csi created
secret/client-info-secret created
serviceaccount/csi-controller-sa created
clusterrole.rbac.authorization.k8s.io/synology-csi-controller-role created
clusterrolebinding.rbac.authorization.k8s.io/synology-csi-controller-role created
statefulset.apps/synology-csi-controller created
csidriver.storage.k8s.io/csi.san.synology.com created
namespace/synology-csi unchanged
serviceaccount/csi-node-sa created
clusterrole.rbac.authorization.k8s.io/synology-csi-node-role created
clusterrolebinding.rbac.authorization.k8s.io/synology-csi-node-role created
daemonset.apps/synology-csi-node created
storageclass.storage.k8s.io/synology-iscsi-storage created
synology-csi NamespaceのPodの状態を確認します。
$ kubectl get pod -owide -n synology-csi
NAME                        READY   STATUS    RESTARTS   AGE   IP               NODE             NOMINATED NODE   READINESS GATES
synology-csi-controller-0   4/4     Running   0          48s   192.168.100.51   192.168.100.50   <none>           <none>
synology-csi-node-jfnvs     2/2     Running   0          48s   192.168.100.50   192.168.100.50   <none>           <none>
synology-csi-node-r8fpm     2/2     Running   0          48s   192.168.100.52   192.168.100.52   <none>           <none>
synology-csi-node-x44wr     2/2     Running   0          48s   192.168.100.51   192.168.100.51   <none>           <none>
Persistent Volumeの動作確認
次のPVCを作成して、動作を確認します。
cat <<EOF > /tmp/pvc.yaml
---
kind: PersistentVolumeClaim
apiVersion: v1
metadata:
  name: test-dynamic-volume-claim
spec:
  accessModes:
  - ReadWriteOnce
  resources:
    requests:
      storage: 1Gi
  storageClassName: synology-iscsi-storage
---
EOF

kubectl apply -f /tmp/pvc.yaml
次のようにPVCがBound状態になれば成功です。
$ kubectl get pvc
NAME                        STATUS   VOLUME                                     CAPACITY   ACCESS MODES   STORAGECLASS             VOLUMEATTRIBUTESCLASS   AGE
test-dynamic-volume-claim   Bound    pvc-6df54034-c251-4184-9d58-cf7b2fa1c039   1Gi        RWO            synology-iscsi-storage   <unset>                 7s
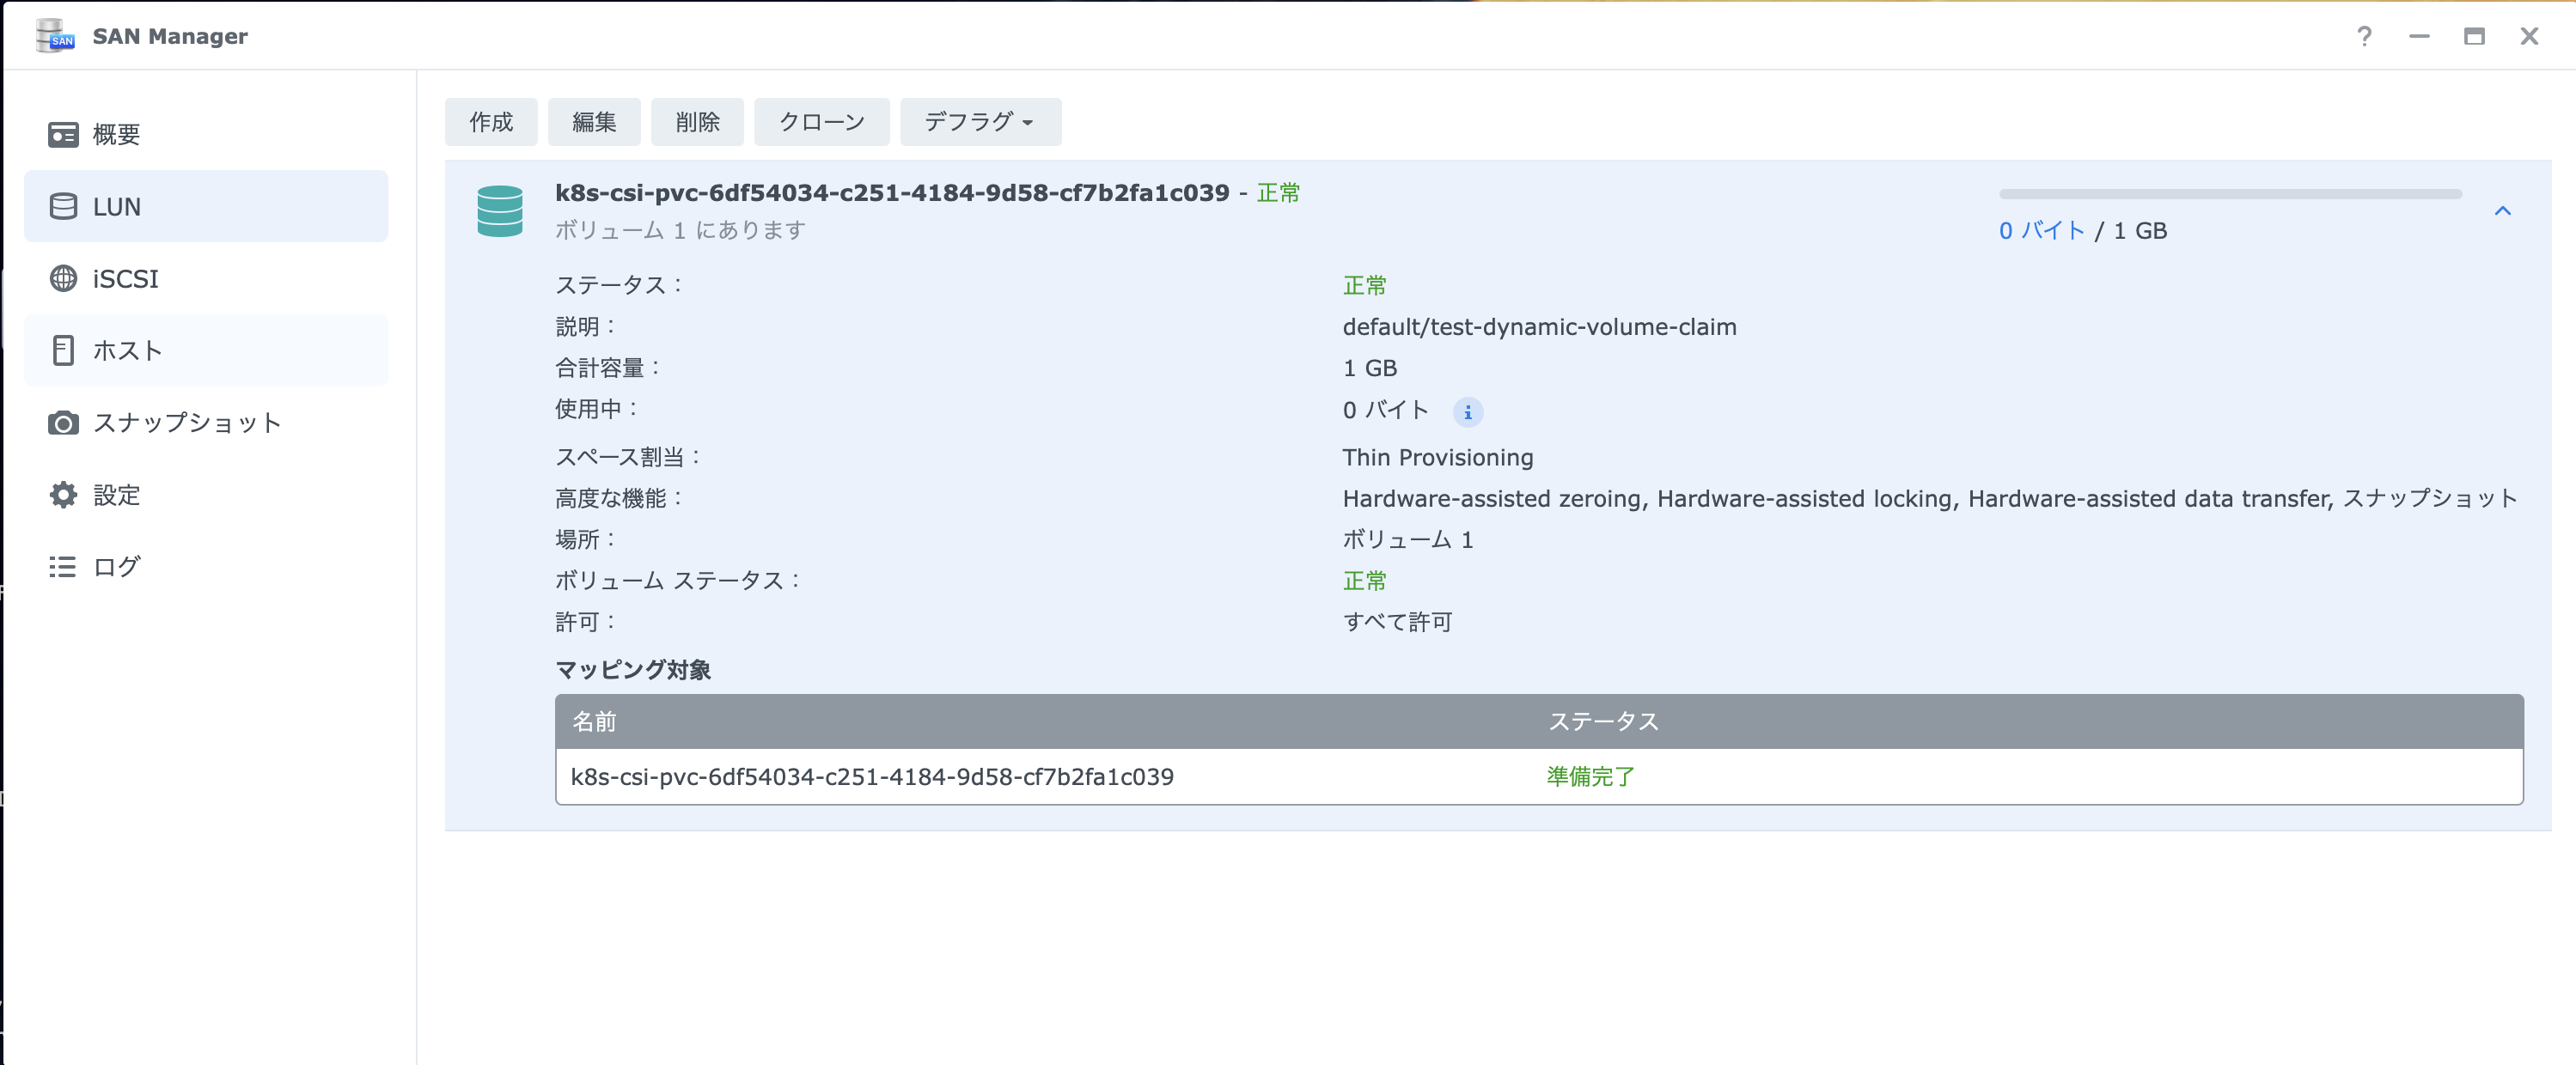
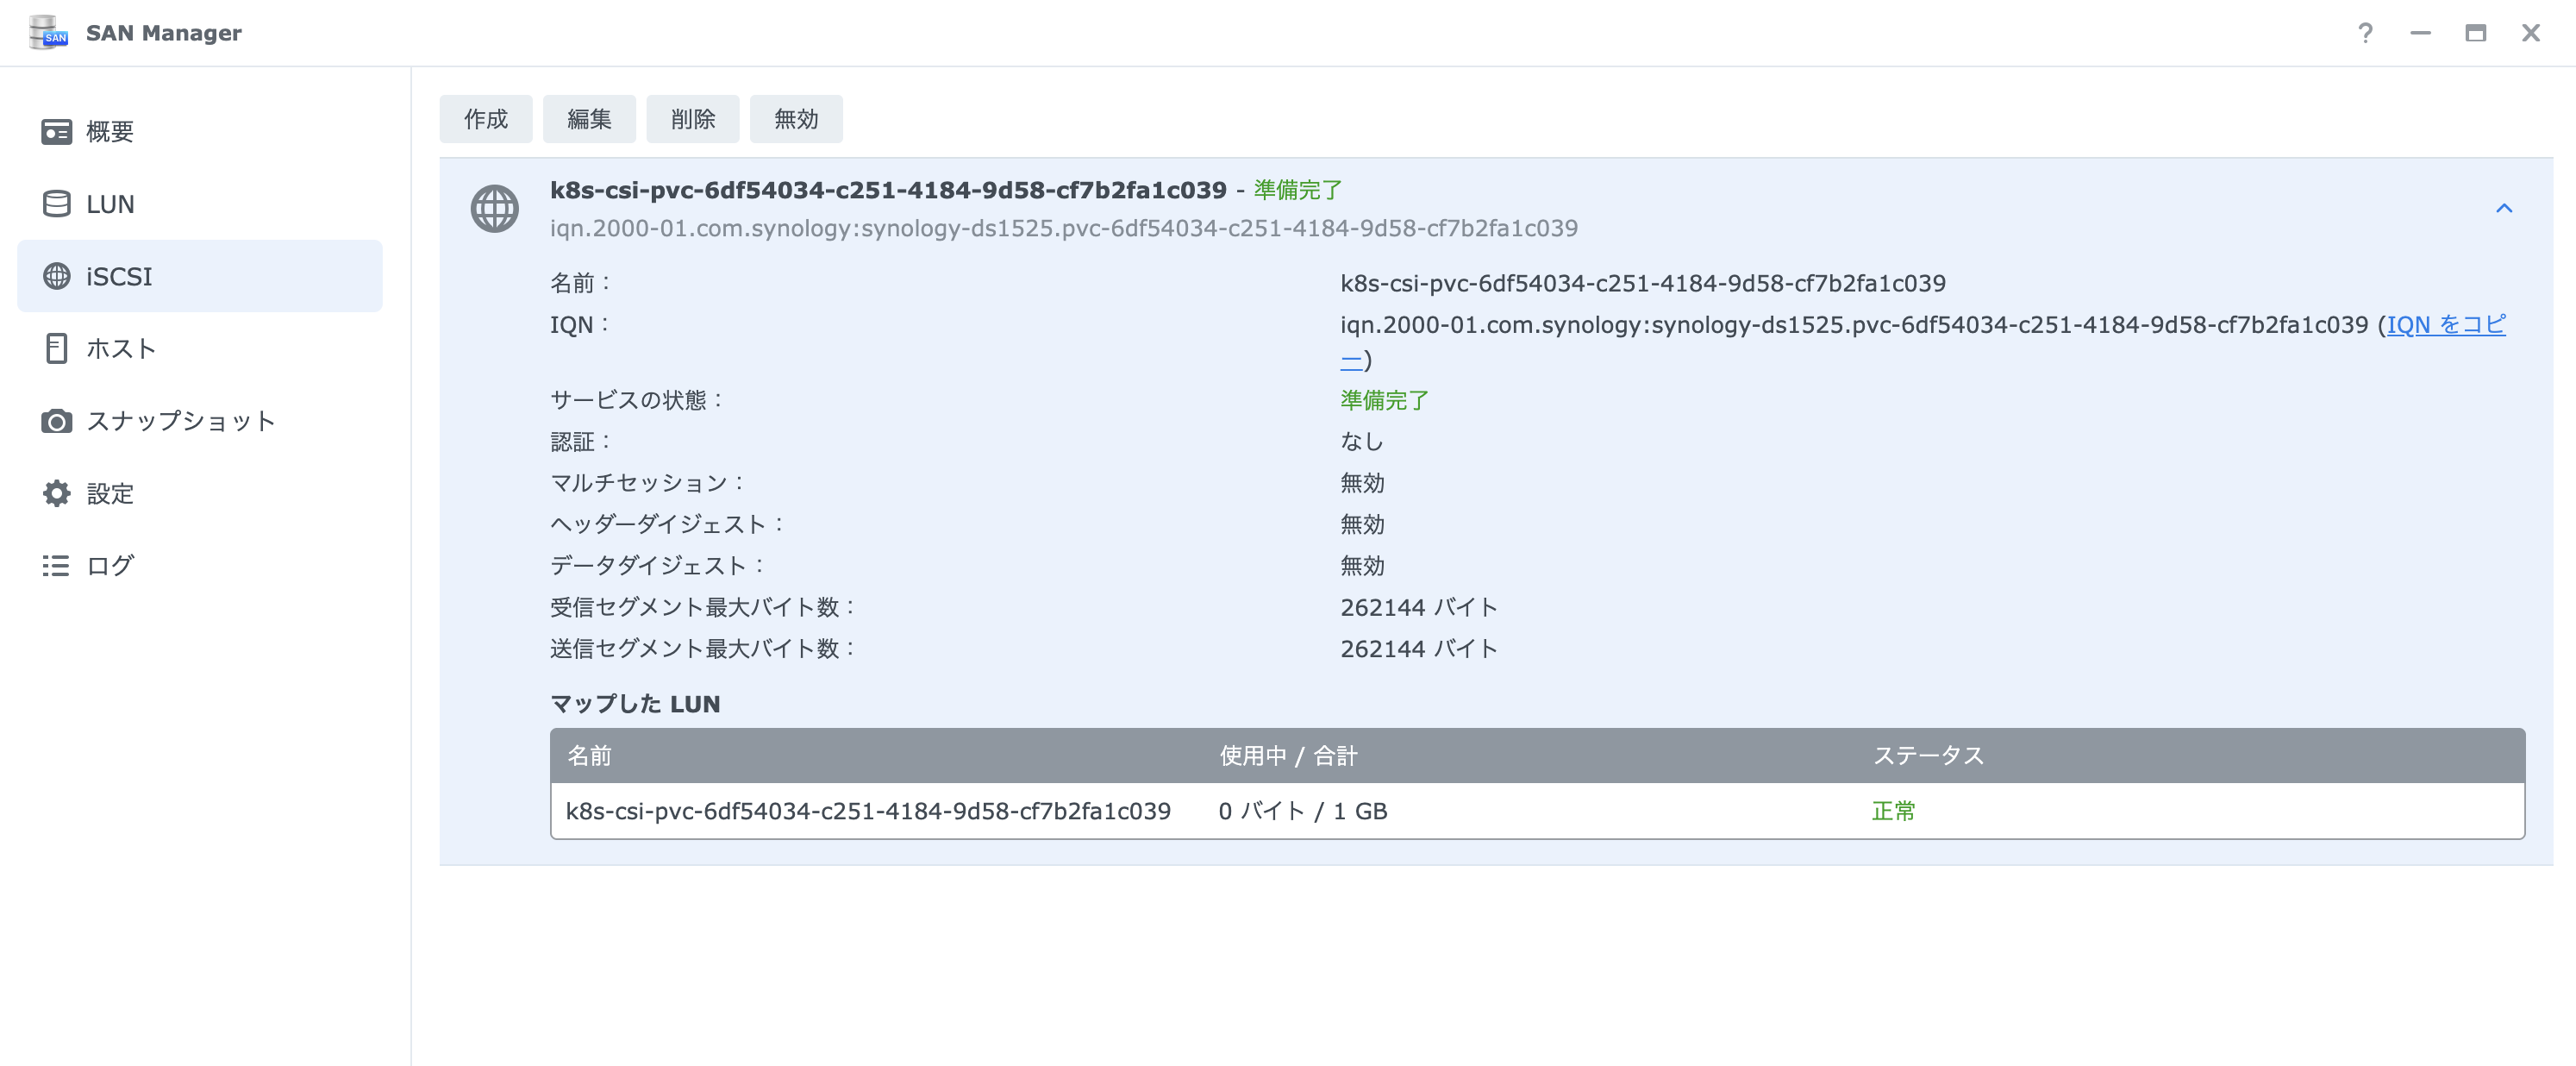
Synology NAS側のSAN ManagerでLUNとiSCSI Targetも作成されていることを確認できます。
このPVCをマウントするPodを作成し、読み書きの動作確認を行います。
cat <<EOF > /tmp/pvc-test-pod.yaml
---
apiVersion: v1
kind: Pod
metadata:
  name: pvc-test-pod
spec:
  securityContext:
    runAsUser: 1000
    runAsGroup: 100
    fsGroup: 100
  containers:
  - name: test-container
    image: index.docker.io/library/busybox:latest
    command: ["/bin/sh"]
    args:
      - -c
      - |
        echo "=== PVC Read/Write Test Start ==="
        echo "Mount point check:"
        df -h /mnt/test
        echo ""

        echo "=== Write Test ==="
        echo "Hello from PVC test - $(date)" >> /mnt/test/test-file.txt
        echo "File write completed"
        echo ""

        echo "=== File Verification ==="
        ls -lah /mnt/test/
        echo ""

        echo "=== Read Test ==="
        cat /mnt/test/test-file.txt
        echo ""

        echo "=== Test Completed ==="
        sleep infinity
    volumeMounts:
    - name: test-volume
      mountPath: /mnt/test
  volumes:
  - name: test-volume
    persistentVolumeClaim:
      claimName: test-dynamic-volume-claim
  restartPolicy: Never
---
EOF

kubectl apply -f /tmp/pvc-test-pod.yaml
次のようにPodがReadyになれば成功です。
$ kubectl  get pod -owide
NAME           READY   STATUS    RESTARTS   AGE   IP          NODE            NOMINATED NODE   READINESS GATES
pvc-test-pod   1/1     Running   0          24s   10.42.1.4   192.168.100.51  <none>           <none>
ログを確認し、読み書きができていることを確認します。
$ kubectl logs pvc-test-pod
=== PVC Read/Write Test Start ===
Mount point check:
Filesystem                Size      Used Available Use% Mounted on
/dev/sdc                  1.0G      5.8M    904.6M   1% /mnt/test

=== Write Test ===
File write completed

=== File Verification ===
total 24K
drwxrwsr-x    1 root     users         26 Mar  2 01:33 .
drwxr-xr-x    3 root     root        4.0K Mar  2 01:33 ..
-rw-r--r--    1 1000     users         51 Mar  2 01:33 test-file.txt

=== Read Test ===
Hello from PVC test - Mon Mar  2 01:31:50 UTC 2026

=== Test Completed ===
次のコマンドでPodを再作成し、データが保持されていることを確認します。
kubectl delete pod pvc-test-pod --force
kubectl apply -f /tmp/pvc-test-pod.yaml
ログを確認し、ファイルに行が追記されていることを確認します。
$ kubectl logs pvc-test-pod
=== PVC Read/Write Test Start ===
Mount point check:
Filesystem                Size      Used Available Use% Mounted on
/dev/sdc                  1.0G      5.8M    904.6M   1% /mnt/test

=== Write Test ===
File write completed

=== File Verification ===
total 24K
drwxrwsr-x    1 root     users         26 Mar  2 01:33 .
drwxr-xr-x    3 root     root        4.0K Mar  2 01:34 ..
-rw-rw-r--    1 1000     users        102 Mar  2 01:34 test-file.txt

=== Read Test ===
Hello from PVC test - Mon Mar  2 01:31:50 UTC 2026
Hello from PVC test - Mon Mar  2 01:31:50 UTC 2026

=== Test Completed ===
次のコマンドでPodとPVCを削除します。
kubectl delete pod pvc-test-pod --force
kubectl delete pvc test-dynamic-volume-claim
SAN ManagerでLUNとiSCSI Targetも削除されていることを確認できます。
HelmでRedisをインストールして動作確認
次にHelmを使ってRedisをインストールし、動作確認を行います。
helm upgrade --install redis \
  oci://registry-1.docker.io/bitnamicharts/redis \
  -n redis \
  --create-namespace --wait \
  --set auth.enabled=false
次のようにPodとPVCが作成されていることを確認します。
$ kubectl get pod,pvc -owide -n redis
NAME                   READY   STATUS    RESTARTS   AGE     IP           NODE             NOMINATED NODE   READINESS GATES
pod/redis-master-0     1/1     Running   0          2m36s   10.42.1.11   192.168.100.51   <none>           <none>
pod/redis-replicas-0   1/1     Running   0          2m36s   10.42.1.12   192.168.100.51   <none>           <none>
pod/redis-replicas-1   1/1     Running   0          114s    10.42.2.5    192.168.100.52   <none>           <none>
pod/redis-replicas-2   1/1     Running   0          72s     10.42.0.4    192.168.100.50   <none>           <none>

NAME                                                STATUS   VOLUME                                     CAPACITY   ACCESS MODES   STORAGECLASS             VOLUMEATTRIBUTESCLASS   AGE     VOLUMEMODE
persistentvolumeclaim/redis-data-redis-master-0     Bound    pvc-5f7792b3-3c49-44d6-8167-0ebc4f4e66fb   8Gi        RWO            synology-iscsi-storage   <unset>                 2m36s   Filesystem
persistentvolumeclaim/redis-data-redis-replicas-0   Bound    pvc-ea541f4a-879a-4ccd-9654-49efc018d87d   8Gi        RWO            synology-iscsi-storage   <unset>                 2m36s   Filesystem
persistentvolumeclaim/redis-data-redis-replicas-1   Bound    pvc-80964ce4-bb0d-4d2d-8b19-881feb82a6ed   8Gi        RWO            synology-iscsi-storage   <unset>                 115s    Filesystem
persistentvolumeclaim/redis-data-redis-replicas-2   Bound    pvc-02e1e1dc-0646-447c-89d5-6f16215d27cf   8Gi        RWO            synology-iscsi-storage   <unset>                 72s     Filesystem
次のコマンドでRedisマスターにポートフォワードし、redis-cliで接続して動作確認を行います。
kubectl port-forward --namespace redis svc/redis-master 6379:6379
次のようにRedisに接続して、データの読み書きができることを確認します。
$ redis-cli -h 127.0.0.1 -p 6379
127.0.0.1:6379> set foo 100
OK
127.0.0.1:6379> get foo
"100"
次のコマンドでRedisをアンインストールし、PVCも削除します。
helm uninstall -n redis redis --wait
kubectl delete pvc -n redis --all
kubectl delete ns redis
K3sにSynology CSI Driverをインストールして、Synology NASのiSCSI LUNをKubernetesのPersistent Volumeとして利用することができました。 K3sは軽量でセットアップも簡単なので、自宅サーバーでKubernetesクラスターを構築するのに便利です。