Notes on Installing VMware Tanzu RabbitMQ 4.3 RPM Package on Rocky Linux 9
Note
- Updated to Tanzu RabbitMQ version 4.3 on 2026-05-13
- Added section on enabling TLS on 2026-05-14
The following steps describe how to install the RPM package for VMware Tanzu RabbitMQ on Rocky Linux 9 and configure a 3-node cluster.
The hostnames will be rmq-1, rmq-2, and rmq-3. Also, the following steps assume that the firewall is disabled; if necessary, please open the following TCP ports.
| Port | Purpose |
|---|---|
| 4369 | epmd (Erlang Port Mapper Daemon) |
| 5672 | AMQP (plaintext) |
| 5671 | AMQPS (TLS) |
| 15672 | HTTP (Management UI) |
| 15671 | HTTPS (Management UI) |
| 25672 | Erlang distribution |
| 35672-35682 | CLI tools |
Table of Contents
Downloading VMware Tanzu RabbitMQ
Log in to Broadcom Support and access the VMware Tanzu RabbitMQ download page.
Select the latest version. This guide uses version 4.3.0.

Check "I agree to the Terms and Conditions" (requires clicking the link),

and download the installer for EL9 to ~/Downloads or similar.

(If necessary) check the files contained in the rpm.
rpm -qlp tanzu-rabbitmq-server-4.3.0-1.el9.x86_64.rpm
Installing Tanzu RabbitMQ
The work in this section is performed on rmq-1.
Install packages used for installation or convenient for working.
sudo dnf install -y wget lsof less vim
Download the Erlang RPM package required for RabbitMQ.
wget https://github.com/rabbitmq/erlang-rpm/releases/download/v27.3.4.11/erlang-27.3.4.11-1.el9.x86_64.rpm
Install Tanzu RabbitMQ and its dependency packages.
sudo dnf install -y logrotate erlang-27.3.4.11-1.el9.x86_64.rpm tanzu-rabbitmq-server-4.3.0-1.el9.x86_64.rpm
Check the versions of the installed packages.
$ rpm -qa | grep -E 'erlang|rabbitmq'
erlang-27.3.4.11-1.el9.x86_64
tanzu-rabbitmq-server-4.3.0-1.el9.x86_64

$ sudo rabbitmqctl --version
4.3.0
Enable the Tanzu RabbitMQ service and start the service.
sudo systemctl enable tanzu-rabbitmq-server
sudo systemctl start tanzu-rabbitmq-server
Check the status of the Tanzu RabbitMQ service. Ensure that Started Tanzu RabbitMQ server. is output.
$ systemctl status tanzu-rabbitmq-server | cat
● tanzu-rabbitmq-server.service - Tanzu RabbitMQ server
     Loaded: loaded (/usr/lib/systemd/system/tanzu-rabbitmq-server.service; enabled; preset: disabled)
    Drop-In: /run/systemd/system/service.d
             └─zzz-lxc-service.conf
     Active: active (running) since Wed 2026-05-13 11:24:34 JST; 5s ago
   Main PID: 1024 (beam.smp)
      Tasks: 52 (limit: 617453)
     Memory: 158.3M (peak: 173.3M)
        CPU: 2.656s
     CGroup: /system.slice/tanzu-rabbitmq-server.service
             ├─1024 /usr/lib64/erlang/erts-15.2.7.8/bin/beam.smp -W w -MBas ageffcbf -MHas ageffcbf -MBlmbcs 512 -MHlmbcs 512 -MMmcs 30 -pc unicode -P 1048576 -t 5000000 -stbt db -zdbbl 128000 -sbwt none -sbwtdcpu none -sbwtdio none -- -root /usr/lib64/erlang -bindir /usr/lib64/erlang/erts-15.2.7.8/bin -progname erl -- -home /var/lib/rabbitmq -- -pa "" -noshell -noinput -s rabbit boot -boot start_sasl -syslog logger "[]" -syslog syslog_error_logger false -kernel prevent_overlapping_partitions false --
             ├─1037 erl_child_setup 32768
             ├─1084 /usr/lib64/erlang/erts-15.2.7.8/bin/inet_gethost 4
             ├─1085 /usr/lib64/erlang/erts-15.2.7.8/bin/inet_gethost 4
             └─1088 /bin/sh -s rabbit_disk_monitor

May 13 11:24:33 rmq-1 rabbitmq-server[1024]:   Doc guides:  https://www.rabbitmq.com/docs
May 13 11:24:33 rmq-1 rabbitmq-server[1024]:   Support:     https://www.rabbitmq.com/docs/contact
May 13 11:24:33 rmq-1 rabbitmq-server[1024]:   Tutorials:   https://www.rabbitmq.com/tutorials
May 13 11:24:33 rmq-1 rabbitmq-server[1024]:   Monitoring:  https://www.rabbitmq.com/docs/monitoring
May 13 11:24:33 rmq-1 rabbitmq-server[1024]:   Upgrading:   https://www.rabbitmq.com/docs/upgrade
May 13 11:24:33 rmq-1 rabbitmq-server[1024]:   Logs: /var/log/rabbitmq/rabbit@rmq-1.log
May 13 11:24:33 rmq-1 rabbitmq-server[1024]:         <stdout>
May 13 11:24:33 rmq-1 rabbitmq-server[1024]:   Config file(s): (none)
May 13 11:24:34 rmq-1 rabbitmq-server[1024]:   Starting broker... completed with 0 plugins.
May 13 11:24:34 rmq-1 systemd[1]: Started Tanzu RabbitMQ server.
Check the listening ports.
$ sudo lsof -n -i -P | grep -i listen | grep rabbitmq
epmd      881 rabbitmq    3u  IPv4 629997      0t0  TCP *:4369 (LISTEN)
epmd      881 rabbitmq    4u  IPv6 629998      0t0  TCP *:4369 (LISTEN)
beam.smp 1024 rabbitmq   24u  IPv4 627526      0t0  TCP *:25672 (LISTEN)
beam.smp 1024 rabbitmq   39u  IPv6 627537      0t0  TCP *:5672 (LISTEN)
Verify that ping to RabbitMQ succeeds.
$ sudo rabbitmq-diagnostics ping
Will ping rabbit@rmq-1. This only checks if the OS process is running and registered with epmd. Timeout: 60000 ms.
Ping succeeded
Cloning rmq-1 to create rmq-2 and rmq-3
Apply the work done so far to rmq-2 and rmq-3 as well. It is recommended to clone the rmq-1 VM to create rmq-2 and rmq-3. If you build rmq-2 and rmq-3 from scratch, copy the contents of /var/lib/rabbitmq/.erlang.cookie from rmq-1 and place them on rmq-2 and rmq-3 before starting them.
$ sudo cat /var/lib/rabbitmq/.erlang.cookie
QQFAJVSPYEVMCQLYCPTH
Enter the IP addresses and hostnames of rmq-1, rmq-2, and rmq-3 into /etc/hosts on all nodes. Below is an example. If using pre-determined static IP addresses, it is good to create this at the time of cloning rmq-1.
cat <<EOF | sudo tee -a /etc/hosts
192.168.139.108 rmq-1
192.168.139.201 rmq-2
192.168.139.227 rmq-3
EOF
Creating the RabbitMQ Cluster
Execute the following commands on rmq-2 and rmq-3 to join the cluster of rmq-1.
sudo rabbitmqctl join_cluster rabbit@rmq-1
Warning
Older versions of RabbitMQ require additional steps for cluster setup.
Execute the following command on any node.
Check the cluster status with the following command. Ensure that three nodes are displayed.
$ sudo rabbitmqctl cluster_status
Cluster status of node rabbit@rmq-1 ...
Basics

Cluster name: rabbit@rmq-1
Total CPU cores available cluster-wide: 48

Cluster Tags

(none)

Disk Nodes

rabbit@rmq-1
rabbit@rmq-2
rabbit@rmq-3

Running Nodes

rabbit@rmq-1
rabbit@rmq-2
rabbit@rmq-3

Versions

rabbit@rmq-1: Tanzu RabbitMQ 4.3.0 on Erlang 27.3.4.11
rabbit@rmq-2: Tanzu RabbitMQ 4.3.0 on Erlang 27.3.4.11
rabbit@rmq-3: Tanzu RabbitMQ 4.3.0 on Erlang 27.3.4.11

CPU Cores

Node: rabbit@rmq-1, available CPU cores: 16
Node: rabbit@rmq-2, available CPU cores: 16
Node: rabbit@rmq-3, available CPU cores: 16

Maintenance status

Node: rabbit@rmq-1, status: not under maintenance
Node: rabbit@rmq-2, status: not under maintenance
Node: rabbit@rmq-3, status: not under maintenance

Alarms

(none)

Network Partitions

(none)

Listeners

Node: rabbit@rmq-1, interface: [::], port: 25672, protocol: clustering, purpose: inter-node and CLI tool communication
Node: rabbit@rmq-1, interface: [::], port: 5672, protocol: amqp, purpose: AMQP 0-9-1 and AMQP 1.0
Node: rabbit@rmq-1, interface: [::], port: 15672, protocol: http, purpose: HTTP API
Node: rabbit@rmq-2, interface: [::], port: 25672, protocol: clustering, purpose: inter-node and CLI tool communication
Node: rabbit@rmq-2, interface: [::], port: 5672, protocol: amqp, purpose: AMQP 0-9-1 and AMQP 1.0
Node: rabbit@rmq-2, interface: [::], port: 15672, protocol: http, purpose: HTTP API
Node: rabbit@rmq-3, interface: [::], port: 15672, protocol: http, purpose: HTTP API
Node: rabbit@rmq-3, interface: [::], port: 25672, protocol: clustering, purpose: inter-node and CLI tool communication
Node: rabbit@rmq-3, interface: [::], port: 5672, protocol: amqp, purpose: AMQP 0-9-1 and AMQP 1.0

Feature flags

Flag: classic_mirrored_queue_version, state: enabled
Flag: classic_queue_type_delivery_support, state: enabled
Flag: detailed_queues_endpoint, state: enabled
Flag: direct_exchange_routing_v2, state: enabled
Flag: drop_unroutable_metric, state: enabled
Flag: empty_basic_get_metric, state: enabled
Flag: feature_flags_v2, state: enabled
Flag: implicit_default_bindings, state: enabled
Flag: khepri_db, state: enabled
Flag: listener_records_in_ets, state: enabled
Flag: maintenance_mode_status, state: enabled
Flag: message_containers, state: enabled
Flag: message_containers_deaths_v2, state: enabled
Flag: quorum_queue, state: enabled
Flag: quorum_queue_non_voters, state: enabled
Flag: rabbit_exchange_type_local_random, state: enabled
Flag: rabbitmq_4.0.0, state: enabled
Flag: rabbitmq_4.1.0, state: enabled
Flag: rabbitmq_4.2.0, state: enabled
Flag: rabbitmq_4.3.0, state: enabled
Flag: restart_streams, state: enabled
Flag: stream_filtering, state: enabled
Flag: stream_queue, state: enabled
Flag: stream_sac_coordinator_unblock_group, state: enabled
Flag: stream_single_active_consumer, state: enabled
Flag: stream_update_config_command, state: enabled
Flag: tie_binding_to_dest_with_keep_while_cond, state: enabled
Flag: topic_binding_projection_v4, state: enabled
Flag: track_qq_members_uids, state: enabled
Flag: tracking_records_in_ets, state: enabled
Flag: user_limits, state: enabled
Flag: virtual_host_metadata, state: enabled
(Optional) Change the cluster name from rabbit@rmq-1 to rmq-cluster.
sudo rabbitmqctl set_cluster_name rmq-cluster
Verify the change.
$ sudo rabbitmqctl cluster_status | grep "Cluster name:"
Cluster name: rmq-cluster
Create an admin user. The guest user configured by default is only available from localhost.
sudo rabbitmqctl add_user admin 'VMware1!'
sudo rabbitmqctl set_user_tags admin administrator
sudo rabbitmqctl set_permissions -p / admin ".*" ".*" ".*"
Check the user list.
$ sudo rabbitmqctl list_users
Listing users ...
user	tags
admin	[administrator]
guest	[administrator]
(Optional) Delete the guest user.
sudo rabbitmqctl delete_user guest
Enabling the Management Plugin
Execute the following command on each node to enable the RabbitMQ Management Plugin.
sudo rabbitmq-plugins enable rabbitmq_management
Check the listening ports and confirm that 15672 has been added.
$ sudo lsof -n -i -P | grep -i listen | grep rabbitmq
epmd      881 rabbitmq    3u  IPv4 629997      0t0  TCP *:4369 (LISTEN)
epmd      881 rabbitmq    4u  IPv6 629998      0t0  TCP *:4369 (LISTEN)
beam.smp 1024 rabbitmq   24u  IPv4 627526      0t0  TCP *:25672 (LISTEN)
beam.smp 1024 rabbitmq   39u  IPv6 627537      0t0  TCP *:5672 (LISTEN)
beam.smp 1024 rabbitmq   42u  IPv4 661184      0t0  TCP *:15672 (LISTEN)
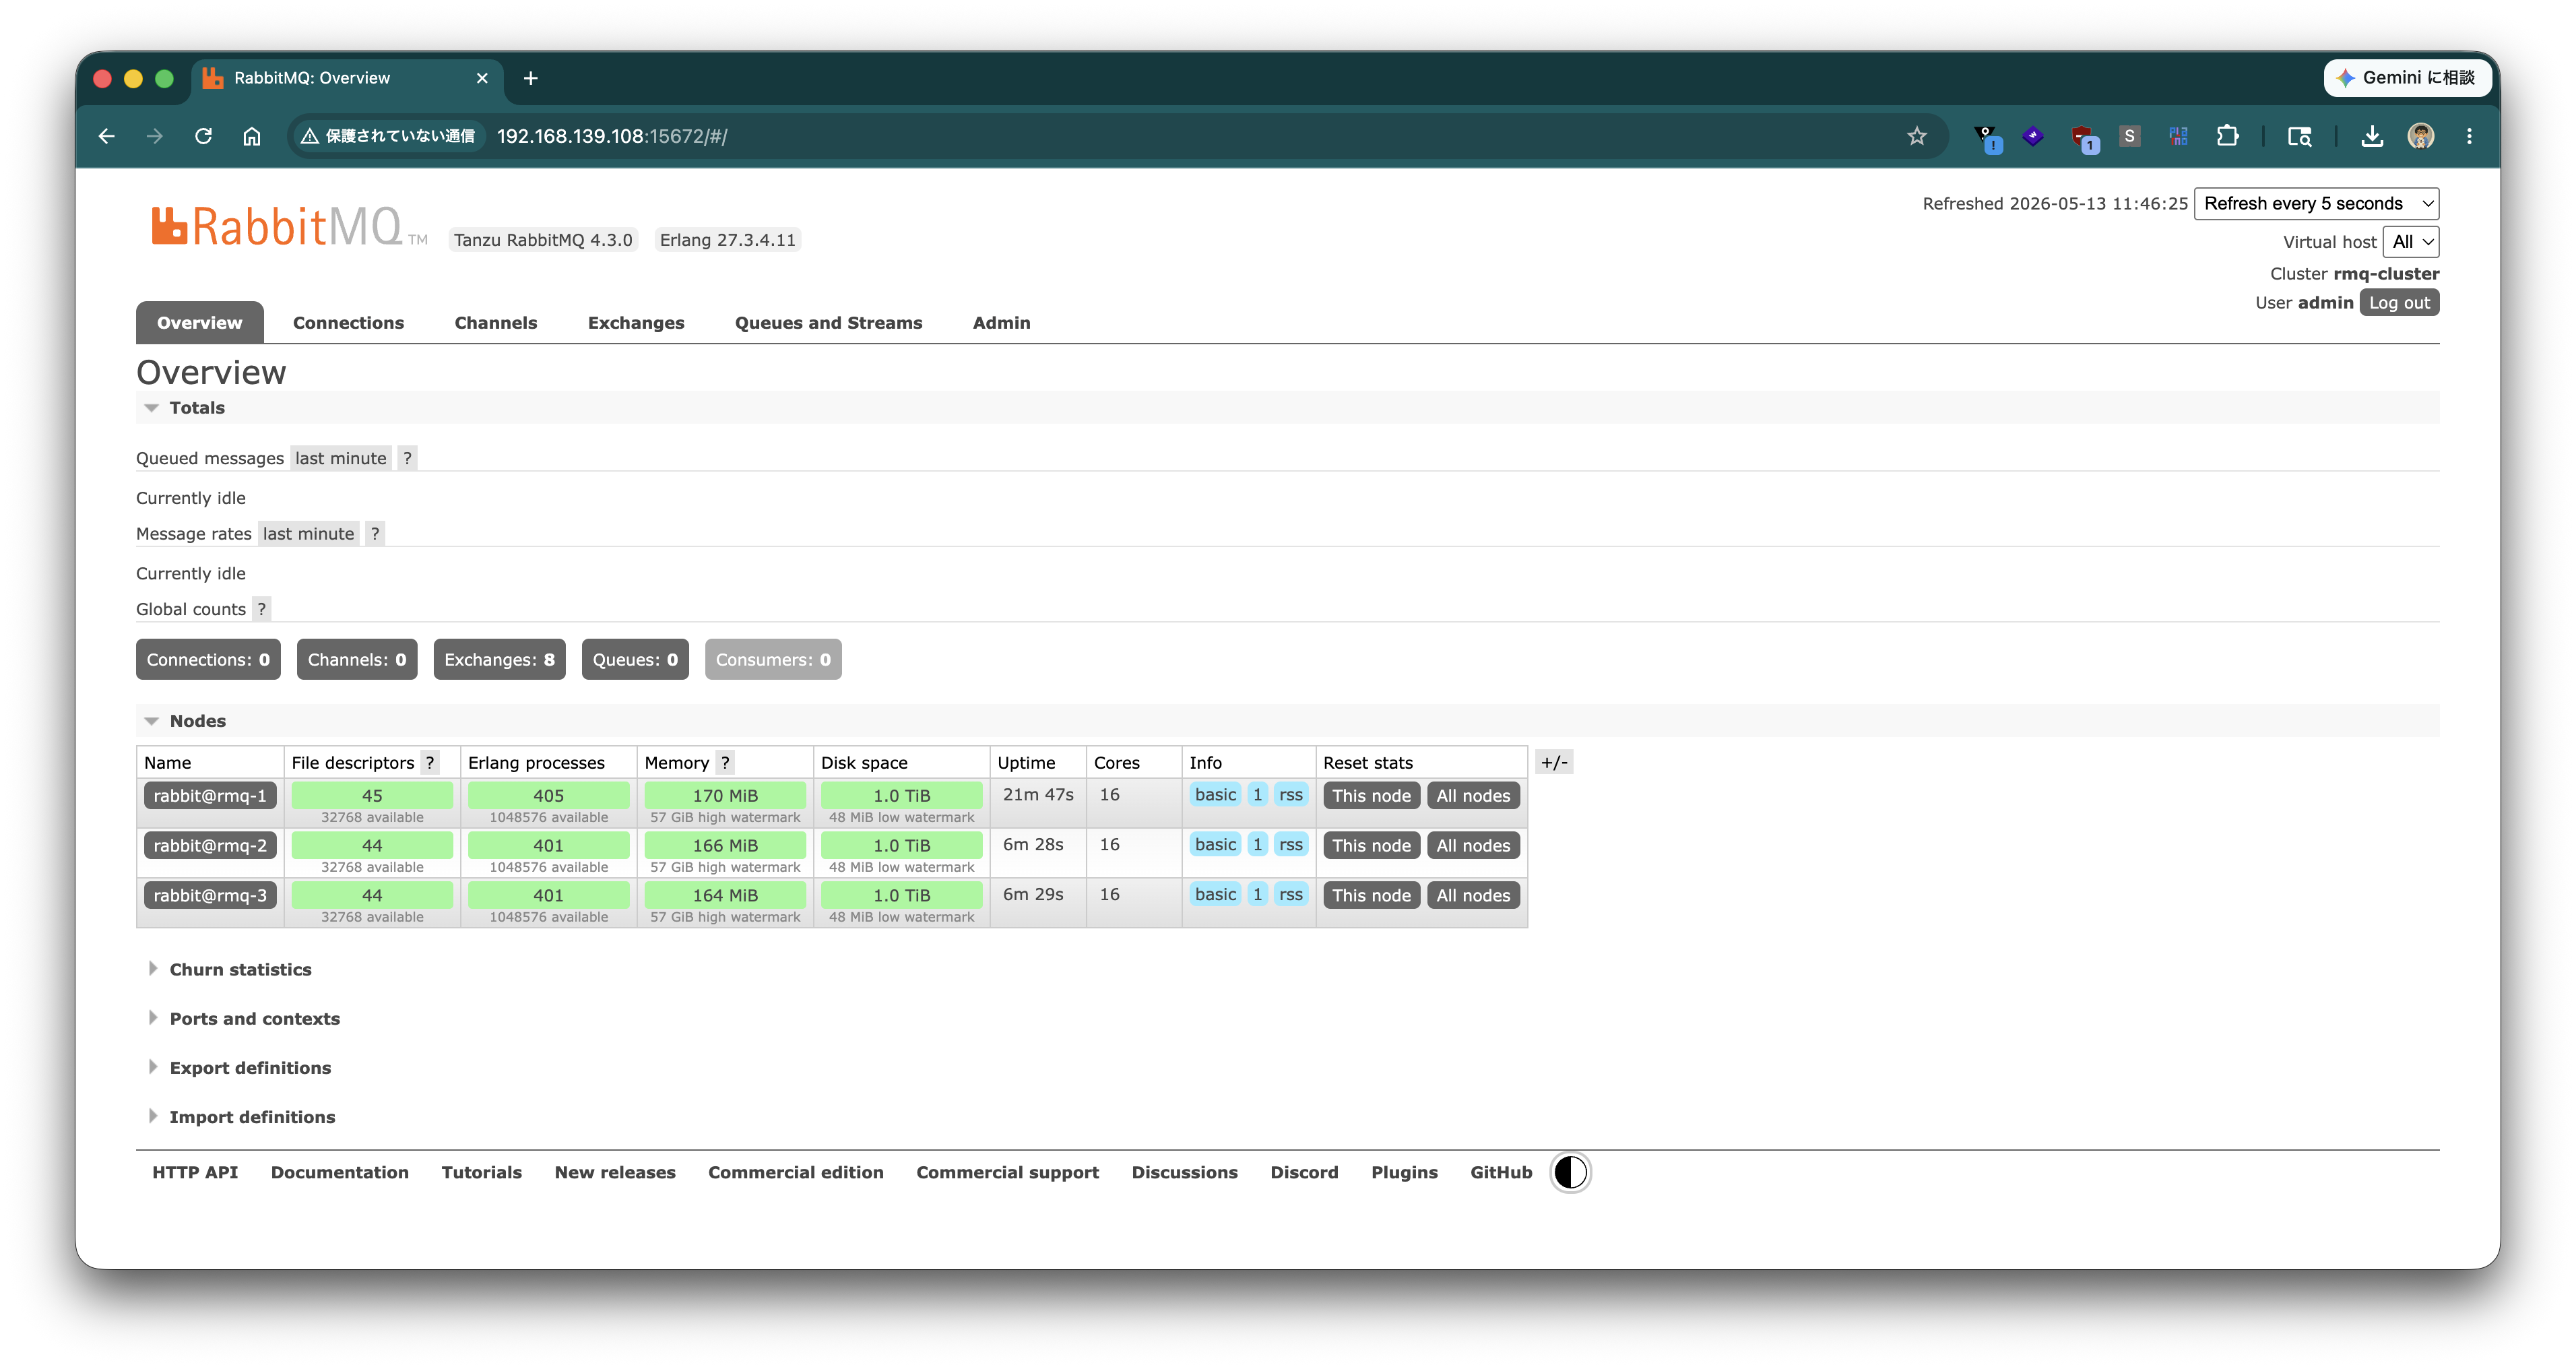
Access port 15672 of any node's IP in a browser and log in with the admin user. A screen like the following will be displayed.
Verification
Verify operation with a simple Python program.
python3 -m venv .venv
source .venv/bin/activate
pip install --upgrade pip
pip install pika
Create the following rabbitmq_cluster_check.py.
#!/usr/bin/env python3
"""
RabbitMQ Cluster Operation Check Script

- Connects to any node in the cluster (failover)
- Creates a Quorum Queue
- Publishes a specified number of messages
- Consumes from the same queue and verifies count and content
- Exits 0 on success / exits 1 on failure

Required packages:
    pip install pika

Example execution (with TLS):
    python3 rabbitmq_cluster_check.py \
        --hosts rabbit01,rabbit02,rabbit03 \
        --port 5671 \
        --user admin --password 'YOUR_PASSWORD' \
        --ca /etc/rabbitmq/certs/ca.crt \
        --count 5 --cleanup

Example execution (mTLS / with client certificate):
    python3 rabbitmq_cluster_check.py \
        --hosts rabbit01,rabbit02,rabbit03 \
        --port 5671 \
        --user admin --password 'YOUR_PASSWORD' \
        --ca /etc/rabbitmq/certs/ca.crt \
        --cert /etc/rabbitmq/certs/client.crt \
        --key /etc/rabbitmq/certs/client.key \
        --count 5 --cleanup

Example execution (without TLS):
    python3 rabbitmq_cluster_check.py \
        --hosts rabbit01,rabbit02,rabbit03 \
        --port 5672 --no-tls \
        --user admin --password 'YOUR_PASSWORD' \
        --count 5 --cleanup
"""

import argparse
import ssl
import sys
import time
import uuid

import pika


def build_params(hosts, port, vhost, user, password,
                 use_tls, ca_file, skip_verify,
                 client_cert=None, client_key=None):
    credentials = pika.PlainCredentials(user, password)

    ssl_context = None
    if use_tls:
        ssl_context = ssl.create_default_context(cafile=ca_file)
        if client_cert and client_key:
            ssl_context.load_cert_chain(certfile=client_cert, keyfile=client_key)
        if skip_verify:
            ssl_context.check_hostname = False
            ssl_context.verify_mode = ssl.CERT_NONE

    params_list = []
    for host in hosts:
        kwargs = dict(
            host=host,
            port=port,
            virtual_host=vhost,
            credentials=credentials,
            connection_attempts=2,
            retry_delay=1,
            socket_timeout=10,
            heartbeat=30,
        )
        if use_tls:
            kwargs["ssl_options"] = pika.SSLOptions(ssl_context, server_hostname=host)
        params_list.append(pika.ConnectionParameters(**kwargs))
    return params_list


def connect_with_failover(params_list):
    last_err = None
    for params in params_list:
        try:
            conn = pika.BlockingConnection(params)
            print(f"[OK]   Connected to {params.host}:{params.port}")
            return conn
        except Exception as e:
            print(f"[WARN] Failed to connect to {params.host}: {e}")
            last_err = e
    raise RuntimeError(f"All nodes unreachable. Last error: {last_err}")


def main():
    p = argparse.ArgumentParser(description="RabbitMQ cluster sanity check")
    p.add_argument("--hosts", default="rabbit01,rabbit02,rabbit03",
                   help="comma-separated hostnames (default: rabbit01,rabbit02,rabbit03)")
    p.add_argument("--port", type=int, default=5671,
                   help="AMQP port (default: 5671 for TLS, use 5672 for plain)")
    p.add_argument("--vhost", default="/", help="vhost (default: /)")
    p.add_argument("--user", default="admin", help="username (default: admin)")
    p.add_argument("--password", required=True, help="password")
    p.add_argument("--queue", default="test.quorum.check",
                   help="queue name (default: test.quorum.check)")
    p.add_argument("--count", type=int, default=5, help="number of messages (default: 5)")
    p.add_argument("--no-tls", action="store_true", help="disable TLS")
    p.add_argument("--ca", default="/etc/rabbitmq/certs/ca.crt",
                   help="CA certificate path for TLS")
    p.add_argument("--cert", default=None,
                   help="client certificate path for mutual TLS (mTLS)")
    p.add_argument("--key", default=None,
                   help="client private key path for mutual TLS (mTLS)")
    p.add_argument("--skip-verify", action="store_true",
                   help="skip TLS hostname/cert verification (NOT for production)")
    p.add_argument("--cleanup", action="store_true",
                   help="delete queue after test")
    args = p.parse_args()

    hosts = [h.strip() for h in args.hosts.split(",") if h.strip()]
    use_tls = not args.no_tls

    print("=" * 60)
    print(f" Target:     {hosts} port={args.port} vhost={args.vhost}")
    print(f" User:       {args.user}")
    print(f" Queue:      {args.queue} (quorum)")
    print(f" Messages:   {args.count}")
    print(f" TLS:        {'enabled (CA=' + args.ca + ')' if use_tls else 'disabled'}")
    print("=" * 60)

    params_list = build_params(
        hosts=hosts, port=args.port, vhost=args.vhost,
        user=args.user, password=args.password,
        use_tls=use_tls, ca_file=args.ca, skip_verify=args.skip_verify,
        client_cert=args.cert, client_key=args.key,
    )

    # ---- Connect (with failover) ----
    connection = connect_with_failover(params_list)
    channel = connection.channel()
    channel.confirm_delivery()  # Enable Publisher Confirms

    # ---- Declare Quorum Queue ----
    print(f"[INFO] Declaring quorum queue: {args.queue}")
    channel.queue_declare(
        queue=args.queue,
        durable=True,
        arguments={"x-queue-type": "quorum"},
    )

    # ---- Publish ----
    run_id = uuid.uuid4().hex[:8]
    print(f"[INFO] Publishing {args.count} messages (run_id={run_id})")
    sent = []
    for i in range(1, args.count + 1):
        body = f"[{run_id}] msg-{i:03d} ts={int(time.time())}"
        channel.basic_publish(
            exchange="",
            routing_key=args.queue,
            body=body.encode("utf-8"),
            properties=pika.BasicProperties(
                delivery_mode=2,          # persistent
                content_type="text/plain",
            ),
            mandatory=True,
        )
        sent.append(body)
        print(f"  -> SENT {body}")

    # ---- Consume ----
    print(f"[INFO] Consuming up to {args.count} messages")
    received = []
    # Target only messages sent this time (filter by run_id)
    for _ in range(args.count * 2):  # Loop with margin
        method, _, body = channel.basic_get(queue=args.queue, auto_ack=False)
        if method is None:
            break
        msg = body.decode("utf-8")
        if run_id in msg:
            received.append(msg)
            channel.basic_ack(delivery_tag=method.delivery_tag)
            print(f"  <- RECV {msg}")
        else:
            # Requeue messages from other run_ids
            channel.basic_nack(delivery_tag=method.delivery_tag, requeue=True)
        if len(received) == args.count:
            break

    # ---- Verify ----
    missing = set(sent) - set(received)
    success = (len(sent) == len(received)) and not missing

    print("-" * 60)
    print(f" Sent:     {len(sent)}")
    print(f" Received: {len(received)}")
    if missing:
        print(f" Missing:  {len(missing)}")
        for m in sorted(missing):
            print(f"   - {m}")
    print("-" * 60)

    # ---- Cleanup ----
    if args.cleanup:
        print(f"[INFO] Deleting queue: {args.queue}")
        channel.queue_delete(queue=args.queue)

    connection.close()

    if success:
        print("[PASS] RabbitMQ cluster check succeeded.")
        sys.exit(0)
    else:
        print("[FAIL] RabbitMQ cluster check failed.")
        sys.exit(1)


if __name__ == "__main__":
    try:
        main()
    except KeyboardInterrupt:
        print("[ABORT] Interrupted by user.")
        sys.exit(130)
    except Exception as e:
        print(f"[ERROR] {e}")
        sys.exit(1)
Execute the script.
python rabbitmq_cluster_check.py --hosts rmq-1,rmq-2,rmq-3 --port 5672 --user admin --password 'VMware1!' --count 5 --no-tls --cleanup
If the output is as follows, it is OK.
============================================================
 Target:     ['rmq-1', 'rmq-2', 'rmq-3'] port=5672 vhost=/
 User:       admin
 Queue:      test.quorum.check (quorum)
 Messages:   5
 TLS:        disabled
============================================================
[OK]   Connected to rmq-1:5672
[INFO] Declaring quorum queue: test.quorum.check
[INFO] Publishing 5 messages (run_id=0fb619ec)
  -> SENT [0fb619ec] msg-001 ts=1776328534
  -> SENT [0fb619ec] msg-002 ts=1776328534
  -> SENT [0fb619ec] msg-003 ts=1776328534
  -> SENT [0fb619ec] msg-004 ts=1776328534
  -> SENT [0fb619ec] msg-005 ts=1776328534
[INFO] Consuming up to 5 messages
  <- RECV [0fb619ec] msg-001 ts=1776328534
  <- RECV [0fb619ec] msg-002 ts=1776328534
  <- RECV [0fb619ec] msg-003 ts=1776328534
  <- RECV [0fb619ec] msg-004 ts=1776328534
  <- RECV [0fb619ec] msg-005 ts=1776328534
------------------------------------------------------------
 Sent:     5
 Received: 5
------------------------------------------------------------
[PASS] RabbitMQ cluster check succeeded.
Enabling TLS
So far, the configuration has been plaintext (AMQP 5672, Management UI 15672). In this section, we will gradually enable TLS for client communication and then for inter-node communication.
- Generate certificates (CA, server, client) with openssl
- Distribute certificates to all nodes
- Enable AMQPS (5671)
- Enable HTTPS (15671) for Management UI
- Enable TLS for inter-node communication (Erlang distribution)
- Enable mTLS (client certificate verification)
Note
rabbitmqctl and rabbitmq-diagnostics communicate via Erlang distribution, not AMQP. Therefore, enabling TLS for AMQP (5671) does not affect CLI tools, but after enabling TLS for inter-node communication (port 25672), TLS settings will also be required for the CLI tools (described later).
Generating TLS Certificates
On rmq-1, use the openssl command to generate one CA, one server certificate shared by the 3 nodes (with SAN containing rmq-1, rmq-2, rmq-3), and a client certificate for the inter-node communication client role and mTLS testing. Keys are RSA 4096, validity is 3650 days. This single issuance covers all necessary cases in the article (AMQPS / Management HTTPS / inter-node distribution server/client roles / AMQP mTLS).
Create a working directory.
mkdir -p ~/certs && cd ~/certs
Create the CA private key and self-signed certificate.
# CA private key
openssl genrsa -out ca_key.pem 4096
chmod 600 ca_key.pem

# Self-signed CA certificate (10 years)
openssl req -x509 -new -key ca_key.pem -sha256 -days 3650 \
  -subj "/O=RabbitMQ Lab/CN=RabbitMQ Lab CA" \
  -out ca_certificate.pem
Create the server certificate configuration file server.cnf. By listing the hostnames of the 3 nodes in subjectAltName (SAN), a single certificate can be shared across all nodes.
cat <<'EOF' > server.cnf
[req]
distinguished_name = dn
prompt             = no

[dn]
O  = server
CN = rmq-cluster

[v3_server]
basicConstraints = CA:FALSE
keyUsage         = critical, digitalSignature, keyEncipherment
extendedKeyUsage = serverAuth
subjectAltName   = @alt_names

[alt_names]
DNS.1 = rmq-1
DNS.2 = rmq-2
DNS.3 = rmq-3
EOF
Generate the server certificate (with SAN, shared by all nodes).
# Server private key
openssl genrsa -out server_key.pem 4096
chmod 600 server_key.pem

# CSR
openssl req -new -key server_key.pem -config server.cnf -out server.csr

# Sign with CA (SAN/EKU are taken from the v3_server section of server.cnf)
openssl x509 -req -in server.csr -sha256 -days 3650 \
  -CA ca_certificate.pem -CAkey ca_key.pem -CAcreateserial \
  -extfile server.cnf -extensions v3_server \
  -out server_certificate.pem
Create the client certificate configuration file client.cnf. Since the client role for inter-node communication requires extendedKeyUsage = clientAuth, it is issued as a separate certificate from the server certificate.
cat <<'EOF' > client.cnf
[req]
distinguished_name = dn
prompt             = no

[dn]
O  = client
CN = rmq-client

[v3_client]
basicConstraints = CA:FALSE
keyUsage         = critical, digitalSignature, keyEncipherment
extendedKeyUsage = clientAuth
EOF
Generate the client certificate.
# Client private key
openssl genrsa -out client_key.pem 4096
chmod 600 client_key.pem

# CSR
openssl req -new -key client_key.pem -config client.cnf -out client.csr

# Sign with CA
openssl x509 -req -in client.csr -sha256 -days 3650 \
  -CA ca_certificate.pem -CAkey ca_key.pem -CAcreateserial \
  -extfile client.cnf -extensions v3_client \
  -out client_certificate.pem
Check the SAN and EKU of the generated certificates.
$ openssl x509 -in server_certificate.pem -noout -ext subjectAltName,extendedKeyUsage
X509v3 Extended Key Usage:
    TLS Web Server Authentication
X509v3 Subject Alternative Name:
    DNS:rmq-1, DNS:rmq-2, DNS:rmq-3

$ openssl x509 -in client_certificate.pem -noout -ext extendedKeyUsage
X509v3 Extended Key Usage:
    TLS Web Client Authentication
Perform chain verification with the CA. If both are OK, it is successful.
$ openssl verify -CAfile ca_certificate.pem server_certificate.pem client_certificate.pem
server_certificate.pem: OK
client_certificate.pem: OK
The following files will be in the ~/certs directory. These will be distributed to each node in subsequent sections.
$ ls -lh ~/certs
-rw-r--r-- 1 toshiaki toshiaki 1.9K May 19 13:33 ca_certificate.pem
-rw-r--r-- 1 toshiaki toshiaki   41 May 19 13:33 ca_certificate.srl
-rw------- 1 toshiaki toshiaki 3.2K May 19 13:33 ca_key.pem
-rw-r--r-- 1 toshiaki toshiaki  222 May 19 13:33 client.cnf
-rw-r--r-- 1 toshiaki toshiaki 1.6K May 19 13:33 client.csr
-rw-r--r-- 1 toshiaki toshiaki 1.9K May 19 13:33 client_certificate.pem
-rw------- 1 toshiaki toshiaki 3.2K May 19 13:33 client_key.pem
-rw-r--r-- 1 toshiaki toshiaki  308 May 19 13:33 server.cnf
-rw-r--r-- 1 toshiaki toshiaki 1.6K May 19 13:33 server.csr
-rw-r--r-- 1 toshiaki toshiaki 2.0K May 19 13:33 server_certificate.pem
-rw------- 1 toshiaki toshiaki 3.2K May 19 13:33 server_key.pem
Note
Here, private keys are generated without a passphrase. If using keys with a passphrase, the ssl_options.password setting is required on the RabbitMQ side.
Distributing Certificates
Create the /etc/rabbitmq/certs directory on each node and place the following files with common names. Certificates must be readable by the rabbitmq user.
ca_certificate.pem— CA certificate (common to all nodes)server_certificate.pem/server_key.pem— Server certificate (one certificate containingrmq-1,rmq-2,rmq-3in SAN, shared by all nodes)client_certificate.pem/client_key.pem— Client certificate for inter-node communication client role and mTLS testing (common to all nodes)
Since the exact same certificate set is placed on all 3 nodes, the same rabbitmq.conf / inter_node_tls.config can be used on all nodes.
Warning
Files created under /etc/rabbitmq/certs/ with sudo cp will be owned by root with mode 600, making them unreadable by the rabbitmq user. Be sure to execute the following chown and chmod commands. If certificate files are not readable by the rabbitmq user, the RabbitMQ server itself will start, but CLI tools (rabbitmqctl) or inter-node TLS dist from other nodes will fail to load certificates, causing the server to hang without even logging TLS errors (leading to obscure symptoms such as Khepri reporting timeout_waiting_for_leader). If you add copy certificates later, re-execute chown / chmod.
Work on rmq-1:
sudo mkdir -p /etc/rabbitmq/certs
sudo cp ~/certs/ca_certificate.pem     /etc/rabbitmq/certs/ca_certificate.pem
sudo cp ~/certs/server_certificate.pem /etc/rabbitmq/certs/server_certificate.pem
sudo cp ~/certs/server_key.pem         /etc/rabbitmq/certs/server_key.pem
sudo cp ~/certs/client_certificate.pem /etc/rabbitmq/certs/client_certificate.pem
sudo cp ~/certs/client_key.pem         /etc/rabbitmq/certs/client_key.pem
sudo chown -R rabbitmq:rabbitmq /etc/rabbitmq/certs
sudo chmod 755 /etc/rabbitmq/certs
sudo chmod 640 /etc/rabbitmq/certs/ca_certificate.pem
sudo chmod 640 /etc/rabbitmq/certs/server_certificate.pem
sudo chmod 640 /etc/rabbitmq/certs/server_key.pem
sudo chmod 640 /etc/rabbitmq/certs/client_certificate.pem
sudo chmod 640 /etc/rabbitmq/certs/client_key.pem
Transfer and place the same files on rmq-2 and rmq-3. Since both server and client certificates are common to all nodes, all 3 nodes will have the exact same file set. Below is an example of transferring from rmq-1 to rmq-2 (same for rmq-3).
# On rmq-1
scp ~/certs/ca_certificate.pem \
    ~/certs/server_certificate.pem \
    ~/certs/server_key.pem \
    ~/certs/client_certificate.pem \
    ~/certs/client_key.pem \
    rmq-2:/tmp/

# On rmq-2
sudo mkdir -p /etc/rabbitmq/certs
sudo cp /tmp/ca_certificate.pem     /etc/rabbitmq/certs/ca_certificate.pem
sudo cp /tmp/server_certificate.pem /etc/rabbitmq/certs/server_certificate.pem
sudo cp /tmp/server_key.pem         /etc/rabbitmq/certs/server_key.pem
sudo cp /tmp/client_certificate.pem /etc/rabbitmq/certs/client_certificate.pem
sudo cp /tmp/client_key.pem         /etc/rabbitmq/certs/client_key.pem
sudo chown -R rabbitmq:rabbitmq /etc/rabbitmq/certs
sudo chmod 755 /etc/rabbitmq/certs
sudo chmod 640 /etc/rabbitmq/certs/ca_certificate.pem
sudo chmod 640 /etc/rabbitmq/certs/server_certificate.pem
sudo chmod 640 /etc/rabbitmq/certs/server_key.pem
sudo chmod 640 /etc/rabbitmq/certs/client_certificate.pem
sudo chmod 640 /etc/rabbitmq/certs/client_key.pem
rm /tmp/ca_certificate.pem /tmp/server_certificate.pem /tmp/server_key.pem \
   /tmp/client_certificate.pem /tmp/client_key.pem
Since key permissions are set to 640 (readable only by owner rabbitmq / group rabbitmq), if you want to directly read /etc/rabbitmq/certs/*.pem from the working user for later verification, add the working user to the rabbitmq group. Execute this on the node running the test (rmq-1 in this article) to reference the private key from the working user for mTLS verification described later.
sudo usermod -aG rabbitmq $(whoami)
To reflect the group change in the current shell, log out and log in again, or execute newgrp rabbitmq.
$ id
uid=1000(toshiaki) gid=1000(toshiaki) groups=1000(toshiaki),10(wheel),989(rabbitmq)
Note
Public certificates (ca_certificate.pem / server_certificate.pem / client_certificate.pem) contain information that is safe to share with others, so 644 is acceptable. Private keys (server_key.pem / client_key.pem) are set to 640 in this article to prevent any user on the same host from stealing TLS credentials.
Enabling AMQPS (5671)
As seen in the systemctl status output at the beginning of the article, there is no configuration file by default (Config file(s): (none)). Create /etc/rabbitmq/rabbitmq.conf on all nodes.
cat <<'EOF' | sudo tee /etc/rabbitmq/rabbitmq.conf
listeners.ssl.default = 5671

ssl_options.cacertfile           = /etc/rabbitmq/certs/ca_certificate.pem
ssl_options.certfile             = /etc/rabbitmq/certs/server_certificate.pem
ssl_options.keyfile              = /etc/rabbitmq/certs/server_key.pem
ssl_options.verify               = verify_none
ssl_options.fail_if_no_peer_cert = false
EOF
Note
Plaintext AMQP (5672) will continue to listen. If you want to disable plaintext, add listeners.tcp = none. This article keeps it for later verification.
Restart the service on all nodes.
sudo systemctl restart tanzu-rabbitmq-server
Check the listening ports and confirm that 5671 has been added.
$ sudo lsof -n -i -P | grep -i listen | grep rabbitmq
epmd      881 rabbitmq    3u  IPv4 629997      0t0  TCP *:4369 (LISTEN)
epmd      881 rabbitmq    4u  IPv6 629998      0t0  TCP *:4369 (LISTEN)
beam.smp 3518 rabbitmq   24u  IPv4 801487      0t0  TCP *:25672 (LISTEN)
beam.smp 3518 rabbitmq   42u  IPv4 807112      0t0  TCP *:15672 (LISTEN)
beam.smp 3518 rabbitmq   43u  IPv6 801517      0t0  TCP *:5672 (LISTEN)
beam.smp 3518 rabbitmq   44u  IPv6 801523      0t0  TCP *:5671 (LISTEN)
Verify the TLS handshake with openssl s_client. If Verify return code: 0 (ok) is displayed, CA verification has succeeded.
$ openssl s_client -connect rmq-1:5671 -CAfile /etc/rabbitmq/certs/ca_certificate.pem </dev/null 2>/dev/null | grep -E 'subject=|Verify return code'
subject=O=server, CN=rmq-cluster
Verify return code: 0 (ok)

$ openssl s_client -connect rmq-2:5671 -CAfile /etc/rabbitmq/certs/ca_certificate.pem </dev/null 2>/dev/null | grep -E 'subject=|Verify return code'
subject=O=server, CN=rmq-cluster
Verify return code: 0 (ok)

$ openssl s_client -connect rmq-3:5671 -CAfile /etc/rabbitmq/certs/ca_certificate.pem </dev/null 2>/dev/null | grep -E 'subject=|Verify return code'
subject=O=server, CN=rmq-cluster
Verify return code: 0 (ok)
Execute rabbitmq_cluster_check.py created in the "Verification" section via TLS. Specifying --ca enables TLS (specify port 5671).
python rabbitmq_cluster_check.py \
  --hosts rmq-1,rmq-2,rmq-3 --port 5671 \
  --user admin --password 'VMware1!' \
  --ca /etc/rabbitmq/certs/ca_certificate.pem \
  --count 5 --cleanup
If TLS: enabled is displayed and it ends with [PASS], it is OK.
============================================================
 Target:     ['rmq-1', 'rmq-2', 'rmq-3'] port=5671 vhost=/
 User:       admin
 Queue:      test.quorum.check (quorum)
 Messages:   5
 TLS:        enabled (CA=/etc/rabbitmq/certs/ca_certificate.pem)
============================================================
[OK]   Connected to rmq-1:5671
[INFO] Declaring quorum queue: test.quorum.check
[INFO] Publishing 5 messages (run_id=c834a3ea)
  -> SENT [c834a3ea] msg-001 ts=1779166061
  -> SENT [c834a3ea] msg-002 ts=1779166061
  -> SENT [c834a3ea] msg-003 ts=1779166061
  -> SENT [c834a3ea] msg-004 ts=1779166061
  -> SENT [c834a3ea] msg-005 ts=1779166061
[INFO] Consuming up to 5 messages
  <- RECV [c834a3ea] msg-001 ts=1779166061
  <- RECV [c834a3ea] msg-002 ts=1779166061
  <- RECV [c834a3ea] msg-003 ts=1779166061
  <- RECV [c834a3ea] msg-004 ts=1779166061
  <- RECV [c834a3ea] msg-005 ts=1779166061
------------------------------------------------------------
 Sent:     5
 Received: 5
------------------------------------------------------------
[INFO] Deleting queue: test.quorum.check
[PASS] RabbitMQ cluster check succeeded.
Enabling HTTPS (15671) for Management UI
Append the following to /etc/rabbitmq/rabbitmq.conf on all nodes.
cat <<'EOF' | sudo tee -a /etc/rabbitmq/rabbitmq.conf

management.ssl.port       = 15671
management.ssl.cacertfile = /etc/rabbitmq/certs/ca_certificate.pem
management.ssl.certfile   = /etc/rabbitmq/certs/server_certificate.pem
management.ssl.keyfile    = /etc/rabbitmq/certs/server_key.pem
EOF
Restart the service on all nodes and confirm that 15671 has been added.
$ sudo systemctl restart tanzu-rabbitmq-server
$ sudo lsof -n -i -P | grep -i listen | grep rabbitmq | grep 15671
beam.smp 3757 rabbitmq   42u  IPv4 822635      0t0  TCP *:15671 (LISTEN)
Note
Plaintext HTTP (15672) remains. If you want to close it, consider measures such as management.tcp.ip = 127.0.0.1 to allow access only from localhost.
Access https://rmq-1:15671/ in a browser and log in with the admin user. (Assuming /etc/hosts on the terminal side is also updated.)
Since the certificate is signed by a private CA, the browser will display a certificate warning.
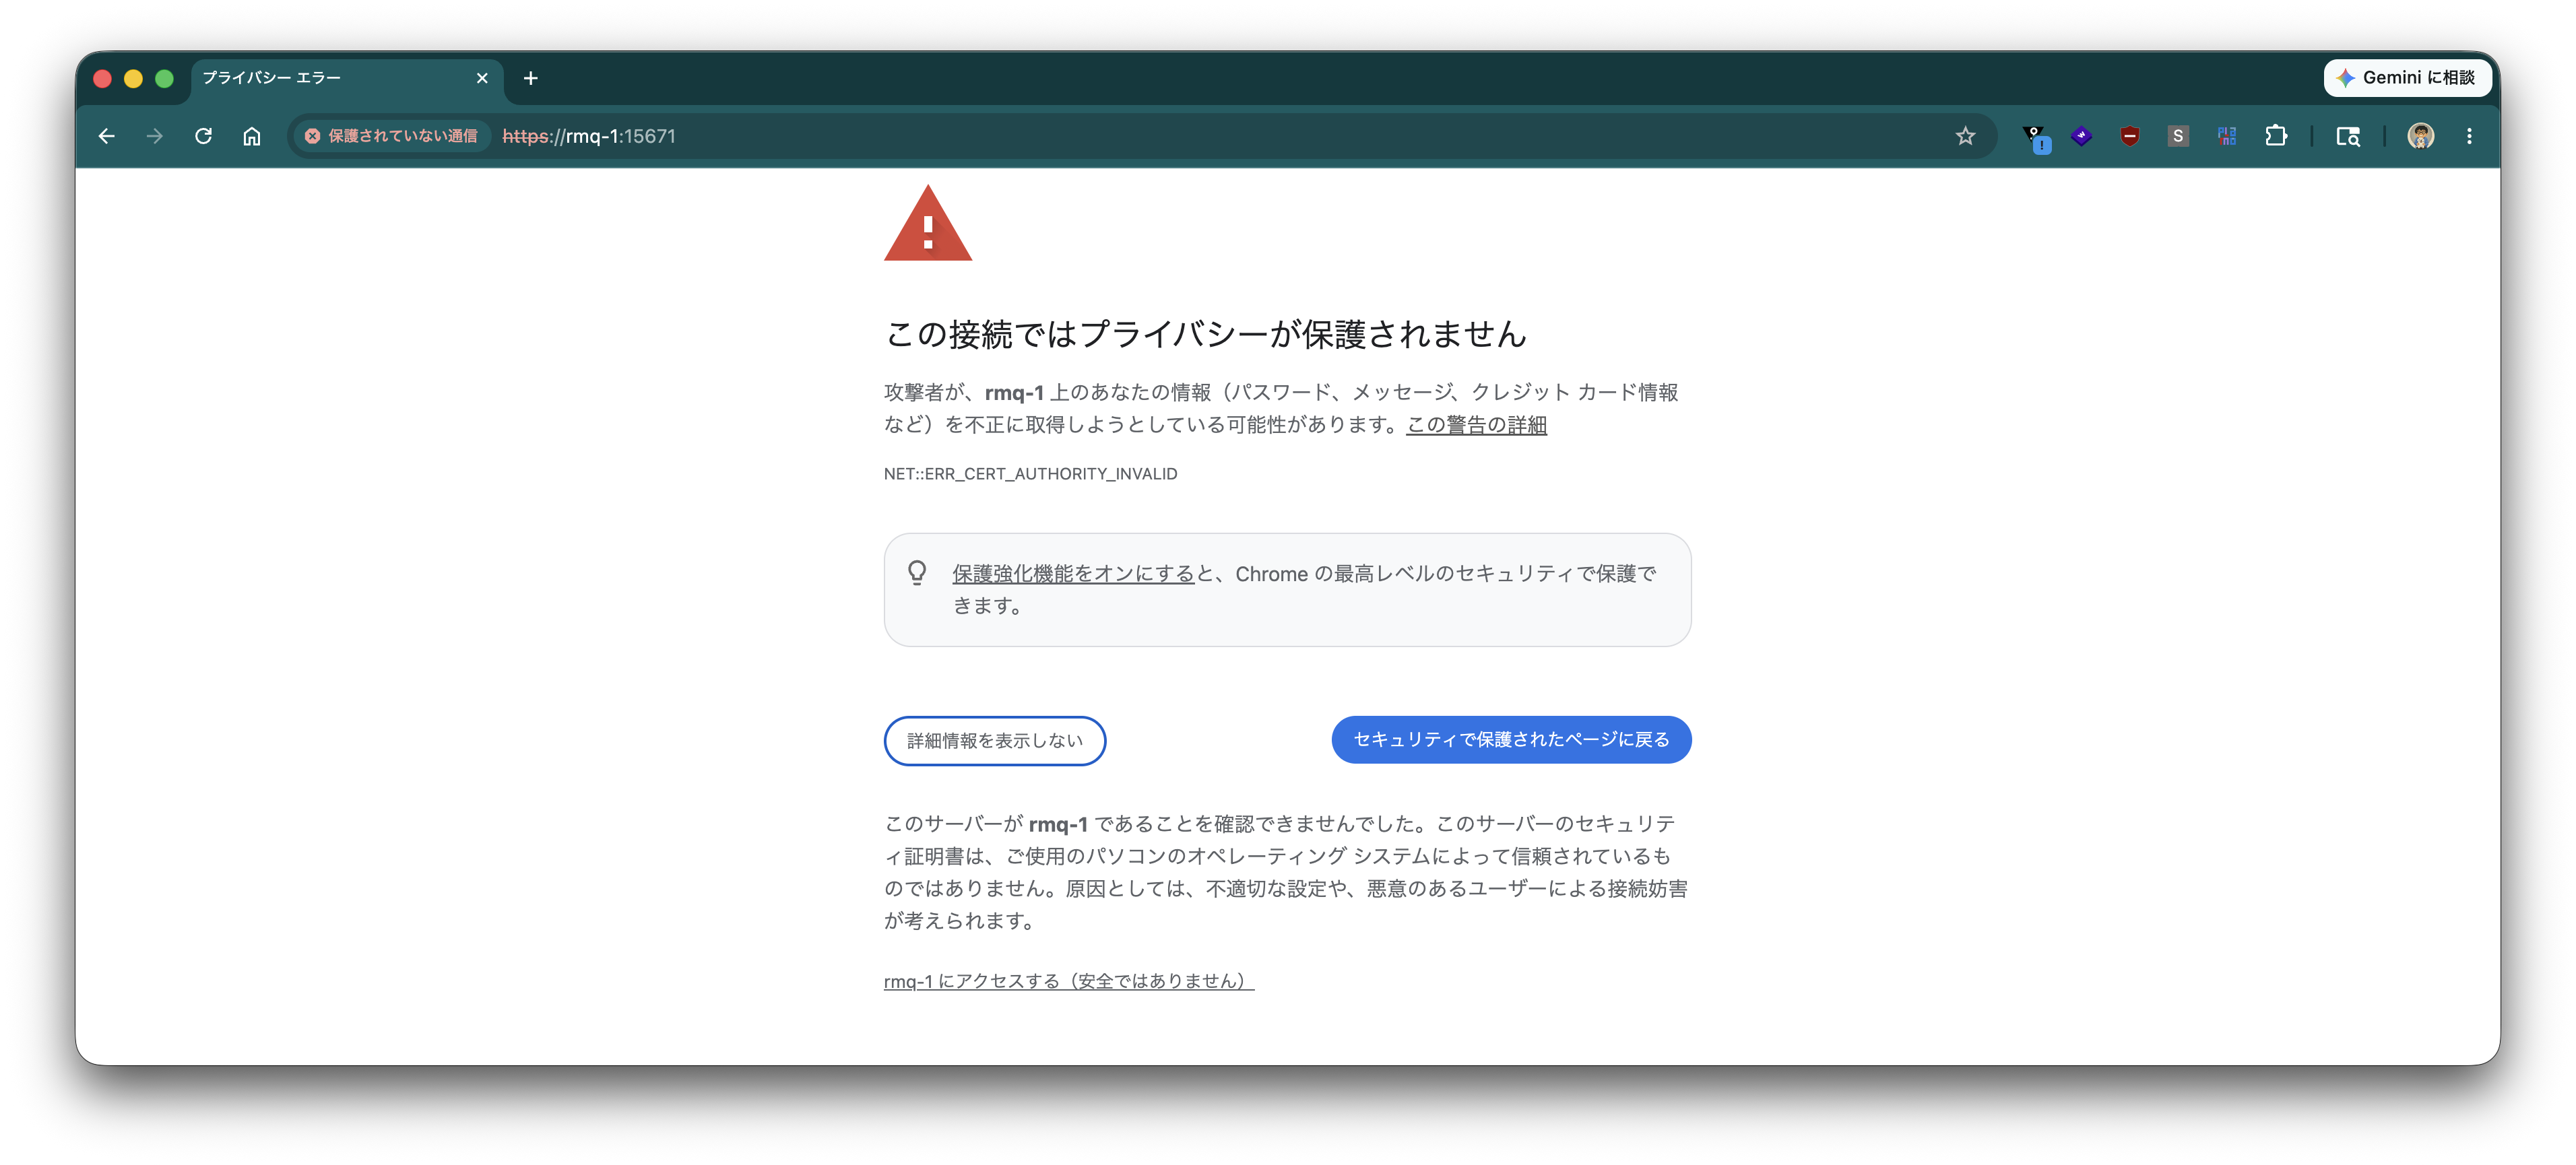
Click "Proceed to rmq-1 (unsafe)" to access the HTTPS-enabled Management UI.
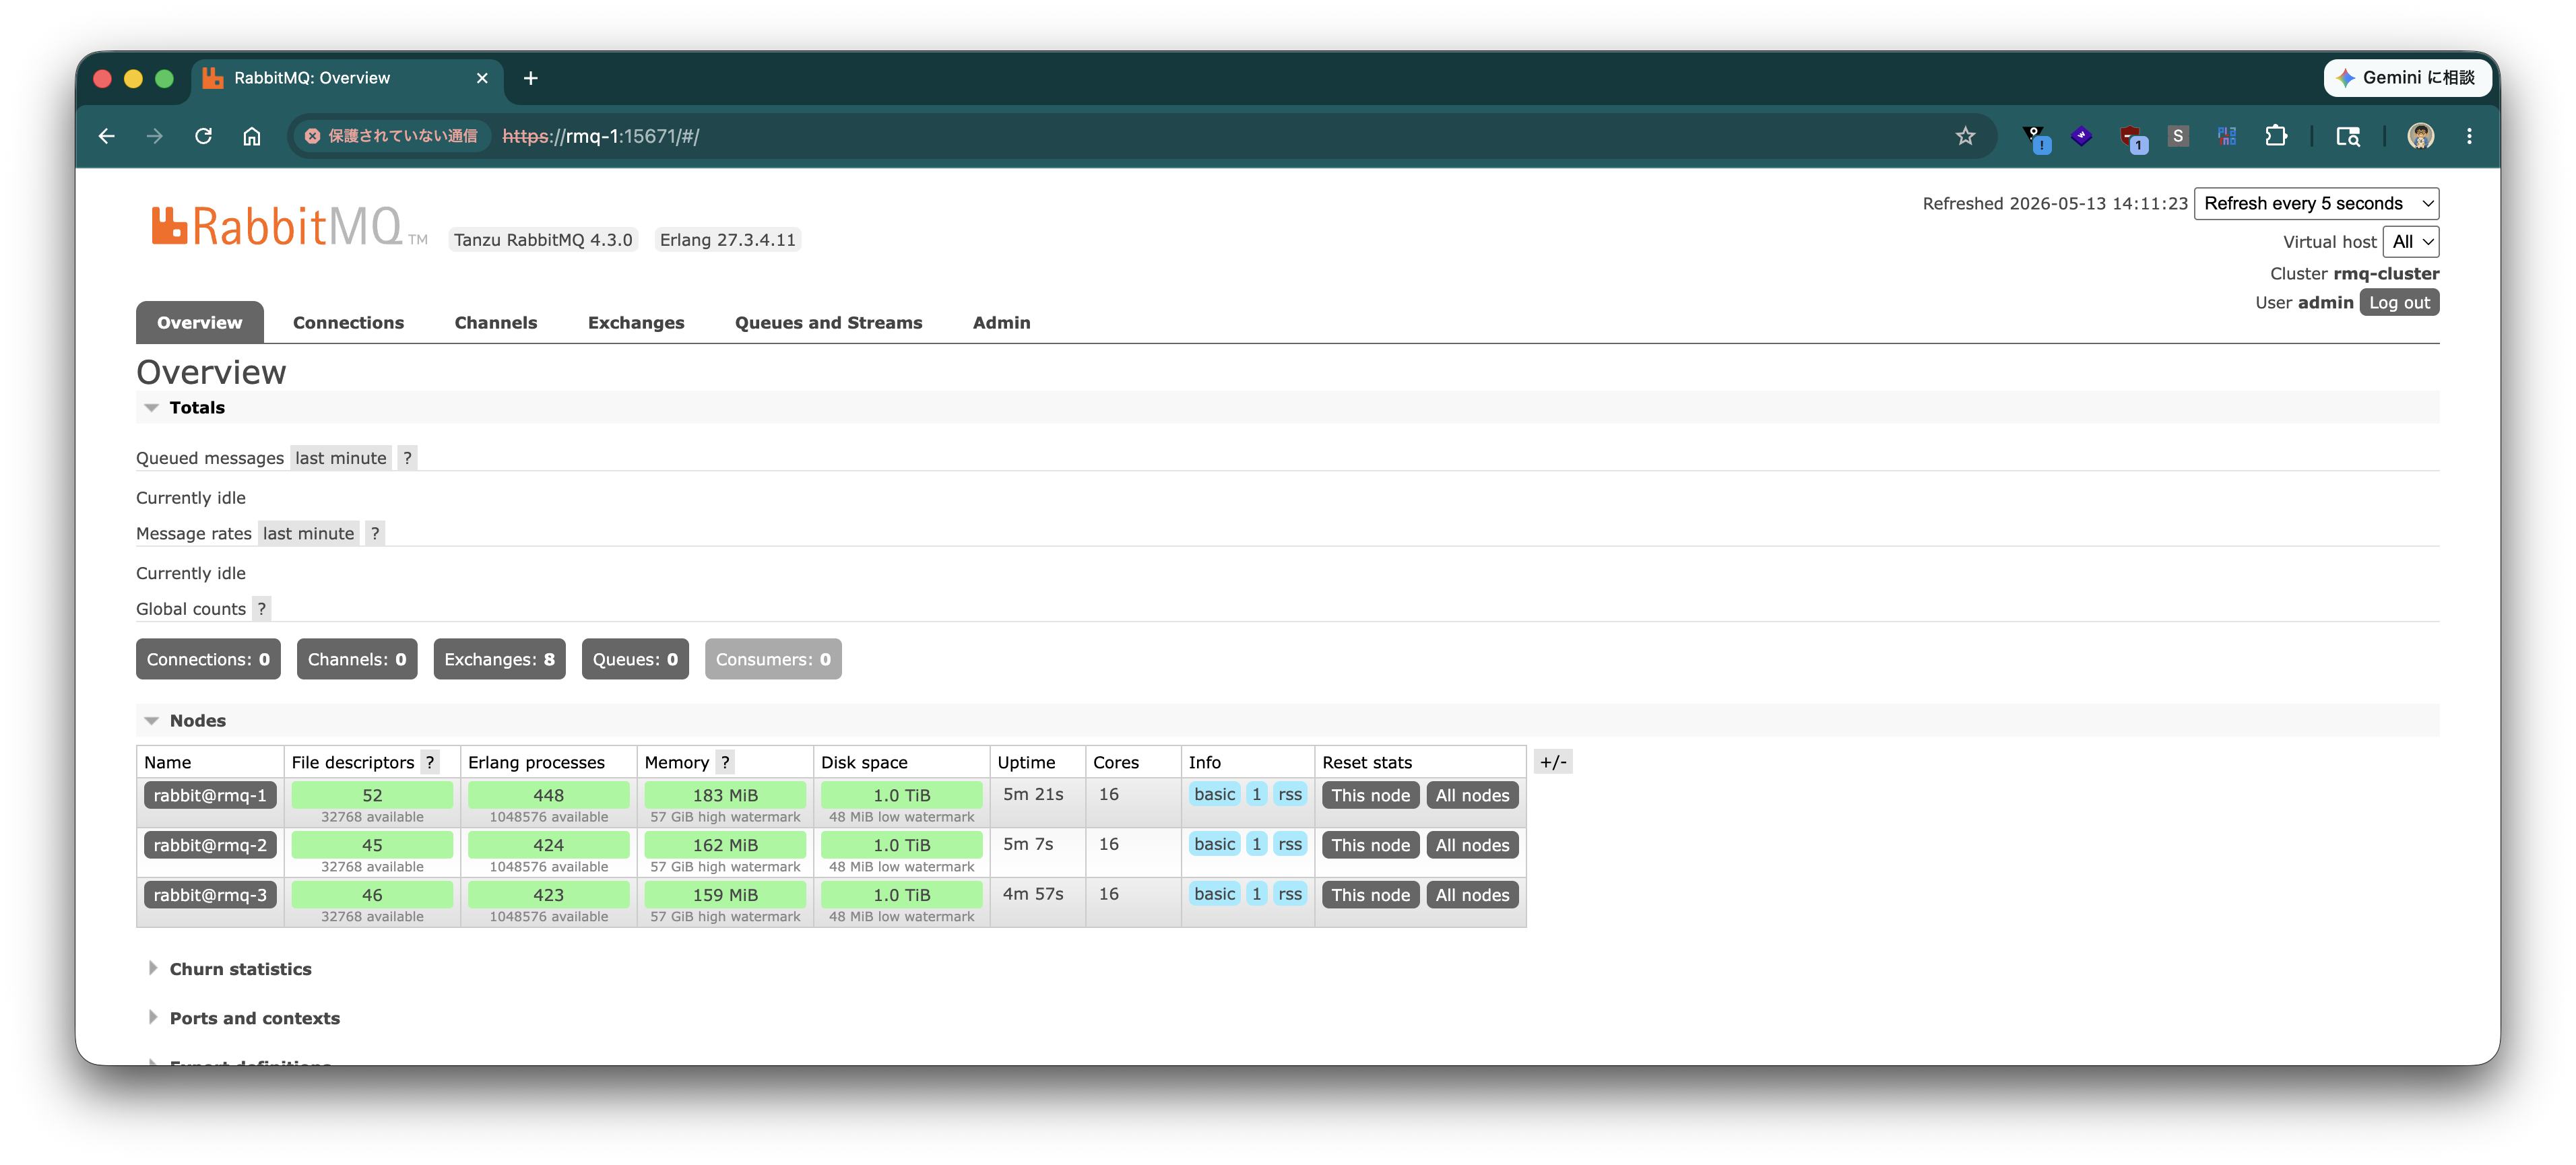
Note that registering ca_certificate.pem in the OS or browser's trusted CAs will eliminate the warning.
Enabling TLS (mTLS) for Inter-Node Communication (Erlang Distribution)
So far, client communication (AMQPS / Management UI) has been enabled for TLS. Next, we will enable TLS for inter-node communication (Erlang distribution, port 25672) and CLI tools (rabbitmqctl, etc.) communicating over it. We will reuse the certificates already placed in the "Distributing Certificates" section (server_certificate.pem / server_key.pem and client_certificate.pem / client_key.pem).
Note
For distribution, a certificate is also required for the client role when this node connects to other nodes (mTLS), and a client certificate with id-kp-clientAuth must be specified there. The server certificate issued in the "Generating TLS Certificates" section has Extended Key Usage of only id-kp-serverAuth and does not have id-kp-clientAuth, so reusing the server certificate for the client role will be rejected by the peer node with invalid_ext_keyusage. Therefore, client_certificate.pem / client_key.pem are prepared separately.
Warning
Enabling TLS for inter-node communication requires switching the entire cluster at once. Nodes with TLS settings and nodes without settings (plaintext) cannot communicate, so rolling restarts (one by one) are not possible. Change settings on all nodes, then stop and start the entire cluster.
Creating inter_node_tls.config
Create /etc/rabbitmq/inter_node_tls.config on all nodes. This is an Erlang term file describing TLS options for both server (when this node behaves as a server) and client (when this node connects to other nodes as a client).
cat <<'EOF' | sudo tee /etc/rabbitmq/inter_node_tls.config
%% coding: utf-8
[
  {server, [
    {cacertfile, "/etc/rabbitmq/certs/ca_certificate.pem"},
    {certfile,   "/etc/rabbitmq/certs/server_certificate.pem"},
    {keyfile,    "/etc/rabbitmq/certs/server_key.pem"},
    {secure_renegotiate, true},
    {verify, verify_peer},
    {fail_if_no_peer_cert, true}
  ]},
  {client, [
    {cacertfile, "/etc/rabbitmq/certs/ca_certificate.pem"},
    {certfile,   "/etc/rabbitmq/certs/client_certificate.pem"},
    {keyfile,    "/etc/rabbitmq/certs/client_key.pem"},
    {secure_renegotiate, true},
    {verify, verify_peer}
  ]}
].
EOF
sudo chown rabbitmq:rabbitmq /etc/rabbitmq/inter_node_tls.config
sudo chmod 644 /etc/rabbitmq/inter_node_tls.config
Note
Since private keys were generated without a passphrase in the "Generating TLS Certificates" section, specifying password is not necessary. If using keys with a passphrase, add {password, "..."} to both server and client.
Configuring rabbitmq-env.conf
Append the following to /etc/rabbitmq/rabbitmq-env.conf on all nodes. -proto_dist inet_tls enables TLS for Erlang distribution, and -ssl_dist_optfile specifies the configuration file created earlier. -pa adds the path to the ssl application to the code path (required at distribution startup).
The path to the Erlang ssl application varies by environment version, so check it first.
$ ls -d /usr/lib64/erlang/lib/ssl-*/ebin
/usr/lib64/erlang/lib/ssl-11.2.12.7/ebin
Append to rabbitmq-env.conf. SERVER_ADDITIONAL_ERL_ARGS are arguments passed to the RabbitMQ server itself, and RABBITMQ_CTL_ERL_ARGS are arguments passed to CLI tools like rabbitmqctl.
cat <<'EOF' | sudo tee -a /etc/rabbitmq/rabbitmq-env.conf

ERL_SSL_PATH=$(ls -d /usr/lib64/erlang/lib/ssl-*/ebin | tail -n1)
SERVER_ADDITIONAL_ERL_ARGS="-pa $ERL_SSL_PATH -proto_dist inet_tls -ssl_dist_optfile /etc/rabbitmq/inter_node_tls.config"
RABBITMQ_CTL_ERL_ARGS="-pa $ERL_SSL_PATH -proto_dist inet_tls -ssl_dist_optfile /etc/rabbitmq/inter_node_tls.config"
EOF
By using dynamic settings like this, the path will automatically follow even if the ssl version increases with Erlang minor updates.
Stopping and Starting the Cluster
After placing certificates and configuration files (inter_node_tls.config and rabbitmq-env.conf) on all nodes, stop the service on all nodes, then start the 3 nodes in parallel.
# Stop on all nodes
sudo systemctl stop tanzu-rabbitmq-server

# Start on all nodes (in parallel. Execute on each node)
sudo systemctl start --no-block tanzu-rabbitmq-server
Warning
RabbitMQ's metadata store (Khepri) requires a majority consensus (2 nodes for a 3-node cluster) via Raft. If you start nodes one by one, the first node will wait for quorum and timeout (timeout_waiting_for_leader), failing to boot. Start the 3 nodes in parallel (e.g., open 3 terminals and execute simultaneously, or execute systemctl start --no-block on each node to prevent the start command from blocking while waiting for quorum). Also, as mentioned earlier, nodes with plaintext settings and nodes with TLS settings cannot communicate, so you cannot execute systemctl restart one by one.
Verification
Confirm that the cluster has reformed with 3 nodes. Since RABBITMQ_CTL_ERL_ARGS is set in rabbitmq-env.conf, rabbitmqctl communicates via TLS as is. The success of this command itself is evidence that TLS handshakes between CLI tools ↔ nodes and nodes ↔ nodes have succeeded.
$ sudo rabbitmqctl cluster_status | grep -A4 "Running Nodes"
Running Nodes

rabbit@rmq-1
rabbit@rmq-2
rabbit@rmq-3
In the output of rabbitmq-diagnostics listeners, confirm that the protocol for port 25672 is clustering/ssl (with TLS). If it remains plaintext, it will be clustering.
$ sudo rabbitmq-diagnostics listeners
Asking node rabbit@rmq-1 to report its protocol listeners ...
Interface: [::], port: 15671, protocol: https, purpose: HTTP API over TLS (HTTPS)
Interface: [::], port: 25672, protocol: clustering/ssl, purpose: inter-node and CLI tool communication over TLS
Interface: [::], port: 5672, protocol: amqp, purpose: AMQP 0-9-1 and AMQP 1.0
Interface: [::], port: 5671, protocol: amqp/ssl, purpose: AMQP 0-9-1 and AMQP 1.0 over TLS
Check port 25672 with openssl s_client. Since fail_if_no_peer_cert is enabled, connections without a client certificate will fail the handshake.
$ openssl s_client -connect rmq-1:25672 -CAfile /etc/rabbitmq/certs/ca_certificate.pem </dev/null; echo "exit=$?"
...
00FEEDFEFF7F0000:error:0A000410:SSL routines:ssl3_read_bytes:ssl/tls alert handshake failure:ssl/record/rec_layer_s3.c:916:SSL alert number 40
...
exit=1
Note
A line Verify return code: 0 (ok) may appear in the middle of the output, but this means "openssl successfully verified the CA of the server certificate received," not that the entire TLS handshake succeeded. In TLS 1.3, the server sends the certificate first and then sends a CertificateRequest, so even if the client cannot return a certificate, openssl displays Verify return code: 0 (ok). Judge that the entire handshake failed by SSL alert number 40 (handshake failure) and a non-zero exit code (exit=1).
If certificates are specified, the TLS handshake succeeds (use the placed client_certificate.pem / client_key.pem for the distribution client role).
$ openssl s_client -connect rmq-1:25672 \
    -CAfile /etc/rabbitmq/certs/ca_certificate.pem \
    -cert /etc/rabbitmq/certs/client_certificate.pem \
    -key  /etc/rabbitmq/certs/client_key.pem </dev/null 2>/dev/null | grep -E 'subject=|Verify return code'; echo "exit=$?"
subject=O=server, CN=rmq-cluster
    Verify return code: 0 (ok)
exit=0
At this point, AMQP (5671) is not yet mTLS, so client-side verification can be performed with rabbitmq_cluster_check.py (--port 5671 --ca ...) as in "Enabling AMQPS (5671)".
Note
epmd (port 4369, Erlang Port Mapper Daemon) only handles mapping of node names and distribution ports and is not enabled for TLS. No confidential data flows, but if necessary, restrict access sources with a firewall. Also, Erlang cookie authentication via /var/lib/rabbitmq/.erlang.cookie remains necessary separately from TLS (already placed in the first half of the article).
Enabling mTLS (Client Certificate Verification)
Finally, configure the server to verify AMQP client certificates (mTLS). Change ssl_options.verify and ssl_options.fail_if_no_peer_cert in /etc/rabbitmq/rabbitmq.conf on all nodes as follows.
ssl_options.verify               = verify_peer
ssl_options.fail_if_no_peer_cert = true
The following command
sudo sed -i \
  -e 's/^\(ssl_options\.verify[[:space:]]*=[[:space:]]*\)verify_none/\1verify_peer/' \
  -e 's/^\(ssl_options\.fail_if_no_peer_cert[[:space:]]*=[[:space:]]*\)false/\1true/' \
  /etc/rabbitmq/rabbitmq.conf
The entire /etc/rabbitmq/rabbitmq.conf after changes will look like this (including Management UI HTTPS settings).
listeners.ssl.default = 5671

ssl_options.cacertfile           = /etc/rabbitmq/certs/ca_certificate.pem
ssl_options.certfile             = /etc/rabbitmq/certs/server_certificate.pem
ssl_options.keyfile              = /etc/rabbitmq/certs/server_key.pem
ssl_options.verify               = verify_peer
ssl_options.fail_if_no_peer_cert = true

management.ssl.port       = 15671
management.ssl.cacertfile = /etc/rabbitmq/certs/ca_certificate.pem
management.ssl.certfile   = /etc/rabbitmq/certs/server_certificate.pem
management.ssl.keyfile    = /etc/rabbitmq/certs/server_key.pem
Note
If you want to make client certificates mandatory for Management UI (HTTPS) as well, add management.ssl.verify = verify_peer and management.ssl.fail_if_no_peer_cert = true. However, since this requires importing client certificates into the browser, this article enables mTLS only for AMQP.
Restart the service on all nodes.
sudo systemctl restart tanzu-rabbitmq-server
Confirm that connections without a client certificate are rejected. openssl s_client will fail the handshake.
$ openssl s_client -connect rmq-1:5671 -CAfile /etc/rabbitmq/certs/ca_certificate.pem </dev/null; echo "exit=$?"
...
40A7XXXXXX:error:0A000412:SSL routines:ssl3_read_bytes:ssl/tls alert certificate required:...:SSL alert number 116
exit=1
Executing rabbitmq_cluster_check.py without a client certificate (only --ca) will also fail to connect.
$ python rabbitmq_cluster_check.py --hosts rmq-1,rmq-2,rmq-3 --port 5671 --user admin --password 'VMware1!' --ca /etc/rabbitmq/certs/ca_certificate.pem --count 5 --cleanup
============================================================
 Target:     ['rmq-1', 'rmq-2', 'rmq-3'] port=5671 vhost=/
 User:       admin
 Queue:      test.quorum.check (quorum)
 Messages:   5
 TLS:        enabled (CA=/etc/rabbitmq/certs/ca_certificate.pem)
============================================================
[WARN] Failed to connect to rmq-1: StreamLostError: ("Stream connection lost: SSLError(1, '[SSL: TLSV13_ALERT_CERTIFICATE_REQUIRED] tlsv13 alert certificate required (_ssl.c:2651)')",)
[WARN] Failed to connect to rmq-2: StreamLostError: ("Stream connection lost: SSLError(1, '[SSL: TLSV13_ALERT_CERTIFICATE_REQUIRED] tlsv13 alert certificate required (_ssl.c:2651)')",)
[WARN] Failed to connect to rmq-3: StreamLostError: ("Stream connection lost: SSLError(1, '[SSL: TLSV13_ALERT_CERTIFICATE_REQUIRED] tlsv13 alert certificate required (_ssl.c:2651)')",)
[ERROR] All nodes unreachable. Last error: StreamLostError: ("Stream connection lost: SSLError(1, '[SSL: TLSV13_ALERT_CERTIFICATE_REQUIRED] tlsv13 alert certificate required (_ssl.c:2651)')",)
Next, confirm that connection succeeds when a client certificate is specified. Pass -cert and -key to openssl s_client.
$ openssl s_client -connect rmq-1:5671 \
    -CAfile /etc/rabbitmq/certs/ca_certificate.pem \
    -cert /etc/rabbitmq/certs/client_certificate.pem \
    -key  /etc/rabbitmq/certs/client_key.pem </dev/null 2>/dev/null | grep 'Verify return code'; echo "exit=$?"
Verify return code: 0 (ok)
exit=0
rabbitmq_cluster_check.py created in the "Verification" section can specify client certificates with --cert and --key. Execute using this.
python rabbitmq_cluster_check.py \
  --hosts rmq-1,rmq-2,rmq-3 --port 5671 \
  --user admin --password 'VMware1!' \
  --ca   /etc/rabbitmq/certs/ca_certificate.pem \
  --cert /etc/rabbitmq/certs/client_certificate.pem \
  --key  /etc/rabbitmq/certs/client_key.pem \
  --count 5 --cleanup
If it ends with [PASS] ..., the mTLS configuration is complete.
============================================================
 Target:     ['rmq-1', 'rmq-2', 'rmq-3'] port=5671 vhost=/
 User:       admin
 Queue:      test.quorum.check (quorum)
 Messages:   5
 TLS:        enabled (CA=/etc/rabbitmq/certs/ca_certificate.pem)
============================================================
[OK]   Connected to rmq-1:5671
[INFO] Declaring quorum queue: test.quorum.check
[INFO] Publishing 5 messages (run_id=50d0b2e9)
  -> SENT [50d0b2e9] msg-001 ts=1779167063
  -> SENT [50d0b2e9] msg-002 ts=1779167064
  -> SENT [50d0b2e9] msg-003 ts=1779167064
  -> SENT [50d0b2e9] msg-004 ts=1779167064
  -> SENT [50d0b2e9] msg-005 ts=1779167064
[INFO] Consuming up to 5 messages
  <- RECV [50d0b2e9] msg-001 ts=1779167063
  <- RECV [50d0b2e9] msg-002 ts=1779167064
  <- RECV [50d0b2e9] msg-003 ts=1779167064
  <- RECV [50d0b2e9] msg-004 ts=1779167064
  <- RECV [50d0b2e9] msg-005 ts=1779167064
------------------------------------------------------------
 Sent:     5
 Received: 5
------------------------------------------------------------
[INFO] Deleting queue: test.quorum.check
[PASS] RabbitMQ cluster check succeeded.
Confirm that the cluster is still operating with 3 nodes. This mTLS enablement is a setting for AMQP (5671), so it does not affect inter-node communication (25672).
$ sudo rabbitmqctl cluster_status | grep -A4 "Running Nodes"
Running Nodes

rabbit@rmq-1
rabbit@rmq-2
rabbit@rmq-3
This completes the TLS enablement for client communication (AMQPS / Management UI HTTPS) and inter-node communication (Erlang distribution).