BOSHを使ってConcourse CIをAWSにインストール
Concourse CIをBOSHを使ってインストールします。
BOSH難しいと言われるけど、学習コストが高いのはリリース(ソフトウェアパッケージ群)を作るところと、マニフェストファイルを書くところで、 用意されたリリースとマニフェストを使ってソフトウェアをインストールする分にはそんなに難しくありません。

上の図の真ん中の箱のBOSH Directorと呼ばれる箇所は前回の記事でbosh initコマンドを使ってAWS上にインストールしました。
今回はBOSH DirectorにConcourse CIに必要なVM群をAWS上に作らせます(右の箱)。
まずはベースVMイメージであるStemcellとConcourse CIで必要となるリリースをBOSHにアップロードします。 リリースはhttp://bosh.ioから確認できます。
$ bosh upload stemcell https://d26ekeud912fhb.cloudfront.net/bosh-stemcell/aws/light-bosh-stemcell-3215.4-aws-xen-hvm-ubuntu-trusty-go_agent.tgz
$ bosh upload release https://bosh.io/d/github.com/concourse/concourse?v=1.1.0
$ bosh upload release https://bosh.io/d/github.com/cloudfoundry-incubator/garden-linux-release?v=0.337.0
次にAWS環境の設定をcloud.ymlに定義します。
今回はConcourse CIの必要なコンポーネントを全てpublicサブネットにインストールします。privateサブネットに分けてNATを経由する場合のインストール方法はまた次回。

publicサブネットのIDはsubnet-860307f1です。

セキュリティグループにWebからアクセスされるインスタンス向けのセキュリティグループを作成します。名前はwebにします。

8080番ポートを開けておきます。

boshセキュリティグループのIDはsg-f2a71596webセキュリティグループのIDはsg-e1962485
です。
ここまでの情報からcloud.ymlは次のようになります。
azs:
- name: z1
  cloud_properties: {availability_zone: ap-northeast-1a}
- name: z2
  cloud_properties: {availability_zone: ap-northeast-1b}

vm_types:
- name: web
  cloud_properties:
    instance_type: t2.micro
    ephemeral_disk: {size: 3000, type: gp2}
    security_groups: [sg-e1962485, sg-f2a71596] # web, bosh
- name: database
  cloud_properties:
    instance_type: t2.micro
    ephemeral_disk: {size: 3000, type: gp2}
    security_groups: [sg-f2a71596] # bosh
- name: worker
  cloud_properties:
    instance_type: m3.medium
    ephemeral_disk: {size: 30000, type: gp2}
    security_groups: [sg-f2a71596] # bosh
- name: compilation
  cloud_properties:
    instance_type: m3.medium
    ephemeral_disk: {size: 30000, type: gp2}
    security_groups: [sg-f2a71596] # bosh

disk_types:
- name: database
  disk_size: 50_000
  cloud_properties: {type: gp2}

networks:
- name: public
  type: manual
  subnets:
  - range: 10.0.0.0/16
    gateway: 10.0.0.1
    az: z1
    reserved: [10.0.0.2-10.0.0.10]
    cloud_properties: {subnet: subnet-860307f1} # public

compilation:
  workers: 8
  reuse_compilation_vms: true
  az: z1
  vm_type: compilation
  network: public
disk sizeやinstance typeは変更しても構いません。
cloud.ymlをBOSH Directorに伝えて、いま使おうとしているIaaSの情報を認識させます。cloud.ymlを変更すれば他のIaaS(Azureなど)にデプロイさせることもできます。
$ bosh update cloud-config cloud.yml
次にConcourse CIをデプロイするための設定をデプロイのマニフェストファイルconcourse.ymlに記述します。
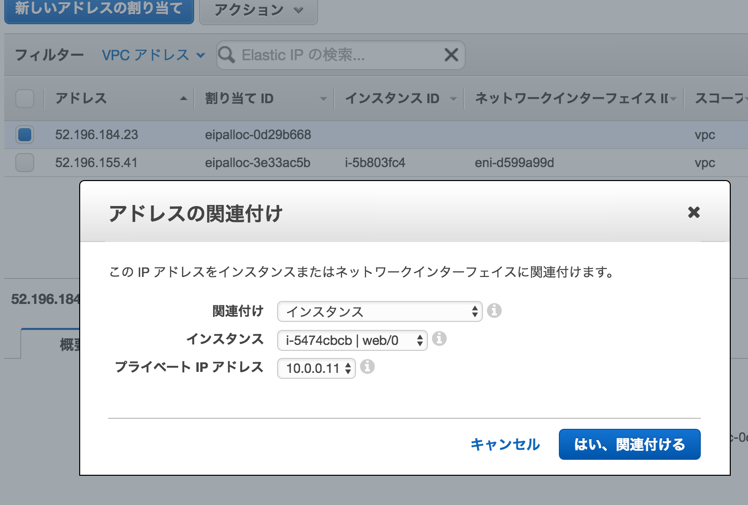
まずはWeb UIにアクセスするためのIPを払い出します。
VPCの「Elastic IP」をクリックして、「新しいアドレスの割り当て」をクリックして、IPを払い出す。


ここまでの情報からconcourse.ymlは次のようになります。
---
name: concourse

# replace with `bosh status --uuid`
director_uuid: <%= `bosh status --uuid` %>

releases:
- name: concourse
  version: latest
- name: garden-linux
  version: latest

stemcells:
- alias: trusty
  os: ubuntu-trusty
  version: latest

instance_groups:
- name: web
  instances: 1
  vm_type: web
  stemcell: trusty
  azs: [z1]
  networks: [{name: public}]
  jobs:
  - name: atc
    release: concourse
    properties:
      # replace with your CI's externally reachable URL, e.g. https://ci.foo.com
      # Elastic IPで払い出したIPを使用
      external_url: http://52.196.184.23:8080

      # replace with username/password, or configure GitHub auth
      basic_auth_username: concourse
      basic_auth_password: password

      postgresql_database: &atc_db atc

      # Allow viewing of pipelines as an anonymous user if the job is configured with `public: true`
      publicly_viewable: true
  - name: tsa
    release: concourse
    properties: {}

- name: db
  instances: 1
  vm_type: database
  stemcell: trusty
  persistent_disk_type: database
  azs: [z1]
  networks: [{name: public}]
  jobs:
  - name: postgresql
    release: concourse
    properties:
      databases:
      - name: *atc_db
        # make up a role and password
        role: REPLACE_ME
        password: REPLACE_ME

- name: worker
  instances: 1
  vm_type: worker
  stemcell: trusty
  azs: [z1]
  networks: [{name: public}]
  jobs:
  - name: groundcrew
    release: concourse
    properties: {}
  - name: baggageclaim
    release: concourse
    properties: {}
  - name: garden
    release: garden-linux
    properties:
      garden:
        listen_network: tcp
        listen_address: 0.0.0.0:7777

update:
  canaries: 1
  max_in_flight: 1
  serial: false
  canary_watch_time: 1000-60000
  update_watch_time: 1000-60000
このマニフェストファイルをBOSH Directorに設定してbosh deploy
$ bosh deployment concourse.yml
$ bosh deploy
しばらくするとパッケージのコンパイルが始まります。cloud.ymlのcompilationに設定したworkerの数だけの一時的EC2インスタンスが立ち上がります。数が大きいほど速く終わります。

Acting as user 'admin' on deployment 'concourse' on 'my-bosh'
Getting deployment properties from director...
Unable to get properties list from director, trying without it...

Detecting deployment changes
----------------------------
...
Please review all changes carefully

Deploying
---------
Are you sure you want to deploy? (type 'yes' to continue): yes

Director task 5
  Started preparing deployment > Preparing deployment. Done (00:00:00)

  Started preparing package compilation > Finding packages to compile. Done (00:00:00)

  Started compiling packages
  Started compiling packages > tar/cfd0d2ff9e0773446e403cef583e0f01cd61f592
  Started compiling packages > busybox/1593c41beb57c12d7f2b82dff61b47d4d119913d
  Started compiling packages > shadow/ffd1741bd9e0a176e67c61ef70cd0ed76b0ec285
  Started compiling packages > iptables/7226d311e90f49b05287e79f339581a1de9ea82e
  Started compiling packages > golang_1.6.1/7c83e83f822259c6324742e3dfc5d4aaae25e9e6
  Started compiling packages > btrfs_tools/85389e209e9f84abcc34c32f50ad532b8f5667b0
  Started compiling packages > bosh_deployment_resource/af028c9366894a761c8cbc5b874fa00b69346ad4
  Started compiling packages > bosh_io_stemcell_resource/b1e55ea2d8a103f3eaeedee29d272eb6a432ab2e
     Done compiling packages > busybox/1593c41beb57c12d7f2b82dff61b47d4d119913d (00:02:00)
    ...
     Done compiling packages (00:09:50)

  Started creating missing vms
  Started creating missing vms > web/0 (b58423f7-968d-4bce-ae5c-a33a84dc9716)
  Started creating missing vms > db/0 (55614b03-aa35-4c6a-84cf-b9a137d945f8)
  Started creating missing vms > worker/0 (1a550f81-993e-4714-aaf7-c0448cfc796d)
     Done creating missing vms > web/0 (b58423f7-968d-4bce-ae5c-a33a84dc9716) (00:01:48)
     Done creating missing vms > db/0 (55614b03-aa35-4c6a-84cf-b9a137d945f8) (00:01:48)
     Done creating missing vms > worker/0 (1a550f81-993e-4714-aaf7-c0448cfc796d) (00:01:52)
     Done creating missing vms (00:01:52)

  Started updating job web > web/0 (b58423f7-968d-4bce-ae5c-a33a84dc9716) (canary)
  Started updating job db > db/0 (55614b03-aa35-4c6a-84cf-b9a137d945f8) (canary)
  Started updating job worker > worker/0 (1a550f81-993e-4714-aaf7-c0448cfc796d) (canary)
     Done updating job web > web/0 (b58423f7-968d-4bce-ae5c-a33a84dc9716) (canary) (00:00:15)
     Done updating job db > db/0 (55614b03-aa35-4c6a-84cf-b9a137d945f8) (canary) (00:00:52)
     Done updating job worker > worker/0 (1a550f81-993e-4714-aaf7-c0448cfc796d) (canary) (00:01:31)

Task 5 done

Started		2016-04-24 06:06:56 UTC
Finished	2016-04-24 06:21:30 UTC
Duration	00:14:34
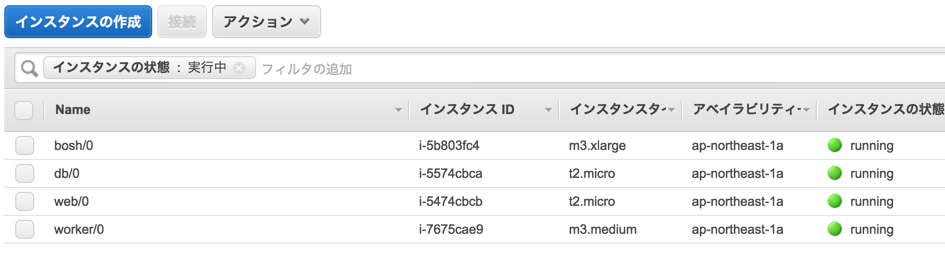
デプロイが完了するとweb/0、db/0、worker0というインスタンスができます。
先ほど払い出したElastic IPをweb/0にバインドします。
これでWeb UIにアクセスできます。

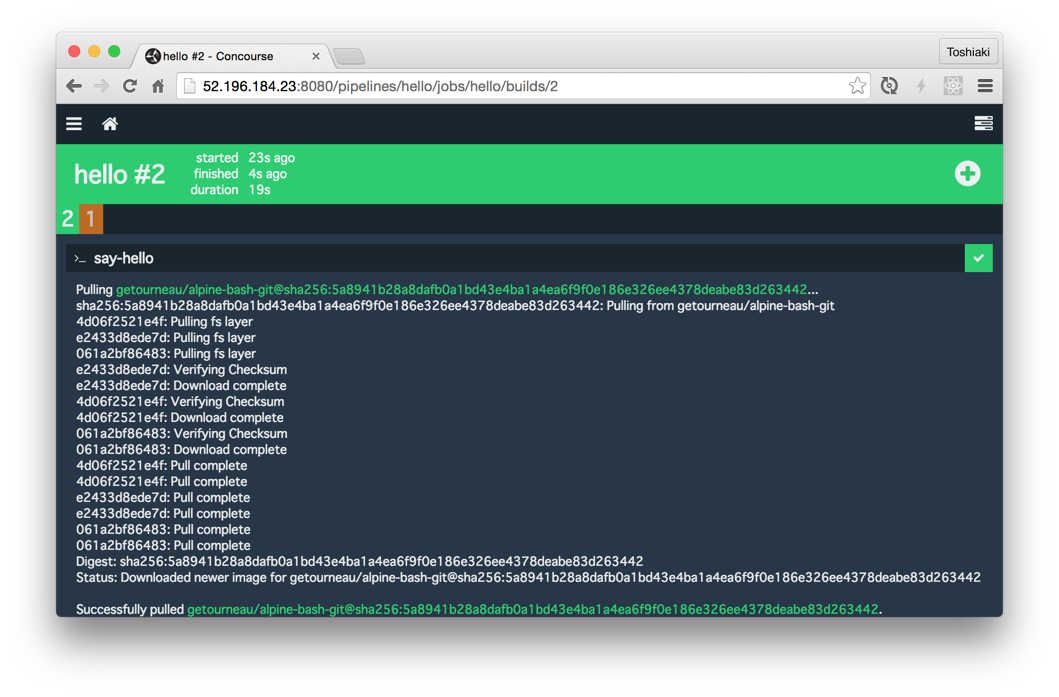
次の簡単なパイプラインを実行してみましょう
---
jobs:
- name: hello
  plan:
  - task: say-hello
    config:
      platform: linux
      image_resource:
        type: docker-image
        source:
          repository: getourneau/alpine-bash-git
      run:
        path: sh
        args:
        - -c
        - |
          echo "Hello World"
パイプラインをflyでデプロイします。(flyコマンドを最新にしてください)
$ fly -t aws login -c http://52.196.184.23:8080
# 上記のマニフェストを使った場合はユーザー名:concourse、パスワード:password
$ fly -t aws sp -p hello -c hello.yml
$ fly -t aws up -p hello

(+)ボタンをクリック

実はこのままでは正しく動作しません・・・! Worker VMからはDockerイメージ取得などインターネットアクセスが必要なためです。 以下のようにタイムアウトが発生するでしょう。

今回の構成ではNATを用いていないため、暫定対処としてWorker VMにElastic IPを関連付けるとうまくいきます。

この運用でも良いのですが、Workerをスケールアウトさせる場合(concourse.ymlを変更してbosh deployするだけ)など今後不便になることが予想されるので、次の記事に説明するNATを使った構成にすることをお勧めします。