Kubernetesハンズオン - 3. アプリケーションのアップデート
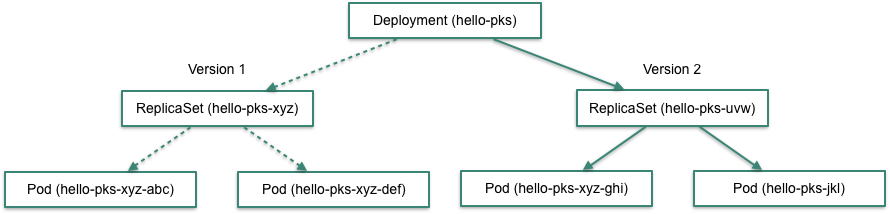
アプリケーションのアップデートはDeploymentによって行われます。
アプリケーションのアップデートを行う場合は、Dockerイメージのタグを新しいバージョンに変更し、kubectl applyすれば良いです。
apiVersion: apps/v1
kind: Deployment
metadata:
  name: hello-pks
spec:
  # ...
  template:
    # ...
    spec:
      containers:
      - image: making/hello-pks:0.0.2 # <-- 0.0.1からアップデート
ただし、ダウンタイムなしにアプリケーションをアップデートしたい場合は、コンテナのヘルスチェックとDeploymentのアップデートストラテジーに気をつける必要があります。
目次
コンテナのヘルスチェック
Deplotmentでアプリケーションを更新する場合は、更新したコンテナが正常に動作しているかどうかを Deploymentのコントローラーは知る必要があります。このヘルスチェックがないと、次のPodを更新して良いか正しく判断することができません。
コンテナのヘルスチェックにはReadiness ProbeとLiveness Probeの2種類があります。 Readiness Probeはコンテナがトラフィックを受けられるかどうかをチェックし、Liveness Probeはコンテナが生存しているかどうかをチェックします。 アプリケーションの更新の際はReadiness Probeを正しく設定する必要があります。
Readiness Probe
Deploymentのspec.template.spec.containers[]にreadinessProbeの設定を行います。
apiVersion: apps/v1
kind: Deployment
metadata:
  name: hello-pks
spec:
  # ...
  template:
    # ...
    spec:
      containers:
      - image: making/hello-pks:0.0.1
        name: hello-pks
        ports:
        - containerPort: 8080
        env:
        - # ...
        readinessProbe:
          httpGet:
            path: /actuator/health
            port: 8080
          initialDelaySeconds: 10
          timeoutSeconds: 3
          failureThreshold: 3
          periodSeconds: 5
Readinss ProbeおよびLiveness ProbeはHTTP、TCP、コマンド実行結果によるヘルスチェックをサポートしています。
ここではHTTPヘルスチェック(httpGet)のみ扱います。その他の方法はドキュメントを参照してください。
making/hello-pksはSpring Boot Actuatorを使っており、ヘルスチェックエンドポイントとして/actuator/healthをpathに設定できます。
initialDelaySecondsはコンテナが起動を開始してから初めのチェックを行うまでの待ち時間(秒)です。
timeoutSecondsは1回のチェックで失敗とみなすまでのタイムアウト(秒)です。failureThresholdはヘルスチェックを失敗とみなすまでのリトライ回数です。
periodSecondsはリトライの間隔(秒)です。
Liveness Probe
Liveness Probeはアプリケーションの更新には直接関係しませんが、ヘルスチェックの1種としてここで説明します。 Liveness Probeはコンテナの生存確認に使われ、Liveness Probeが失敗した場合はコンテナが再起動します。 アプリが終了せずに動かなくなったり、デッドロックしてstuckしたアプリを再起動するために使用します。
Deploymentのspec.template.spec.containers[]にlivenessProbeの設定を行います。
apiVersion: apps/v1
kind: Deployment
metadata:
  name: hello-pks
spec:
  # ...
  template:
    # ...
    spec:
      containers:
      - image: making/hello-pks:0.0.1
        name: hello-pks
        ports:
        - containerPort: 8080
        env:
        - # ...
        readinessProbe:
          # ...
        livenessProbe:
          httpGet:
            path: /actuator/info
            port: 8080
          initialDelaySeconds: 20
          timeoutSeconds: 1
          periodSeconds: 10
          failureThreshold: 1
設定項目はReadiness Probeと同じです。
Readinss ProbeおよびLiveness Probeに同じ内容を設定するのは良くありません。Liveness Probeではデータベースの接続チェック等は行わない方が良いです。
Readiness ProbeとLiveness Probeの違いはこの記事が詳しいです。
Deploymentのアップデートストラテジー
Deploymentでアプリケーションを更新する場合にアップデートストラテジーとしてRollingUpdateとRecreateが選べます。
デフォルトはRollingUpdateです。
Rolling Update
Rolling UpdateではPodを少しずつ新しいバージョンに移行し、ダウンタイムなく切り替えることができます。
Rolling Updateの挙動はmaxUnavailableとmaxSurgeによって調節できます。
apiVersion: apps/v1
kind: Deployment
metadata:
  name: hello-pks
spec:
  replicas: 4
  strategy:
    type: RollingUpdate
    rollingUpdate:
      maxSurge: 25%
      maxUnavailable: 25%
    # ...
maxUnavailableはアップデート中に許容できる最大の使用不可Podの数または割合です。
maxSurgeはアップデート中にreplicas数を超えて増やして良いPodの数または割合です。
maxUnavailableやmaxSurgeはreplicasに依存しないように%で指定した方が良いです。
maxUnavailableとmaxSurgeともにデフォルト値は25%です。
例えばreplicasが4の場合でmaxUnavailableが2とmaxSurgeが0だとします。
その場合はPod数は次の表のように推移します。(実行タイミングやコンテナの起動速度により異なる場合があります)
| 旧バージョンのPod数(Ready/Desired) | 新バージョンのPod数(Ready/Desired) |
|---|---|
| 4/4 | 0/0 |
| 2/2 | 0/2 |
| 0/0 | 2/4 |
| 0/0 | 4/4 |
移行の途中にReadyなPod数の合計が2 (4 - 2)な状態を経由していることがわかります。
🎥 asciinemaで見る(ReplicaSetのDESIREDとREADYの数字の推移に注目してください)
replicasが4の場合でmaxUnavailableが0とmaxSurgeが2だとします。
その場合はReady状態なPod数は次の表のように推移します。(実行タイミングやコンテナの起動速度により異なる場合があります)
| 旧バージョンのPod数(Ready/Desired) | 新バージョンのPod数(Ready/Desired) |
|---|---|
| 4/4 | 0/0 |
| 4/4 | 0/2 |
| 3/3 | 1/3 |
| 2/2 | 2/4 |
| 1/1 | 3/4 |
| 0/0 | 4/4 |
移行中もReadyなPod数の合計が4であることがわかります。
🎥 asciinemaで見る(ReplicaSetのDESIREDとREADYの数字の推移に注目してください)
例えばreplicasが4の場合でmaxUnavailableが2とmaxSurgeが2だとします。
その場合はPod数は次の表のように推移します。(実行タイミングやコンテナの起動速度により異なる場合があります)
| 旧バージョンのPod数(Ready/Desired) | 新バージョンのPod数(Ready/Desired) |
|---|---|
| 4/4 | 0/0 |
| 2/2 | 0/4 |
| 1/1 | 1/4 |
| 0/0 | 2/4 |
| 0/0 | 4/4 |
🎥 asciinemaで見る(ReplicaSetのDESIREDとREADYの数字の推移に注目してください)
Recreate
Recreateの場合、全てのPodを停止してから再作成します。 バージョンアップに要する時間は短く余分なリソースも不要ですが、ダウンタイムが発生します。
apiVersion: apps/v1
kind: Deployment
metadata:
  name: hello-pks
spec:
  strategy:
    type: Recreate
  # ...
replicasが4の場合、Pod数は次の表のように推移します。(実行タイミングやコンテナの起動速度により異なる場合があります)
| 旧バージョンのPod数(Ready/Desired) | 新バージョンのPod数(Ready/Desired) |
|---|---|
| 4/4 | 0/0 |
| 0/0 | 0/0 |
| 0/0 | 0/4 |
| 0/0 | 2/4 |
| 0/0 | 4/4 |
🎥 asciinemaで見る(ReplicaSetのDESIREDとREADYの数字の推移に注目してください)
以上の内容をまとめ、hello-pks.ymlを次のように編集してください。
apiVersion: apps/v1
kind: Deployment
metadata:
  name: hello-pks
spec:
  replicas: 4
  strategy:
    type: RollingUpdate
    rollingUpdate:
      maxSurge: 25%
      maxUnavailable: 25%
  selector:
    matchLabels:
      app: hello-pks
  template:
    metadata:
      labels:
        app: hello-pks
    spec:
      containers:
      - image: making/hello-pks:0.0.2
        name: hello-pks
        ports:
        - containerPort: 8080
        env:
        - name: NODE_NAME
          valueFrom:
            fieldRef:
              fieldPath: spec.nodeName
        - name: NODE_IP
          valueFrom:
            fieldRef:
              fieldPath: status.hostIP
        - name: POD_NAME
          valueFrom:
            fieldRef:
              fieldPath: metadata.name
        - name: POD_NAMESPACE
          valueFrom:
            fieldRef:
              fieldPath: metadata.namespace
        - name: POD_IP
          valueFrom:
            fieldRef:
              fieldPath: status.podIP
        readinessProbe:
          httpGet:
            path: /actuator/health
            port: 8080
          initialDelaySeconds: 10
          timeoutSeconds: 3
          failureThreshold: 3
          periodSeconds: 5
        livenessProbe:
          httpGet:
            path: /actuator/info
            port: 8080
          initialDelaySeconds: 20
          timeoutSeconds: 1
          periodSeconds: 10
          failureThreshold: 1
---
kind: Service
apiVersion: v1
metadata:
  name: hello-pks
spec:
  type: LoadBalancer
  selector:
    app: hello-pks
  ports:
  - protocol: TCP
    port: 8080
kubectl applyで変更を適用してください。
kubectl apply -f hello-pks.yml
出力結果
deployment "hello-pks" configured